
Dora Wings 1/72 Bellanca CH/J-300
| KIT #: | 72001 |
| PRICE: | $25.50 |
| DECALS: | Three options |
| REVIEWER: | John Summerford |
| NOTES: | No color call-outs, substituted some photo etch pieces, no indication of tail bracing wires needed. |
| HISTORY |
The Bellanca CH-300 Pacemaker was a six-seat utility aircraft, built primarily in the United States in the 1920s and 1930s. It was a conventional, high-wing braced monoplane with fixed tailwheel undercarriage. Like other Bellanca aircraft of the period, it featured "flying struts" and were powered by 300 hp Wright J-6s.
 One of
the first records set by a Bellanca CH-300 series aircraft occurred on July
28–30, 1931, when Russell Norton Boardman (age 33) and John Louis Polando (age
29) flew from Floyd Bennett Field to Istanbul, Turkey in a Bellanca "Special
J-300" high-wing monoplane named Cape Cod, registration NR761W. They made it
safely to Istanbul nonstop in 49:20 hours, establishing a distance record of
5,011.8 miles (8,065.7 km), the first nonstop record flight in surpassing
5,000 miles.
One of
the first records set by a Bellanca CH-300 series aircraft occurred on July
28–30, 1931, when Russell Norton Boardman (age 33) and John Louis Polando (age
29) flew from Floyd Bennett Field to Istanbul, Turkey in a Bellanca "Special
J-300" high-wing monoplane named Cape Cod, registration NR761W. They made it
safely to Istanbul nonstop in 49:20 hours, establishing a distance record of
5,011.8 miles (8,065.7 km), the first nonstop record flight in surpassing
5,000 miles.
On June 3, 1932, Stanislaus F. Hausner, flying a Bellanca CH Pacemaker named Rose Marie, powered by a 300-hp Wright J-6, attempted a transatlantic flight from Floyd Bennett Field, New York, to Warsaw, Poland. The attempt failed when he made a forced landing at sea; he was rescued by a British tanker eight days later.
On July 15, 1933 6:24 AM two Lithuanian pilots Steponas Darius ir Stasys Girėnas flying a heavily modified CH-300 lifted off from Floyd Bennet Field to attempt a nonstop transatlantic flight. They successfully crossed the Atlantic, however crashed in the forest near Pszczelnik, Poland.
| THE KIT |
Enclosed in a zip-top bag are four gray plastic sprues, one sprue of clear parts plus their masks, two resin spats, a fret of photo etch, (in its own bag) and set of three decal markings. (Also in its own bag.) Two of the markings are for the successful trans-Atlantic crossings and the third for a Boston based aircraft. Total plastic parts count is 57. Some of the parts are very small and removing them from the sprue gates will be a challenge.
 Rib and fuel tank detail on
the wings look like they could be sanded down a bit. Cockpit detail is basic and
the cabin detail is nonexistent. I’m sure extra fuel tanks were installed there
for the long-distance flights. If you wish to model a passenger plane, you’ll
have scratch build windows and seats and source the livery. It might be
interesting to render a bush plane on floats such as the one on display at the
Canada Aviation Museum.
Rib and fuel tank detail on
the wings look like they could be sanded down a bit. Cockpit detail is basic and
the cabin detail is nonexistent. I’m sure extra fuel tanks were installed there
for the long-distance flights. If you wish to model a passenger plane, you’ll
have scratch build windows and seats and source the livery. It might be
interesting to render a bush plane on floats such as the one on display at the
Canada Aviation Museum.
The instructions extend over four sheets through 20 steps. An introduction, parts map and three pages of painting and decaling diagrams make for half of the packet and assembly diagrams make up the rest. There are no color call-outs.
| CONSTRUCTION |
 Building starts with
assembling the cowl. I glued the panels together first and then aligned them
with the engine support ring. Engine, exhaust collector and townend ring went on
next without much fuss. I opted to skip the tiny photo etch cowl latches. I
filed a notch into the ring in order to mount the exhaust pipe.
Building starts with
assembling the cowl. I glued the panels together first and then aligned them
with the engine support ring. Engine, exhaust collector and townend ring went on
next without much fuss. I opted to skip the tiny photo etch cowl latches. I
filed a notch into the ring in order to mount the exhaust pipe.
Interior bits were assembled next, and again, I didn’t use the photo etch. I jumped ahead in the instructions and glued the side windows into the fuselage halves and then the interior assembly to the right fuselage half. The halves were glued together, then the instrument panel glued to the firewall, under the exposed points of the fuselage. I glued on the roof then filled and sanded the seam. The engine assembly needed some filing to get a good fit. In order to fit the wind shield, I needed to file a lot of material from the roof leading edge. Even then I was left with gaps at the side windows. I applied the vinyl masks at this stage.
 Before moving on the
empennage, I drilled out the divots in the fuselage for the photo etch control
cables/horns and used a knife blade to cut small trenches from the holes aft
using a twisting motion. The tail section went on easily. After gluing the
rudder horns and the bottom elevator horns, I found the parts fiddly and
unconvincing. I decided to shape the rest of the horns from .020 sheet and use
monofilament thread for the cables. Before gluing the horns on, I scored a notch
at the tips with razor saw to give the thread a place to rest when gluing.
Before moving on the
empennage, I drilled out the divots in the fuselage for the photo etch control
cables/horns and used a knife blade to cut small trenches from the holes aft
using a twisting motion. The tail section went on easily. After gluing the
rudder horns and the bottom elevator horns, I found the parts fiddly and
unconvincing. I decided to shape the rest of the horns from .020 sheet and use
monofilament thread for the cables. Before gluing the horns on, I scored a notch
at the tips with razor saw to give the thread a place to rest when gluing.

Holes in the ailerons were drilled and then elongated to slide single piece horns into place instead of gluing horns on the tops and bottoms. I also drilled out the holes for the control cables and carved trenches like the fuselage was treated. Each wing is in two pieces with the lower half nesting in the upper half, leaving a seam to fill. There are only dots and dimples to align the wings to the fuselage. I used pieces of a paper clip to pin the wings in place. Be sure to include some dihedral. A gap remained—which is there on the real aircraft, but it is overlarge. I filled the gap with epoxy and cleaned it up with a cotton bud soaked in rubbing alcohol. The venturis and fuel tank filler neck were glued to the top of the fuselage and the model was ready to paint.
| COLORS & MARKINGS |
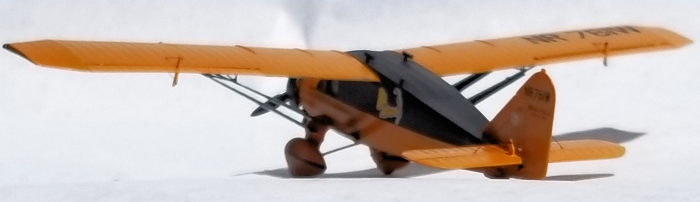
 I chose to
depict the plane that flew non-stop from New York City to Istanbul. I first
applied the orange enamel paint, then masked that and applied the black. I
didn’t do a very good job on masking and had to do some clean up. There are not
any decal stripes of this color scheme for the spats, so they had to be masked
and the black applied there. I free handed the stripe on the inside of the
spats.
I chose to
depict the plane that flew non-stop from New York City to Istanbul. I first
applied the orange enamel paint, then masked that and applied the black. I
didn’t do a very good job on masking and had to do some clean up. There are not
any decal stripes of this color scheme for the spats, so they had to be masked
and the black applied there. I free handed the stripe on the inside of the
spats.
Don’t wet several decals at one time. They separate from the backing paper quickly and can float away. They behaved nicely when applied and settled down well. The ID numbers for decals 15 and 18 are crossed.
The wing struts previously painted black were installed along with the photo-etch cross braces. Gluing the control horns on before painting was a mistake. I re-glued two horns back in place and used the monofilament thread dyed black as control cables on the scratch-built horns.
While doing that, I noticed markings indicating places where bracing wires go on the fin and stabilizer. There is nothing in the instruction about them. I drilled holes in the markings and threaded more monofilament through them. A small drop of super glue was placed on the underside of the stabilizer at each hole and the thread was trimmed flush.
The pitot was glued in place and the prop was the last addition.
| CONCLUSIONS |
I am delighted to place this model on my shelf. It is bigger than I thought it would be with a wing span of 8 and 3/8 inches. The molded detail is good, so the only photo-etch parts that I found useful are the braces on the wing struts. Novices will find that assembling this kit will stretch their skills. I enjoyed the build, spending less than 20 hours on it.
20 August 2019
Copyright ModelingMadness.com
If you would like your product reviewed fairly and fairly quickly, please contact the editor or see other details in the Note to Contributors.