| KIT #: | 72523 |
| PRICE: | NZ$20.00 'used' |
| DECALS: | options |
| REVIEWER: | Michael Rohde |
| NOTES: | Short run |
| HISTORY |
In 1927 J.K. Northrop and Gerald Vultee designed the Lockheed Vega with the intention to put this aircraft into service with Lockheed's own airline .The first flight of the prototype Vega I took place on July 4th 1927.
 The Lockheed Vega was based
in its construction on a wooden monocoque fuselage and plywood covered
cantilever wings and tailplane. The fuselage was built from sheets of plywood
skinned over wooden ribs. A large concrete mold was used to laminate a single
half of the fuselage shell in sections with glue in between each layer. A
inflatable rubber bladder was then used to compress the lamination into shape
inside the mold. The two fuselage shells were then nailed and glued over a
separately constructed rib framework. Since the fuselage was fabricated in that
way the wing could not cut through the fuselage and had to be mounted on top .
The Lockheed Vega was based
in its construction on a wooden monocoque fuselage and plywood covered
cantilever wings and tailplane. The fuselage was built from sheets of plywood
skinned over wooden ribs. A large concrete mold was used to laminate a single
half of the fuselage shell in sections with glue in between each layer. A
inflatable rubber bladder was then used to compress the lamination into shape
inside the mold. The two fuselage shells were then nailed and glued over a
separately constructed rib framework. Since the fuselage was fabricated in that
way the wing could not cut through the fuselage and had to be mounted on top .
Model 5's also received a refined NACA cowling and streamlined wheel spats which , in combination with the 420 hp Pratt& Whitney R 1340 C 1 Wasp , allowed to carry two more passenger seats and increased overall performance to a top speed of 266 km/h ( cruising speed 245 km/h). A total of 65 Vega 5s were built.
| THE KIT |
The box contains 3 frames holding 41 parts molded in grey plastic and one frame with 11 clear parts. The model can be build as a 6 seat passenger plane or equipped with long range tanks. Instructions contain paint and marking options, a brief history and a list of 7 steps with good drawings to assemble the model
 The decals are of good
quality and do register well. Only the very small letters are a bit blurred. We
have 3 options to choose from.:
The decals are of good
quality and do register well. Only the very small letters are a bit blurred. We
have 3 options to choose from.:
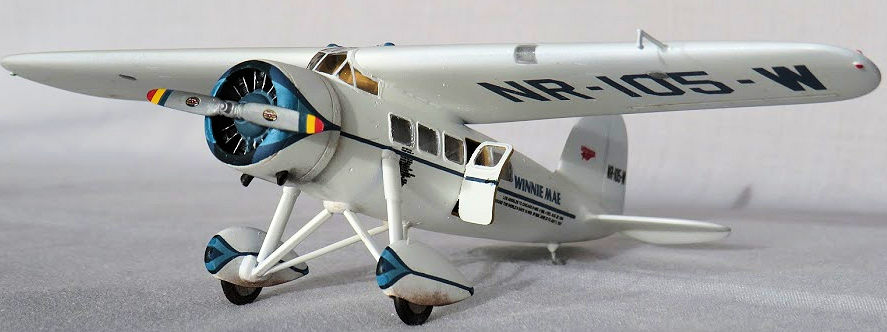
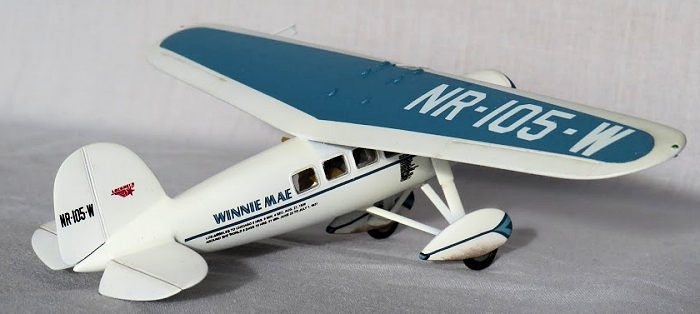
Vega Model 5B/5C Reg. NC 105 W 'Winnie Mae' used by F.C Hall's personal pilot Wiley Post
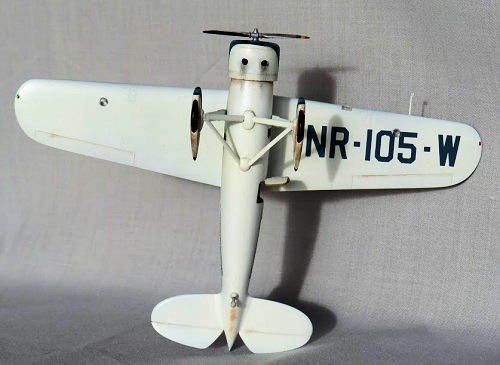
Vega Model 5B/5C Reg. NR 105 W 'Winnie Mae' --Wiley Post and Harold Gatty's flight around the world June 23rd to July 1st 1931.
Vega Model 5B/5C Reg. NR- 7952 Used by Amelia Earhart on her transatlantic solo flight May 20th - 21st 1932 and the first woman's solo transcontinental nonstop flight Los Angeles to New York August 1932.
| CONSTRUCTION |
I built this model following the step by step layout of the instructions. The very first thing I did was to separate all components from their respective frames and dry fit esp. the fuselage halfs and the wing sections. All parts require some attention to get rid of seamlines caused by mold shift.
Step 1 to 3:
Starting with the interior I did , however ,scratch build the rather large fuselage tank based on photos online. There is also a small table for the navigator and a radio set plus a floor mounted compass which I added. The cockpit area received a throttle quadrant and a small sidewall mounted console.
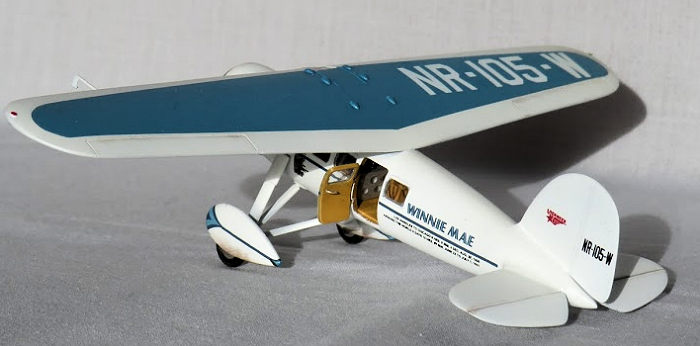
The kit does provide a
separate fuselage door and I carefully cut out this particular section in the
fuselage to have the door installed in a open position for the sake of being
able to lo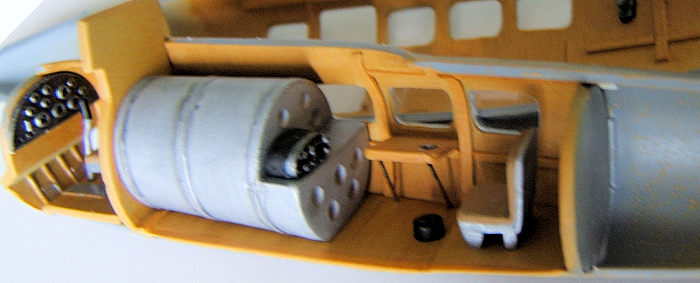 ok inside and have a glimpse of some of the interior details. All the
fuselage windows were dry fitted first. It was necessary to carefully scrape
away a small amount of plastic to have a snug fit.
ok inside and have a glimpse of some of the interior details. All the
fuselage windows were dry fitted first. It was necessary to carefully scrape
away a small amount of plastic to have a snug fit.
The interior was painted in a light wood colour and amber oils were used to imitate the wood grain and texture. The cockpit and rear compartment were completed and installed using drops of superglue. The fuselage shells were then glued together. There was a discernible step along the seams which required some filler to get rid of. Careful sanding and polishing followed to clean up the fuselage. To protect the 10 windows I covered these with some masking tape.
Now it was time to dry fit the canopy and glue it into place. The canopy frame was hand painted .
Step 4 and 5:
In step 4 I pre paint the radial and the NACA cowling. As per plan the short exhaust stubs are glued onto the cowling, but in this case I drilled holes just big enough to achieve a slight press fit.
Step 5 takes care of assembling the main wing and the horizontal and vertical tailplanes. The two wing halfes do not match very well. The leading and trailing edges had to be filled and sanded.
The kit does not provide clear parts for the landing lights. I fashioned these out of clear sprue .A small section in the leading edge was cut out , a short piece of clear sprue glued into place and trimmed back to match the outlines of the leading edge. Holes were drilled on the underside of the wing and a perfectly round slice of clear plastic was fitted. Careful sanding and polishing was done to blend these parts perfectly into the wing.
Once that was done I checked the fit of the main wing onto the top of the fuselage and around the canopy. The cutout for the canopy was good on one side but a gap on the other side had to be fixed with Evergreen strip. Small adjustments had to be made at the interface between fuselage and wing to reduce any gaps to a minimum.
 Fin and horizontal
taiplanes have no locator pins and great care had to be taken to get a good
contact between the contact areas of said parts and the fuselage. This was
achieved by removing small amounts of material until a maximum of contact was
reached. Remaining gaps were filled with superglue and sanded back.
Fin and horizontal
taiplanes have no locator pins and great care had to be taken to get a good
contact between the contact areas of said parts and the fuselage. This was
achieved by removing small amounts of material until a maximum of contact was
reached. Remaining gaps were filled with superglue and sanded back.
Step 6:
Here we come to the landing gear. All the parts involved ( 14 of them) were already cleaned up and ready to go. First I painted the wheels and left to dry. The attachment points of the struts were carefully drilled to make it easier to glue the struts into place. (The main struts do have small locator pins ). The center struts were the first ones to be glued into place .Before the glue had set I attached the rear supporting struts and balanced the model so that the assembly stayed in the right angle to the fuselage. Then followed the inner struts which also carry the wheelspats.
It is important to re-check the alignment of the landing gear before the glue has set entirely. The wheel spat shells were glued together and the seams were filled and sanded. The fit of the wheels inside the spats was fine and I could attach the spats to the landing gear. Holes were drilled to get a positive fit of the axles in the spats.
Step 7 took care of fitting the propeller and the pitot tube. This I left until the model was painted.
| COLORS & MARKINGS |
 In this case a very easy
job to do. Overall Tamiya XF 2 flat white was applied and the top wing center
was offset using a coat of Humbrol 48 mediterranean blue. A overall coat of
Tamiya clear gloss was done as a base for the decals.
In this case a very easy
job to do. Overall Tamiya XF 2 flat white was applied and the top wing center
was offset using a coat of Humbrol 48 mediterranean blue. A overall coat of
Tamiya clear gloss was done as a base for the decals.
The decals went on well . The very thin decorative stripes were very delicate but a good helping of Microsol these settled well. A bit of matching paint had to be used to touch up the decals around the cowl ring and the front of the spats because the decals did not reach quite far enough . But that was easily done using fine brushes under magnification. A final coat of Tamiya gloss clear sealed the decals.
As a final touch a bit of weathering around the wheel spats and the NACA cowling concluded the build.
| CONCLUSIONS |
A easy model to build and a nice rendering of one of the most famous planes in aviation history.That bit of extra work I put in is not absolutely necessary to get a good result out of the box and is entirely up to the modeller. In that scale This kit of the Lockheed Vega might be the best we can get at this stage.
It would be great if say ICM would take the plunge and decided to do a 1/48 scale kit of this aircraft.
Michael Rohde
10 September 2019
Copyright ModelingMadness.com
If you would like your product reviewed fairly and fairly quickly, please contact the editor or see other details in the Note to Contributors.
Back to the Main Page Back to the Review Index Page Back to the Previews Index Page