
Huma 1/72 Fieseler Fi.5
| KIT #: | |
| PRICE: | |
| DECALS: | Two Options |
| REVIEWER: | Michael Rohde |
| NOTES: |
. |
| HISTORY |
The successful aerobatic pilot Gerhard Fieseler stopped participating in International Aeorobatic Competition flying in 1932 and decided to focus on the construction of light aircraft based on his own designs.
In the year 1933 Gerhard Fieseler introduced his first design ,the Fieseler F 5 , which went into serial construction in his own factory. The Fi 5 was well received and turned into a popular sports and aerobatics capable aircraft of the 1930's. The Fi 5 was a low wing , mixed construction aircraft featuring a welded tubular steel frame with integrated formers .
 The top of
the fuselage from the firewall backwards to the vertical tail plane was covered
with plywood and the keel surfaces had fabric covering. The fuselage had also
two open cockpits arranged in tandem.
The top of
the fuselage from the firewall backwards to the vertical tail plane was covered
with plywood and the keel surfaces had fabric covering. The fuselage had also
two open cockpits arranged in tandem.
The wings consisted of two I- shaped spars with wooden ribs . The upper wing surfaces had plywood covering back to the rear spar , the lower wing portion was covered with ply back to the front spar. The remaining wing surfaces were fabric covered (as were ailerons , the rather large flaps and the horizontal tail plane). The horizontal tail plane could be adjusted in flight.
The wings could be quickly folded back by operating quick release latches.When folding the wings into flying position, the aluminium panels covering the wing roots could only be closed properly when all quick release latches were engaged 100 %. A interesting and at the same time very simple safety feature.
The fixed landing gear was spatted and featured single oleo struts with single leading shoe drum brakes.The tail skid was made of steel and had a rubber silent block as a shock absorber.
The Fi 5 was powered initially by a Hirth 4 cylinder in line engine with 60 hp which enabled the aircraft to reach a top speed of 200 km/h. About 27 Fi 5's were built and the last surviving example was written off in France in 1968.
| THE KIT |
 The kit
contains 22 cream coloured soft plastic parts on two frames and on frame
carrying the clear plastic windshields. Fit of the parts is not very good and
dry fitting is recommended.
The kit
contains 22 cream coloured soft plastic parts on two frames and on frame
carrying the clear plastic windshields. Fit of the parts is not very good and
dry fitting is recommended.
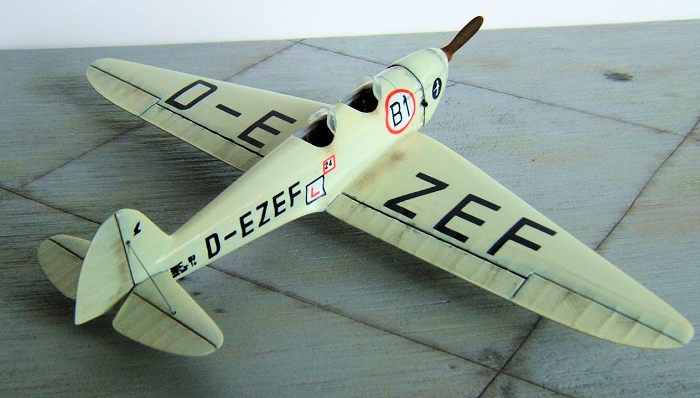
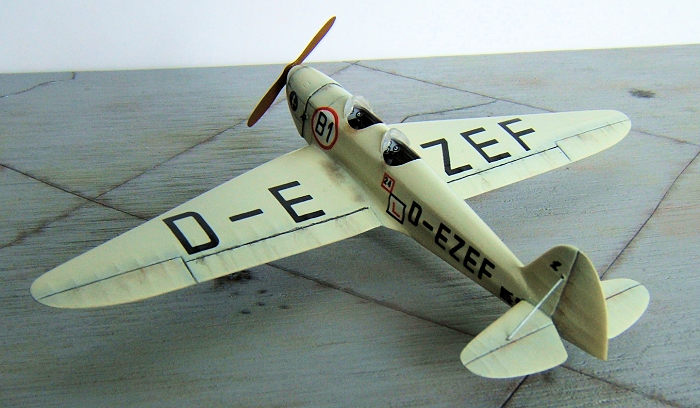
The decal sheet gives us two options.The decals are a little bit thick but they do settle well with Microsol. Instructions are simple and very easy to follow.
| CONSTRUCTION |
I removed all the parts from their frames and cleaned up all the flash and sinkmarks. The cockpit is very basic and there is only a cockpit floor , two seats ,two control columns and 2 instrument panels. There are two pilot figures , but they are very coarse and not worth saving. To spruce up the interior a bit I added the ribs and stringers plus rudder pedals , throttle quadrants and map holders made out of scrap plastic . I painted the interior light grey and added seat harnesses made with Tamiya masking tape. There are two decals for both instrument panels provided as well..
 Due to the
simplicity of the interior the fuselage was closed up in no time. The fuselage
halves fitted together reasonably good. The front engine cover needed a bit of
work. In comparison to the outlines of the fuselage it was a bit oversized and
needed careful sanding back. The air intakes required a bit of attention too to
get 3 openings evenly round and 2 evenly rectangular.
Due to the
simplicity of the interior the fuselage was closed up in no time. The fuselage
halves fitted together reasonably good. The front engine cover needed a bit of
work. In comparison to the outlines of the fuselage it was a bit oversized and
needed careful sanding back. The air intakes required a bit of attention too to
get 3 openings evenly round and 2 evenly rectangular.
Horizontal tail plane and rudder needed dry fitting. Especially the seat of the rudder required careful cutting of a recess before one could glue the rudder into place.The tailplane needed a bit of surgery too to accommodate the rudder.
The wings were a bit more tricky. There are recesses at the wing roots with a hole for the locator pin on the wing. The problem was that the recess is a bit uneven and needed careful trimming to get the wings seated as good as possible. I got there in the end but I used CA glue as a filler to get rid of the remaining gaps.I applied the glue in stages to control any excess overflow. We are dealing with rather soft plastic here and the super glue is so much harder. So -- reducing sanding to a minimum was important.
 The landing
gear units are one piece jobs . Wheels and spats all in one. These needed a bit
of work to get rid of sink marks . Tamiya putty was applied to do the job. The
finished pieces were glued into place on the wings and the tail skid was
attached to the rear fuselage.
The landing
gear units are one piece jobs . Wheels and spats all in one. These needed a bit
of work to get rid of sink marks . Tamiya putty was applied to do the job. The
finished pieces were glued into place on the wings and the tail skid was
attached to the rear fuselage.
The clear parts were not only quite thin but , like the other plastic, very soft. In short-- while trying to cut these off the sprue and get these bits to fit onto the fuselage- I broke one and lost the other to the dreaded carpet monster. I had no other choice but to find some clear plastic in my scrap box and fashion these in such a manner to resemble the wind shields. I pretty much managed to get that happening but the shape is a bit different and the wind screens are a tat thicker that the original bits.
After all the sanding and polishing I re scribed all the panel lines and finally got to this really tiny propeller. That was another tricky bit , the size of that thing and the fact that the blades were rather thin and also a bit out of shape was a bit of a nail biting experience.
| COLORS & MARKINGS |
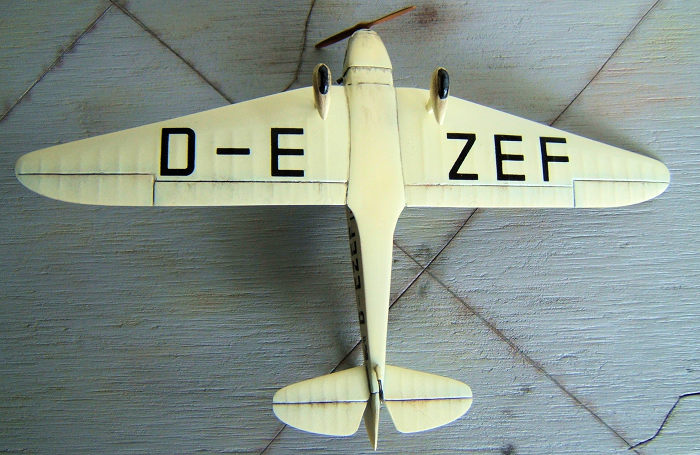
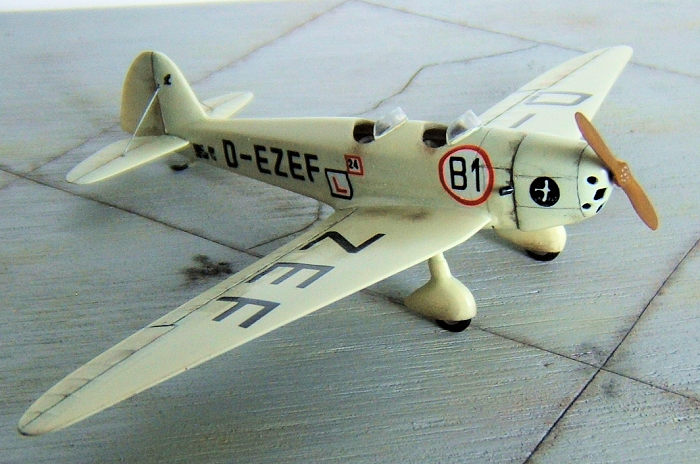 In the end I
got to the stage where I could start painting this tiny model.( wing span just
under 14 cm, fuselage 9 cm). First of all I masked of the cockpits and the wind
screens. The wheels and hubs were hand painted first and masked off as well.
In the end I
got to the stage where I could start painting this tiny model.( wing span just
under 14 cm, fuselage 9 cm). First of all I masked of the cockpits and the wind
screens. The wheels and hubs were hand painted first and masked off as well.
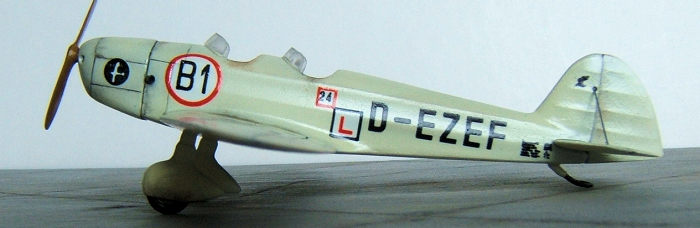
I started with some pre shading using Tamiya flat black followed by an overall coat of crème white. I mixed this paint using Tamiya flat white and a tiny amount of yellow to get this colour. A overall coat of Tamiya gloss clear followed. The propeller was painted in Tamiya earth and oil paint umbra was streaked along the blades to get this wood grain appearance.
The decals went on quite easy. ( I was a bit worried since I had no previous experience with HUMA decals.) A final coat of Tamiya gloss clear was applied to seal the decals. Finally a bit of weathering with Tamiya accent panel liner black and Pastels finished the job.
| CONCLUSIONS |
A simple kit indeed. The Fi 5 was a very rare plane and as far as I know HUMA is ( or was) the only company who made a kit. Can I recommend it? I'd say yes. With a bit of work you get a acceptable model of one of more obscure German inter war perion aircraft out of this kit.
12 February 2019
Copyright ModelingMadness.com.
If you would like your product reviewed fairly and fairly quickly, please contact the editor or see other details in the Note to Contributors.
Back to the Main Page Back to the Review Index Page Back to the Previews Index Page