Dora Wings 1/48 Bellanca C.400
| KIT #: | |
| PRICE: | |
| DECALS: | Three options |
| REVIEWER: | Michael Rohde |
| NOTES: |
| HISTORY |
 Guiseppe Mario Bellanca established the Bellanca
Aircraft Corporation of America in 1927. One of his rather successful designs
was the C- 400’ Skyrocket, a six seat utility aircraft which made its first
flight in 1930 . This model was equipped with a Pratt & Whitney Wasp radial
engine delivering 420 hp, giving it a max. speed of 249 km/h. A total of 32
aircraft were built.
Guiseppe Mario Bellanca established the Bellanca
Aircraft Corporation of America in 1927. One of his rather successful designs
was the C- 400’ Skyrocket, a six seat utility aircraft which made its first
flight in 1930 . This model was equipped with a Pratt & Whitney Wasp radial
engine delivering 420 hp, giving it a max. speed of 249 km/h. A total of 32
aircraft were built.
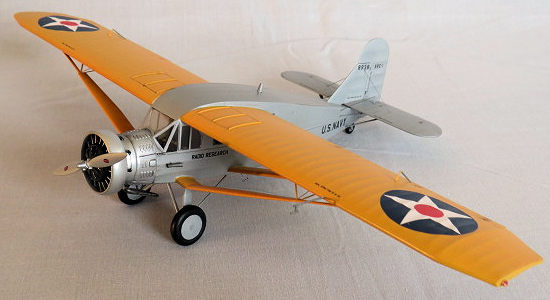
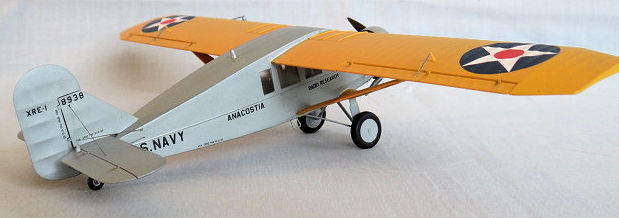
Three of these were purchased by the US Navy under the designation RE, of which two were used for radio research and one was equipped as an air ambulance for the US Marines Corps. The remaining aircraft were available on the open market as de luxe versions for private pilot owners. These were powered with a more powerful 450 hp Pratt & Whitney Wasp radial.
| THE KIT |
The kit is made up of six frames with 72 parts and one clear frame with 12 parts. Photo etch and canopy masks are supplied . All the parts for a fully spatted landing gear option( civilian version ) are included as well.
 The decal sheet offers 3 options:
XRE-2 Light transport US Navy
XRE-1 Radio Research aircraft based at Naval Air Station Anacostia
XRE-3 Air Ambulance aircraft US Marine Corps
Being a limited run kit there are no locating pins and the parts do require clean up and test fitting. The decals are of good quality and register well. Instructions come in form of a 11 page booklet. The pages show a parts diagram. , a 15 step assembly guide ,3 colour paint schemes with decal positions and 4 photos of period CH -400 Skyrocket aircraft in military markings.
| CONSTRUCTION |
Assembly started with the cockpit. Four steps are required to complete this section. Photo etch parts to be used are the rudder pedals, levers on the instrument panel and two sets of seat harnesses. A decal for the instrument panel is supplied. The seats ( six of them ) were painted separately using Tamiya XF 64 ( red brown) for the leather trim. The instrument panel was kept in black . The cockpit /passenger floor was painted in a light sand brown using Humbrol 148.
 Before I assembled the fuselage , I glued the
passenger compartment windows into place and masked them. The rest of the
cockpit interior was painted with Humbrol 148 . The cockpit / passenger
compartment was glued onto one fuselage shell , the other half was then added
on. The fuselage upper decking comes as a separate part. Before this piece was
glued on, the inside masking on the windows was removed. Seams were filled with
putty and carefully sanded.
Before I assembled the fuselage , I glued the
passenger compartment windows into place and masked them. The rest of the
cockpit interior was painted with Humbrol 148 . The cockpit / passenger
compartment was glued onto one fuselage shell , the other half was then added
on. The fuselage upper decking comes as a separate part. Before this piece was
glued on, the inside masking on the windows was removed. Seams were filled with
putty and carefully sanded.
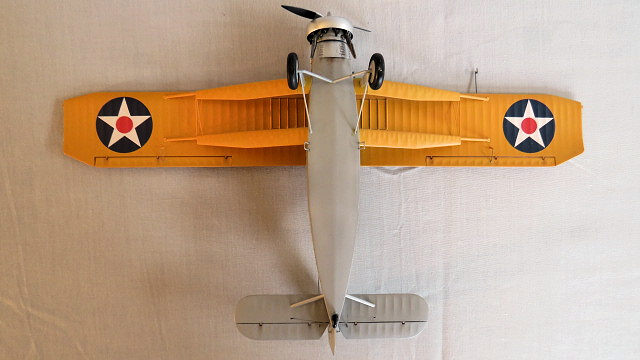
Next in line were the tail plane, wings and wing supports. The ailerons, rudder and elevators are separate and can be mounted in different positions. A small amount of filler and sanding along the seams around the leading and trailing edges was necessary. The same applied to the tail plane assembly.
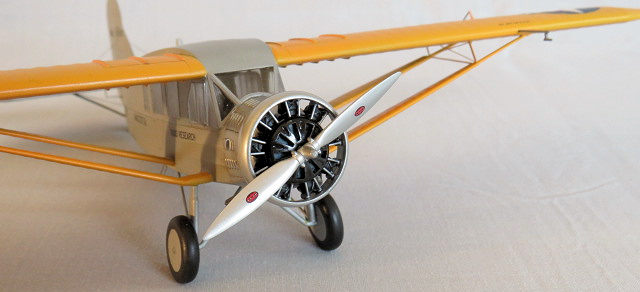
Building the engine is quite straight forward. To
begin with one has to put together the radial consisting of a front and rear
half . I drilled small holes into the cylinder heads to accomodate the ignition
leads. I made sure that the radial does fit into the cowl ring with a slight
interference fit . This required removing a bit of material on the top of the
cylinder heads . The kit pushrods were replaced by Evergreen polystyrene rods .
Engine, carburettor ring and front covers with pushrods were painted separately
and then assembled. Fine copper wire was used for the ignition leads. The rear
part of the engine is a bit mor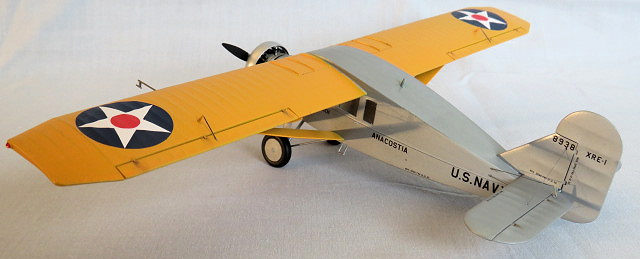 e complicated. First we need to put together the
front fuselage . Dora Wings could have done with less parts , but they have
decided to split this section into 6 separate pieces.To make the fit as good as
possible , these parts had to be cleaned along the seams to achieve a good fit.
Next, we have to glue 9 exhaust stubs and the two main exhausts onto the exhaust
collector ring and adjust these to align with the exhaust ports on the cylinder
heads. Allow time for the glue to set sufficiently before continuing.
e complicated. First we need to put together the
front fuselage . Dora Wings could have done with less parts , but they have
decided to split this section into 6 separate pieces.To make the fit as good as
possible , these parts had to be cleaned along the seams to achieve a good fit.
Next, we have to glue 9 exhaust stubs and the two main exhausts onto the exhaust
collector ring and adjust these to align with the exhaust ports on the cylinder
heads. Allow time for the glue to set sufficiently before continuing.
The completed front fuselage needs to be dry fitted to the main fuselage . To get a good fit of the main canopy ( the wind screen rests partially on the top ) I dry fitted the canopy and then glued it into place. The completed forward section was then glued onto the main fuselage.
Before the wings and tail plane were attached to the fuselage, I masked all the clear parts with the masks provided in the kit. Then I proceeded to fit the wing and tail plane struts. Small gaps between the wing roots and fuselage were filled with CA glue.
The landing gear legs were attached to the fuselage and front struts. At this point the outer strut braces (PE parts) were fitted using CA glue. Rudder , aileron and elevator linkages ( PE) were fitted after airbrushing was completed.
| COLORS & MARKINGS |
The colour scheme is simple. The fuselage and tail plane are painted in Tamiya flat aluminium and the wings and main struts in chrome yellow. The forward fuselage was painted in chrome silver ( all metal finish/ weathered with Tamiya panel liner Black to enhance surface details). Overall the aircraft received only moderate weathering common with well serviced peace time aircraft.
For this model I have chosen the markings of the XRE-1 used for radio research work This aircraft was stationed at the Naval Air Station Anacostia.
| CONCLUSIONS |
Overall a fairly simple kit to build apart from the need to clean up and test fit parts prior to assembly. Suitable for advanced beginners.
| REFERENCES |
11 March 2022 Copyright ModelingMadness.com.
All rights reserved. No reproduction in part or in whole without express
permission. If you would like your product reviewed fairly and
fairly quickly, please
contact
the editor or see other details in the
Note to
Contributors.