1/50 SZD-48 Jantar sailplane.
| KIT #: | |
| PRICE: | AUD$5.00 'used' |
| DECALS: | One set of stickers |
| REVIEWER: | George Oh |
| NOTES: | Simple kit that I deemed 'a quick build'. |
| HISTORY |
 When SZD of Poland was unable to improve their SZD-41 Jantar Standard
sailplane in ways they wanted-to, they developed, under the guidance of
Władysław Okarmus, the SZD-48 Jantar Standard. It first flew on 10 Dec 1977.
More improvements followed with the production of the Standard-2, then the
Standard-3.
When SZD of Poland was unable to improve their SZD-41 Jantar Standard
sailplane in ways they wanted-to, they developed, under the guidance of
Władysław Okarmus, the SZD-48 Jantar Standard. It first flew on 10 Dec 1977.
More improvements followed with the production of the Standard-2, then the
Standard-3.
The Jantar Standard's fibre glass/epoxy resin shell is built over a welded steel tubing frame. It is fitted with four aluminium airbrakes (one above, and one below each wing), and 150 litres of water ballast. Uniquely, the Standard-3 features a single-piece, forward-opening canopy (which makes getting out easier) and a long coaming over the instrument panel (as a glare shield and for easy access to the back of the panel).
I dunno how (or why) they do it, but all sailplanes (and the Standard-3 is no exemption) seem to land on only two tandem wheels - a small tail wheel, and a larger (usually retractable) front wheel. I wonder if the wings/wingtips ever suffer damage from the lack of support?
| THE KIT |
I saw this kit at the end of a 3-day model show's Swap n' Sell. It was sitting on the end of a table, unloved, with its five brothers, in its clear plastic box, under a $5 price-tag. A quick look inside showed only 5 basic parts and a clear canopy - which suggests a quick build. THIS, and the desire to round-out the cost of my purchases, prompted me to buy it.
The cockpit was represented by a flat plate onto-which a thick sticker is to be applied, to represent the seat and the coaming. The tailplane is to be butt-joined onto the top of the tailfin.
| CONSTRUCTION |
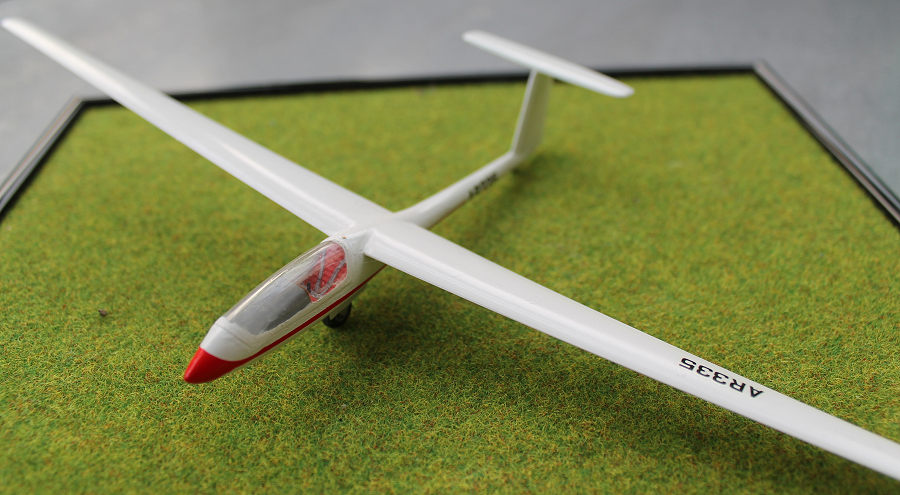
I started this kit because it looked like a quick build, and because I've never done a glossy-white finish on a model. I have admired them on other builders' airliner models, but have never attempted one because military aircraft seldom have them. So I resolved to have a crack at one on this model in order to expand my modelling repertoire. Aside from the clean white finish, I decided to scratch-build a proper cockpit and add the front wheel with its doors.
 Building started (in the follow-through after the model show) when I scribed-off
the cockpit plate. Before I closed the fuselage, I created a pilot hole in the
fin for the tailplane, and behind the cockpit bulkhead for the landing wheel.
Internet research gave me images of the cockpit, and I was able to cobble
together a reasonable semblance of what I saw. The seat is textured plastic card
and hopefully, it looks very comfortable, even with its decal WWII seat-belts.
Scrap decals formed the instrument panel and a piece of thin plastic card was
bent into shape to form the coaming. Thicker plastic strip forms the side
consoles, and lengths of wire represent the major levers, and the control column
(which is embedded in the floor of the fuselage).
Building started (in the follow-through after the model show) when I scribed-off
the cockpit plate. Before I closed the fuselage, I created a pilot hole in the
fin for the tailplane, and behind the cockpit bulkhead for the landing wheel.
Internet research gave me images of the cockpit, and I was able to cobble
together a reasonable semblance of what I saw. The seat is textured plastic card
and hopefully, it looks very comfortable, even with its decal WWII seat-belts.
Scrap decals formed the instrument panel and a piece of thin plastic card was
bent into shape to form the coaming. Thicker plastic strip forms the side
consoles, and lengths of wire represent the major levers, and the control column
(which is embedded in the floor of the fuselage).
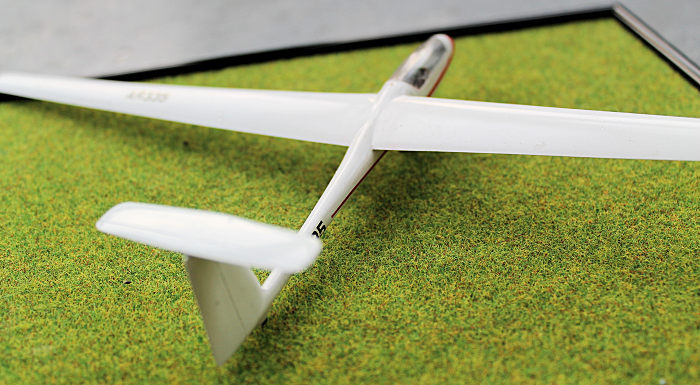
Dry-fitting told me that the wings had a tendency to settle with a marked dihedral rather than being flat (= level). Reshaping the locating sockets for the wing tags helped a little, but pushing the wings into position deformed the fuselage spine above the wing tags. To keep the wings flat, I drilled laterally into their locater tabs and joined them with a long length of stiff wire. Liberally irrigating the joins with glue solidified everything, then a fair bit of sanding was needed to knock back the deformity. A few filling/sanding/priming sessions restored the smoothness of the fuselage. None of the flying surfaces any control surfaces, but that was rectified by a little scribing, using drawings found on the internet. But they didn't show the position, size or shape of the airbrakes - so I didn't include them.
I didn't trust the butt-join between the tailplane and the fin, so I pinned them together using the pilot hole that I had prepared earlier. Filling/sanding and priming followed. Finally, I attached the canopy, and the fit wasn't too crash-hot. With that, the airframe was complete. There was only the canopy to be masked - Easy, because there was only the framing around the edges to do.
| COLORS & MARKINGS |
 The
advice I had received was to hit the model with several coats of flat white, and
to lightly wet-sand each. To get the glossy white finish, the smooth flat-white
coats are to be sprayed with several coats of gloss white - again, each coat was
to be wet-sanded. Tamiya was my paint of choice because it was in my stash. I
wasn't all plane/plain sailing, because the painting revealed seams that needed
refilling, rough spots, and pitting in the paint - all of which had to be fixed.
My go at a perfectly-clean smooth white glossy finish 'aint perfect, but it'll
do (for now).
The
advice I had received was to hit the model with several coats of flat white, and
to lightly wet-sand each. To get the glossy white finish, the smooth flat-white
coats are to be sprayed with several coats of gloss white - again, each coat was
to be wet-sanded. Tamiya was my paint of choice because it was in my stash. I
wasn't all plane/plain sailing, because the painting revealed seams that needed
refilling, rough spots, and pitting in the paint - all of which had to be fixed.
My go at a perfectly-clean smooth white glossy finish 'aint perfect, but it'll
do (for now).
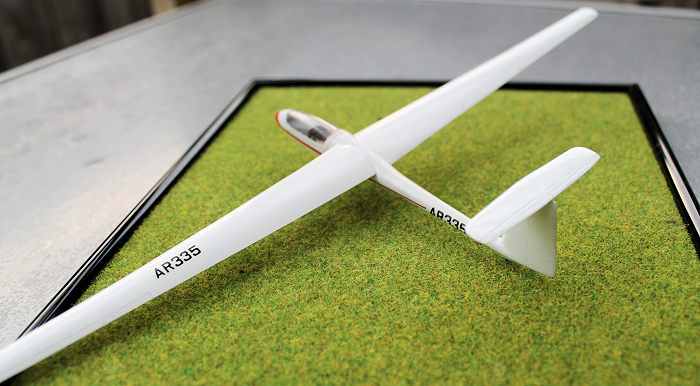
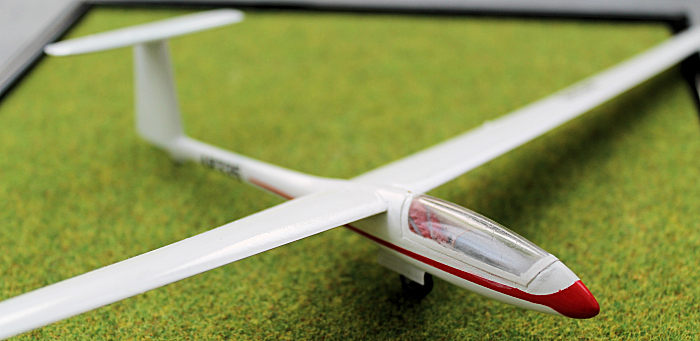
The stickers would have given the sailplane red wingtips and a red nose. Instead, I used paint. I masked-off a zone on the nose, and a stripe along each side. This I hit with Mr Color shine red - again, because I had it from building my T.800 figure (see elsewhere in MM). But I declined to do the red wingtips. The stickers would have also provided the make and model below the canopy, and the glider's registration number. Instead, I simply used the serial number provided by a college from two identical decal sheets.
The
model was completed, but I wanted more for it the form of the landing wheel. The
wheel itself was found in the spares box. A hole was drilled through it from its
north to south pole, and the wheel was threaded onto a long wire. Two V-struts
were cut from thin plastic card and glued directly to the sides of the wheel,
then trimmed level with its top. The undercarriage doors were fashioned from a
piece of thin metal foil that was folded over a piece of plastic strip the same
t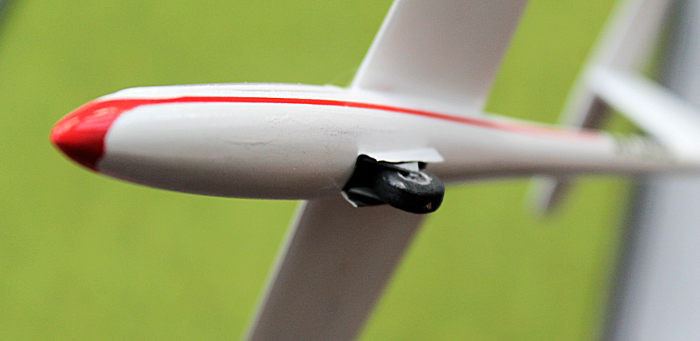 hickness as the wheel. I painted gloss black inside to give it depth, and gloss
white doors to blend it with the airframe. This piece of foil was also threaded
onto the wire, and the wire was pushed right through the fuselage (and out of
the spine), then everything was superglued in-place. After trimming the wire
flush with the top of the fuselage, the point of emergence needed to be filled
and the paint touched-up. A touch of black paint under the tail to replicate the
tailwheel, and I could declare this one done.
hickness as the wheel. I painted gloss black inside to give it depth, and gloss
white doors to blend it with the airframe. This piece of foil was also threaded
onto the wire, and the wire was pushed right through the fuselage (and out of
the spine), then everything was superglued in-place. After trimming the wire
flush with the top of the fuselage, the point of emergence needed to be filled
and the paint touched-up. A touch of black paint under the tail to replicate the
tailwheel, and I could declare this one done.
To protect those long high-aspect-ratio wings, I plonked it down onto a sheet of railway lawn placed in a picture frame. In the future, I'll scratch-build a couple of trestles to support the wingtips, and lay-out a tow-rope. Maybe!! I couldn't find a photo of the point where the tow-rope connects to the nose of the glider, or else I'd be able to connect the tow-line to the nose.
| CONCLUSIONS |
For me, this was an ultra-quick build, aided by the very-low parts count. Even the scratch-building wasn't a problem. The longest part of the build was the painting, because of my inexperience, and the multiple coats that were required. I don't build many civilian subjects or gliders, so this one model was a foray into territory seldom-trod by me. But I like building models, and this was no exception. I'm glad that I bought it. Now I reckon that I should have a crack at that Concord, 727 and/or 747.
| REFERENCES |
Nothing but 'net.
George Oh
22 July 2019 Copyright ModelingMadness.com If you would like your product reviewed fairly and fairly quickly, please contact the editor or see other details in the
Note to
Contributors. Back to the Main Page
Back to the Review
Index Page
Back to the Previews Index Page