| KIT #: | |
| PRICE: | $55 for conversion/32 for kit |
| DECALS: | Spares |
| REVIEWER: | Terry Miesle |
| NOTES: | Speculative 1980s modernized Cavalier Turbo Mustang NASA Chase Plane. |
| HISTORY |
Halberd Models is a Ukrainian manufacturer supplying resin kits, conversions and printed rubber and resin wheel sets. The kits and conversions are finely cast in resin, with photoetch, decals and clear-cast resin canopies where applicable. These are among the finest cast resin kits I have seen, and the parts breakdown is very good.
 This conversion is for the
Eduard P-51D kit, and you can use overtrees or a Weekend Edition since you’re
not using any of the decals. A little bit of surgery is required, for
which the instructions are mostly clear. Decals are provided for a
prototype intended to sell a COIN aircraft to the USAF. Full fuselage
halves are provided, but you will use the wings, tail surfaces etc.
Honestly, this would be easier as a full kit, and probably worth the cost.
This conversion is for the
Eduard P-51D kit, and you can use overtrees or a Weekend Edition since you’re
not using any of the decals. A little bit of surgery is required, for
which the instructions are mostly clear. Decals are provided for a
prototype intended to sell a COIN aircraft to the USAF. Full fuselage
halves are provided, but you will use the wings, tail surfaces etc.
Honestly, this would be easier as a full kit, and probably worth the cost.
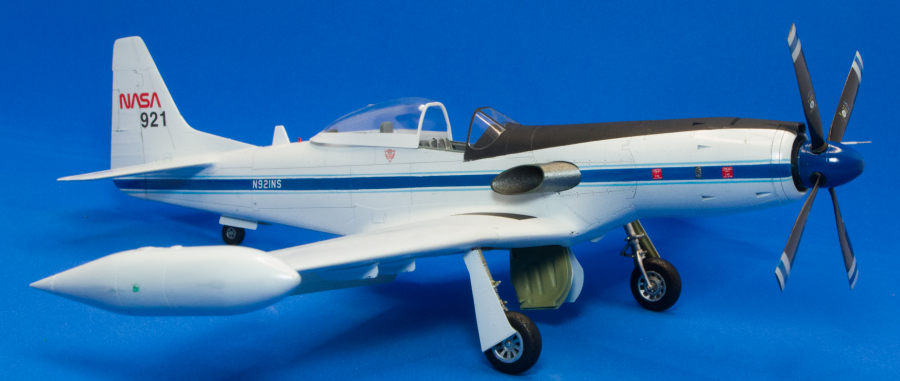
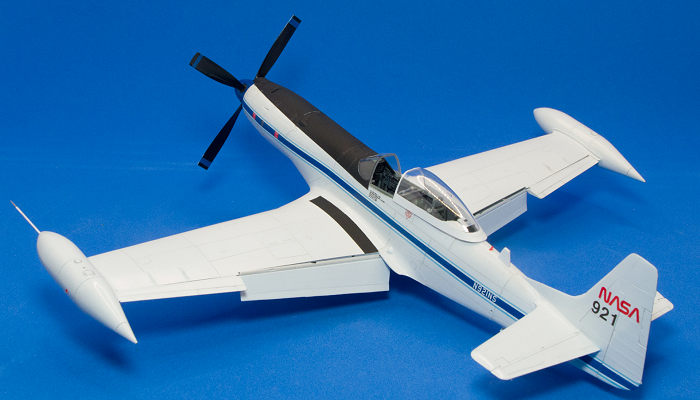
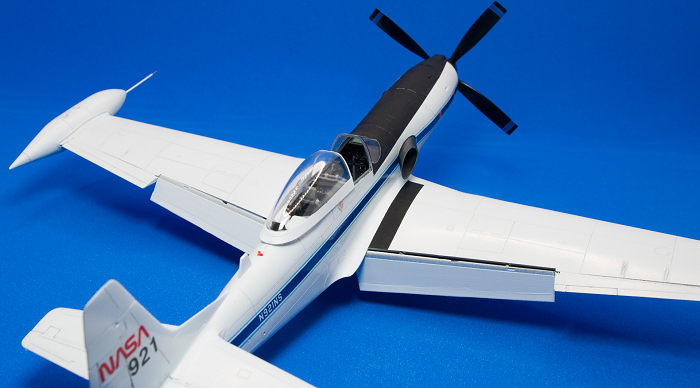
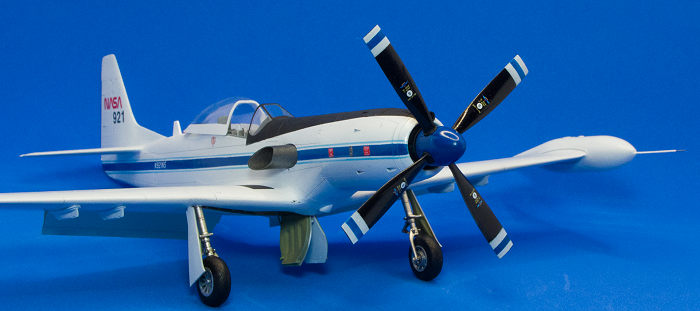
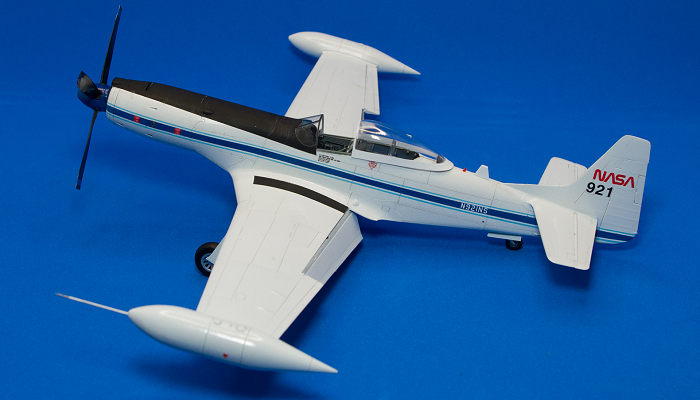
My thought upon seeing this conversion was available in my preferred scale was to think about doing something different with it. The aircraft was obviously a hot rod, long and sleek, so it needed to be something fast. I wasn’t particularly interested in doing a racer or a COIN aircraft but had been itching to paint another NASA scheme. I figure this aircraft would have made an excellent camera ship and chase plane. I have plenty of NASA decals, and had painted the pinstripes on another speculative aircraft, so that was a challenge I was ready to embrace again. I’m calling it an NF-51T.
| CONSTRUCTION |
I followed the instructions pretty closely, since they make sense. I did make some changes, though. Initially I had painted the cockpit green, but quickly found out they were painted grey, and since I had not added any extra details it was easy enough to give it a coat of Tamiya Neutral Grey. I didn’t repaint the wheel wells, it was a bit too late for that. I deleted the guns, and filled the ammo chute exits etc.
The cockpit would need to be updated to something like the 1980s. I used a Quinta Studios 3D decal set for F5-B which I bought some time ago. These were chopped up and applied to the cockpit. I wasn’t particularly interested in making them “realistic” but just wanted to make it look more modern. Yes, I should have updated the sidewalls a bit more but I did not do a lot. Since this is a 2-seater, the back seat had a smaller instrument panel, which I intended to look like instrument/camera controls.
 I used an old trick for the
exhaust. Epoxy putty in the fuselage to provide a channel so I could
install the tube later. A bit of dish soap or oil will keep the epoxy
putty from sticking to the part, so I packed in enough to provide this guide and
shaped it on the exit side of the fuselage
I used an old trick for the
exhaust. Epoxy putty in the fuselage to provide a channel so I could
install the tube later. A bit of dish soap or oil will keep the epoxy
putty from sticking to the part, so I packed in enough to provide this guide and
shaped it on the exit side of the fuselage
Fixing the wings to the fuselage takes some work. I’m not entirely sure if I misread the instructions, but I had to do a fair amount of surgery and use my vast epoxy putty experience. Aves to the rescue! As you can see on one of the few pre-painting pictures I had an issue with one wing root. I fully expect this was my issue, not the conversion, but that was the best fit I could make and I just feathered the filling and moved forward. Most resin assembly used CA cement, largely gel and Madlabs Black CA. Fit of kit parts and resin bits was largely without issue, but the extended vertical tail extension took some work.
I added two bomb shackle hardpoints. After painting, I would conclude this was a mistake. I should have added a single modern pylon on each wing instead. But by the time I reached this conclusion I had a nice white base and removing those resin hardpoints would have required grinding and sanding. Oh well. I had intended to make a camera pod, but abandoned that.
| COLORS & MARKINGS |
After all the construction steps were complete, I applied two thin coats of Tamiya Primer rattlecan. After the requisite corrections and polishing I was ready for painting.
Painting white is always a challenge. The secret is to not paint white. The formula I’ve found uses Acrylicos Vallejo Game Air White with about 10% to 15% Game Air Wolf Grey. This is a blue-tinted light grey. I prepare a mixture in a dropper bottle at the start of each project, so I can use the same mix throughout. I thin AV paints with their Airbrush Thinner and Flow Improver. The most important tips for using polyurethane paints is to apply thin coats. Allow the paint to cure before the next coat, do not rush the process. Drying is not the same as curing. If you do this, the paint is very durable. I have also taken to straining paints through a square of cheap nylon stockings to make sure there are no chunks or nuggets. This can happen with any type of paint. I will occasionally add a bit of Future with the thinners to harden the paint a little but I don’t recall whether I did so with this project.
AK Clear Gloss is my go-to
gloss coat at the moment, though I will use diluted Future as well. I had
intended to use the Fundekals T-38 NASA decals for the bulk of the markings, but
would need to paint the pinstripes myself. Measuring the decals I
found the entire stripe set is 5mm wide, wit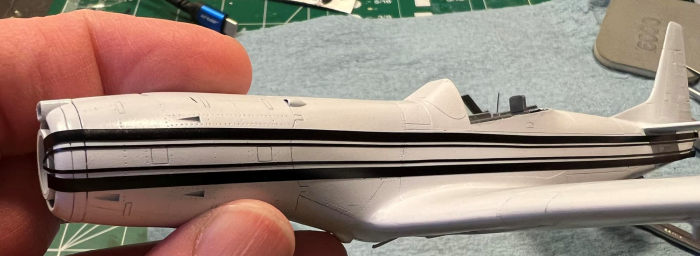 h a 3mm dark blue center stripe and
0.5mm light blue pinstripes. I made masks with my Silhouette vinyl cutter
using Removable Vinyl from Siser.. I’ll detail how to set up those masks
and painting:
h a 3mm dark blue center stripe and
0.5mm light blue pinstripes. I made masks with my Silhouette vinyl cutter
using Removable Vinyl from Siser.. I’ll detail how to set up those masks
and painting:
Apply a 5mm stripe. This is pretty rigid, and resists curving. Vinyl adhesive can be pulled up and reset as needed.
Apply mask stripes alongside the 5mm stripe, to be the actual outside masks.
Remove the 5mm stripe.
Apply a 0.5mm stripe along the outside edges.
Apply another 0.5mm strip along that stripe.
Remove the outer stripe, and now you have three unmasked stripes, two 0.5mm outside and one 3mm inside.
 Paint the entire stripe
assembly with light blue (Tamiya X14 Light Blue).
Paint the entire stripe
assembly with light blue (Tamiya X14 Light Blue).
Mask the outer stripes.
Paint the inner stripe with darker blue (Tamiya X4 Gloss Blue).
Remove masks, gloss coat over the full area.
Tamiya Flat Black provided the anti-glare panel, and I liked the look of a tapered panel found on some NASA T-38s which was enough reason to use that. The spinner is also Tamiya X4 Blue, the props a semi-gloss black. Propeller flashes I thought should be special, so on the front surface white and blue, but I applied only the dark blue stripe to the back surface to provide less visual intrusion for the pilot. That propeller is a beast, be careful and you won’t need to glue it in place.
| FINAL CONSTRUCTION |
 The parts of the Eduard
kit like landing gear, canopy etc. all fit very well. I did add a
Masterkit T-38 Pitot tube, some modern-looking antennae and beacons made
from scrap styrene. Decals were a mix of the Fundekals T-38 NASA set,
the NASA worm on the tail was from a generic sheet and the engine decals
were from the Halberd kit decals. Fortunately, those lined up
perfectly with the pinstripe - a bit of serendipity. The overall clear
is a satin coat mixing AV Gloss and a bit of AV Matte.
The parts of the Eduard
kit like landing gear, canopy etc. all fit very well. I did add a
Masterkit T-38 Pitot tube, some modern-looking antennae and beacons made
from scrap styrene. Decals were a mix of the Fundekals T-38 NASA set,
the NASA worm on the tail was from a generic sheet and the engine decals
were from the Halberd kit decals. Fortunately, those lined up
perfectly with the pinstripe - a bit of serendipity. The overall clear
is a satin coat mixing AV Gloss and a bit of AV Matte.
Very little weathering was applied. Very faint panel line color from some watercolors was all I applied. I didn’t want this to be dirty. I did debate whether to add exhaust staining. The turbo exhaust is an exhaust shade, but I did not stain the aircraft’s paint. Dealer’s choice.
| CONCLUSIONS |
Wow. Buy any of Halberd Models kits with confidence. As I said, the casting is immaculate and the master work is excellent. The Cavalier Turbo Mustang is essentially legendary among the last legs of the Mustang’s career. It’s a fantastic Tabula Rasa for your imagination. Overall I’m happy with the execution of this project. It was fun to share on Facebook, I didn’t keep this one secret. I look forward to building more Halberd kits.
5 June 2023
Copyright ModelingMadness.com. All rights reserved. No reproduction in part or in whole without express permission.
Thanks to me for picking this one up when it was on sale.
If you would like your product reviewed fairly and quickly, please contact the editor or see other details in the Note to Contributors.