
Accurate Miniatures 1/48 Avenger Fire Bomber
| KIT #: | |
| PRICE: | $ |
| DECALS: | |
| REVIEWER: | Charles Horner |
| NOTES: | Lone Star conversion. Draw Decals |
| HISTORY |
The Grumman TBF’s and later, G.M.-built TBM variants, had a stellar combat record during WWII. The TBF-1 entered service in early 1942, just before the Battle of Midway as a torpedo bomber, replacing the TBD’s. The TBM-3 ended the war in 1945 mostly as a level bomber.
 After the war, while many of its brethren aircraft were scrapped, the Avenger
lived on with ten front-line squadrons still operated the type in 1950. After
that, it took on many secondary rolls such as Naval Reserves training aircraft,
COD (Carrier Onboard Delivery), anti-submarine, target tugs and early-warning --
some going through extensive modifications for its new roles. By 1957, all were
gone from the US Navy, but a number of foreign countries had purchased surplus
Avengers. Those countries included Canada, UK, France, and Japan, amount others.
Some of these Avengers remained in foreign service into the mid-1960’s.
After the war, while many of its brethren aircraft were scrapped, the Avenger
lived on with ten front-line squadrons still operated the type in 1950. After
that, it took on many secondary rolls such as Naval Reserves training aircraft,
COD (Carrier Onboard Delivery), anti-submarine, target tugs and early-warning --
some going through extensive modifications for its new roles. By 1957, all were
gone from the US Navy, but a number of foreign countries had purchased surplus
Avengers. Those countries included Canada, UK, France, and Japan, amount others.
Some of these Avengers remained in foreign service into the mid-1960’s.
As early as 1954, the forestry services of the U.S. and Canada recognized the Avenger as an ideal water bomber to fight forest fires. A number of private companies purchased surplus Avengers and modified them with a single-pilot and large water tanks in the bomb bay. In the U.S., they served in this role until about 1972, when after a series of crashes, the US Forestry no longer accepted the use of single-engine water bombers. Canada had no such rules and continued to use the Avenger well into the 1990’s.
After nearly sixty years of service, there was a relatively large number of flyable Avengers at the start of the 21st Century and the warbird community snapped them up, restoring many of them back to their original WWII configuration.
| THE KIT |
 The Accurate Miniature’s Avenger kits came out in 1996 and in my opinion, is
still the best representation of the type in 1/48 scale. I originally had four
of these kits in my stash and had built three of them, including an early TBF-1,
a TBM-3D (night intruder), and a Canadian AS-3 sub hunter. I was in no
particular hurry to build a fourth one until I found the Lone Star Model’s web
site was open for orders.
The Accurate Miniature’s Avenger kits came out in 1996 and in my opinion, is
still the best representation of the type in 1/48 scale. I originally had four
of these kits in my stash and had built three of them, including an early TBF-1,
a TBM-3D (night intruder), and a Canadian AS-3 sub hunter. I was in no
particular hurry to build a fourth one until I found the Lone Star Model’s web
site was open for orders.
Lone Star typically opens his site to take orders, then closes it until he fills them or just when he feels like opening it again. I had always wanted a couple of his resin conversions but had never been lucky enough to hit the right time. As I scanned though his offerings, I saw the Avenger firebomber and knew this would make a great addition to my shelf of Avengers.
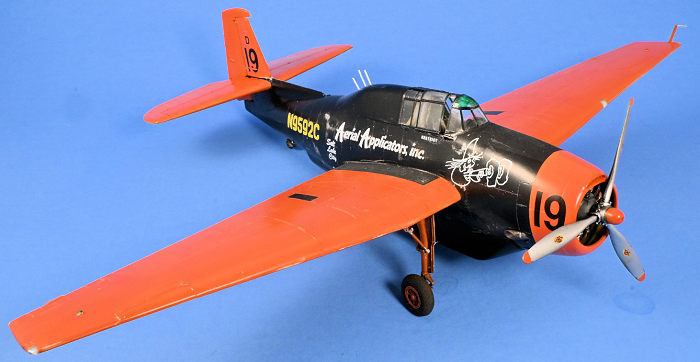
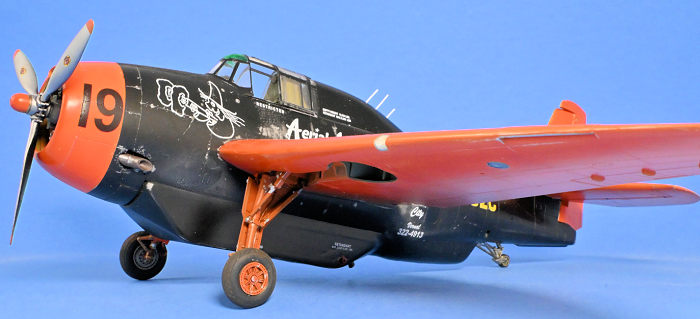
I received it about a month and a half later. Lone Star included markings for an over-all, orange plane from Hemet Valley Flying Service, which I was not excited able. Draw Decals offered some alternatives. I selected the black and orange, Aerial Applicators, Inc. aircraft. The sheet came with markings for three company aircraft, all nearly the same, but not quite.
Aerial Applicators operated a small fleet of Avengers as fire-bombers and crop sprayers out of Salt Lake City from 1966 to 1972. It appears that after 1972, the black and orange aircraft went to the Canadian firm of Hicks & Lawrence, Ltd.
| CONSTRUCTION |
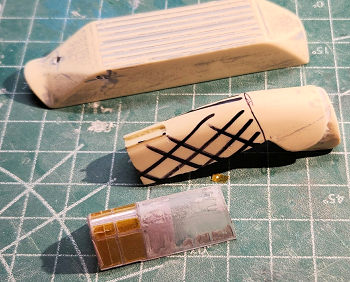 Lone Star’s conversion kit is “old-school” cast resin. By today’s standard,
it’s a bit crude. This conversion consisted of only two pieces: the
aft-cockpit/turret plug and the water tank. In theory, this is a easy “drop-in”
conversion but in this case, some serious prep work to the resin needed to be
done.
Lone Star’s conversion kit is “old-school” cast resin. By today’s standard,
it’s a bit crude. This conversion consisted of only two pieces: the
aft-cockpit/turret plug and the water tank. In theory, this is a easy “drop-in”
conversion but in this case, some serious prep work to the resin needed to be
done.
I first sanded the sides of the water tank and cockpit plug smooth. The fill pipes on either side of the tank and the dispersal pipe at the rear were so poorly represented, I cut them off and inserted brass tubing. The bottom of the water tank is corrugated and I spent an evening with small file and pick, cleaning up between the longitudinal corrugations. With this done, I still had some dips and dings in the resin so I completely covered all of the parts with a heavy coat of Mr. Surface 500 and proceeded to sand it back down to the resin, leaving the pieces pock-marked with gray filler.
Next, I tackled the cockpit plug. The Hemet Valley plane, offered by Lone Star, has no windows behind the cockpit, but the Aerial Applicators had one bay of windows there. I figured I’d just cut the resin plug short, but realized that it was a bit wide where it met the fuselage. This would mean sanding this area and possibly damaging the kit details. I decided to use the kit “glass”, back to the turret opening. I sanded the part behind the windows, smooth. This meant an angle cut to the plug, but a lot less mating area to blend to the fuselage.
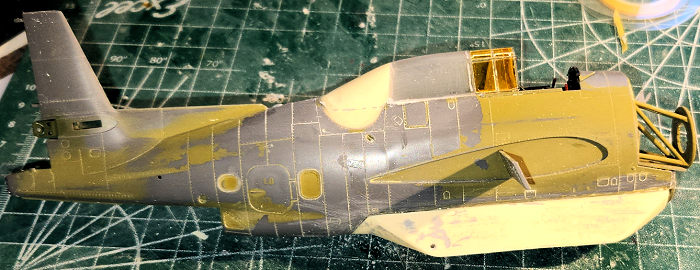 This was the fourth Accurate Miniature’s Avenger kit I had built. I didn’t
need to include any internal parts behind the front cockpit, included the turret
parts. All of the lower fuselage windows were painted over and the tail hook
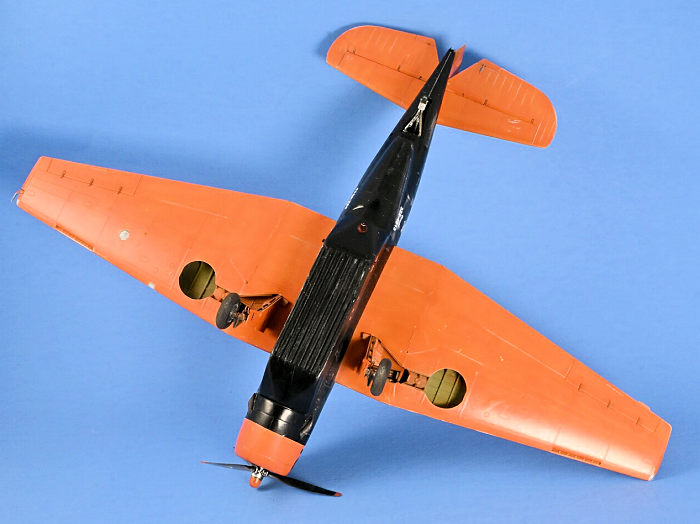
removed. I plugged the wing gun openings, the shell chutes holes in the lower
wing and removed the bump in the upper wing gun door.
This was the fourth Accurate Miniature’s Avenger kit I had built. I didn’t
need to include any internal parts behind the front cockpit, included the turret
parts. All of the lower fuselage windows were painted over and the tail hook
removed. I plugged the wing gun openings, the shell chutes holes in the lower
wing and removed the bump in the upper wing gun door.
AM had offered seatbelts as a decal on an earlier build. Thinking of the future, I had scanned the decal, duplicated it a number of times and printing them out on a sheet of photo paper. The belts then can be cut out, the edges and backs colored with a black marker, then glued to the seat. I have found it to be a good way to added belts to a cockpit without spending money on resin or photo-etched aftermarket. The results may not be as good, but acceptable for the most part.
The rest of the kit went together with no issues.
| COLORS & MARKINGS |
My standard build procedure is to complete the basic kit, filling and sanding as needed, before starting the painting process. In this case, all the markings are on the fuselage and the wings and tail only have orange paint. The AM kit has a nice depression on the fuselage sides were the wings slip into, held there by two spars coming out of the fuselage. After checking the fit, I saw that no filler would be needed. I therefore decided to separate the build into two parts: fuselage and wings.
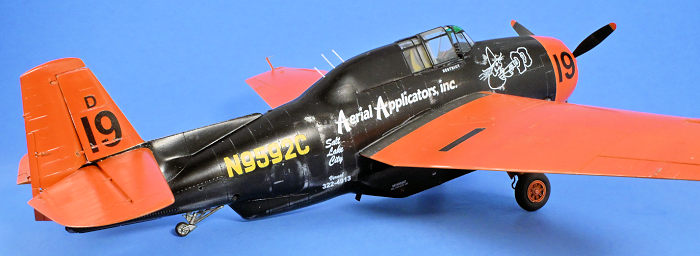 Draw Decals notes that the black fuselage was well worn, but the orange wings
and tail were in very good shape.
Draw Decals notes that the black fuselage was well worn, but the orange wings
and tail were in very good shape.
I painted the wings, horizonal tail, cowling and vertical tail a base coat of Tamiya XF-2, flat white. After a light sanding to smooth the surface out, I applied Tamiya’s Panel Line brown to all of the seam lines to try and break up the solid orange.
The International Orange color was from MRP. I found this on-line and had never used this product. The paint is very thin, for air bushing only. Using light coats, it lays down a beautiful smooth, hard, simi-gloss finish. When dry, I destressed the finish slightly with light sanding and some brown wash. I masked and painted the black wing walk-ways, then use a silver pencil to show ware. Satisfied, I put these aside.
I masked off the orange on the fuselage and sprayed the rest with Floquil Railroad Colors, Engine Black. This product is long out of production, but I have some bottles stashed. It is a very fine grain laquear paint and as long as the bottles are sealed well, the paint stays good. I next used my silver pencil to show ware along the seam lines and especially on the skin by the cockpit entrance.
 After a coat of Future, I started the decaling. Draw decals are screen
printed onto a single sheet of clear film, so each marking has to be carefully
cut out. They are thin and go down easily. Decal solvents only react with the
clear film, not the inks but the results, if managed correctly, are excellent.
After a coat of Future, I started the decaling. Draw decals are screen
printed onto a single sheet of clear film, so each marking has to be carefully
cut out. They are thin and go down easily. Decal solvents only react with the
clear film, not the inks but the results, if managed correctly, are excellent.
After another coat of Future to seal the decals, I cut them along seam lines and brought out the silver pencil again to add some ware over the markings. I even scrapped some parts of the decals off as if worn through.
Final assembly of wings and tail went without a hitch. I added the main landing gear. I had originally painted the inner doors Zinc Green and the struts a dark silver. I realized later that these were paint orange as well. Spraying the orange over the green and silver gave an added effect of a darker, dirtier orange – perfect for the look of the inner gear doors and struts.
I added the prop, painted silver on the front and black on the back, and a final coat of Tamiya simi-gloss. I then called it done.
| CONCLUSIONS |
I’m very pleased with the outcome. It really stands out at the end of my Avenger line-up (1942 -1972). This actually was a very simple build. Even the added prep to the resin was really not a problem. If I wanted “shake and bake” I’d build a Tamiya kit. Since I like more unique subjects, a little work is not uncalled for.
| REFERENCES |
“Grumman TBF/TBM Avenger”, H. Hill Goodspeed, Wings of Fame, Vol. 13.
Draw Decal information sheet.
27 October 2025
Copyright ModelingMadness.com. All rights reserved. No reproduction in part or in whole without express permssion from the editor.
If you would like your product reviewed fairly and fairly quickly, please contact the editor or see other details in the Note to Contributors.