| KIT #: | A039 |
| PRICE: | $20.00 or so 'used' |
| DECALS: | Four options |
| REVIEWER: | Joel Hamm |
| NOTES: | Injected, resin details, vacuformed canopy, & related headaches. |
| HISTORY |
Vultee’s V-11 “attack bomber” grew, in 1935 or so, out of their V-1 transport, which had nowhere else to go once the CAA (much later FAA) decreed that single engine airliners couldn’t go anywhere, at least not while carrying passengers. A fistful were sold to Brazil, China, and Russia, where they saw limited combat in pre-WWII scuffles. Wiki tells of a Vultee dropping its three 250 pounders on a U-Boat, doing nothing to the nasty Nazi, but nearly knocking itself down with the spray of its own exploding ordnance.
Unimpressed, the USAAC said ho-hum, as it favored twin engines for the job, and already had the Northrop A-17 locking up the attack bomber role. The term attack bomber seems redundant. If you are dropping bombs on someone, obviously you are attacking them. I suppose it is possible to unlimber your load in order to effect a hastier skeedaddle; much as horses void their bowels in flight (certainly not the provenance of the P-51’s Mustang moniker), but the connotation is most unmilitary of the designation “Retreat Bomber”.
 Anyway,
purely out of obligation, the army bought a few to play around with
applications, configurations, and powerplants. Just about all available
photographs show the P&W R2800 variant, recognizable by its long chord
streamlined cowl. The kit contains only the short, squat, square Twin Wasp R1830
nose. My intent was to perform a schnoz transplant, but the bin of spare engines
and covers was apparently forgotten back at the Winter Palace.
Anyway,
purely out of obligation, the army bought a few to play around with
applications, configurations, and powerplants. Just about all available
photographs show the P&W R2800 variant, recognizable by its long chord
streamlined cowl. The kit contains only the short, squat, square Twin Wasp R1830
nose. My intent was to perform a schnoz transplant, but the bin of spare engines
and covers was apparently forgotten back at the Winter Palace.
Fortunately, one grainy rear quarter pic did appear seeming to show a blunt cowl version in US markings. No claim is made that this model accurately represents an American plane, since the arrangement of antennae, scoops, and other appurtenances could not be confirmed. The only other photographic evidence offered by the Whorled Wide Web consists of reproduced “baseball card” drawings, included at the time as premiums in packs of Wings Brand cigarettes; renderings produced more by the artist’s imagination than research.
| THE KIT |
Not bad by
short run or even long run standards. The majority of parts are provided as
cleanly injected plastic, free or flash and other flaws. A separate bag holds
two resin frets of parts petite enough to require pouring. Transparencies are
provided as four – count ‘em: 4! – vacanopies; a degree of insurance recalling t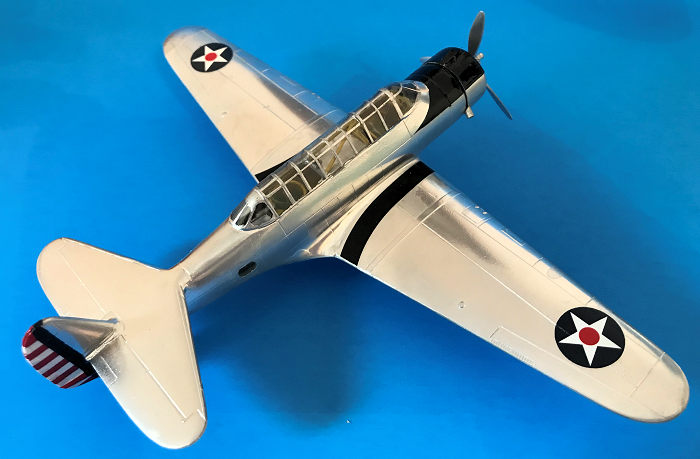 he
caution observed by those donning prophylactics during the practice of self
abuse. A closer examination however, reduces that apparent excess to a factor of
only two. One pair of vacs has the single-piece windscreen of the Brazilian
export ; the other has a forward windshield divided into four separate panes –
pains to mask and paint, but proper for the USAAC A/C.
he
caution observed by those donning prophylactics during the practice of self
abuse. A closer examination however, reduces that apparent excess to a factor of
only two. One pair of vacs has the single-piece windscreen of the Brazilian
export ; the other has a forward windshield divided into four separate panes –
pains to mask and paint, but proper for the USAAC A/C.
An even more challenging fenestration material is provided for the three other fuselage openings, small oval ports on the airplane’s aft flanks, and a large triangle on its belly. These clear panels are supposed to be cut from a thumbnail of acetate, then fit and fastened into the apertures. The average modeler might manage this whose day job is retinal surgery, but not me; so devising an alternate glazing method was the first step in building this one.
| CONSTRUCTION |
This was a Nashua project. I’m Nashua why I bought the model and leshua why I built it. The stash, in no danger of running dry, was stacked high with high tech no hassle Hasemiya throw-togethers; more suitable than this short runner for my atrophied skills; on subjects more significant than this dead end, no-thanks, pawn-it-off-on-the-Brazilians-and-Chinese flopped inter-war attack bomber.
 Two factors
favored it: first – a half price clearance sale from Special Hobby, which was
ditching its hanger-on brand names. Second - a half mile expanse of greenhouse
transparency showcasing a cockpit full of resin and PE possibilities. Vacu-formed
canopies – vacanopies I’ve dubbed them, if they do not outright terrify
modelers, discourage dabbling with short run subjects. They are fragile,
ill-fitting even when carefully trimmed, demand kid glove treatment when masking
and painting; but easily gentrified by stabilizing with a mummification medium.
Details on the process anon.
Two factors
favored it: first – a half price clearance sale from Special Hobby, which was
ditching its hanger-on brand names. Second - a half mile expanse of greenhouse
transparency showcasing a cockpit full of resin and PE possibilities. Vacu-formed
canopies – vacanopies I’ve dubbed them, if they do not outright terrify
modelers, discourage dabbling with short run subjects. They are fragile,
ill-fitting even when carefully trimmed, demand kid glove treatment when masking
and painting; but easily gentrified by stabilizing with a mummification medium.
Details on the process anon.
The most promising procedure would be post-paint in-situ casting with clear epoxy. The windows were blanked off inside the fuselage with clear plastic, taking care that no gaps would later let the sticky stuff ooze past. The outside depressions were then masked with Blue Tack gum.
The gaping cockpit allowed all furnishings to be inserted later, so only the floor and instrument panel got glued in, once everything was sprayed flat chromate yellow; which should be interior green; but that would darken the venue too much to see said furniture.
Airframe assembly proceeded smoothly, requiring clamp muscle and filler only at the wing beavertail junction.
| COLORS & MARKINGS |
A Testors gloss white enamel undercoat got ubergeschprited with Alclad chrome silver, my first ever use of the concoction. Shortly thereafter, a posting in Readers Forum expressed to all concerned my joy at the excellent results, qualified only by repeated airbrush cloggings ascribed to age. Not mine – the bottle’s, which through festering fallow and forgotten for a decade in a desk drawer had, despite an uncracked original seal, suffered two thirds volumetric depletion.
 The kit
decal sheet includes markings for the air forces of Brazil, China, Russia,
Turkey, and the Klingon Intergallactic Empire. Nothing for the Ewe Ess of Eh. No
problem was anticipated in finding dot-in-star-in-circle roundels; but a lack of
proper sized rudder stripes could put the project on indefinite hold. Sometimes,
though, the styrene deities smile upon their supplicants. A first dive into the
decal dumpster brought up the still sealed Propagteam sheet from an aborted MPM
A-17. Everything fit perfectly; with rudder stripes needing only slight
trimming.
The kit
decal sheet includes markings for the air forces of Brazil, China, Russia,
Turkey, and the Klingon Intergallactic Empire. Nothing for the Ewe Ess of Eh. No
problem was anticipated in finding dot-in-star-in-circle roundels; but a lack of
proper sized rudder stripes could put the project on indefinite hold. Sometimes,
though, the styrene deities smile upon their supplicants. A first dive into the
decal dumpster brought up the still sealed Propagteam sheet from an aborted MPM
A-17. Everything fit perfectly; with rudder stripes needing only slight
trimming.
The usual practice was skipped of sealing everything for the future with Future, in hopes of preserving Alclad’s blinding brightness, which nevertheless was already dulling due to decal fluids, handling, and exposure to the poisonous post industrial revolution atmosphere. Oh well, same thing happens to real airplanes. Opined the poet: “Nothing gold can stay.” Ditto silver.
| FINAL CONSTRUCTION |
While vacuformed transparencies share the consistency, handling foibles,
shaping demands, and often irreplaceability of donor cornea tissue, they are
easily put in their place through the process of petrification – stabilizing
with a solidifying medium. Best all around, number one, top notch product for
the p urpose
is Durham’s Rock Hard Wood Putty powder. Plaster of Paris ranks second. Mix to
the consistency of a McDonald’s milkshake (which tastes about the same), spoon
into the canopy, and rap against a tabletop to force out air bubbles.
urpose
is Durham’s Rock Hard Wood Putty powder. Plaster of Paris ranks second. Mix to
the consistency of a McDonald’s milkshake (which tastes about the same), spoon
into the canopy, and rap against a tabletop to force out air bubbles.
While still damp, the hardened compound easily separates from the acetate so it can fully dry. Absent backup vacanopies, this first casting should be set aside as a male mold on which to suck or smash a replacement in case of bung-ing up the trim job. Repeat the process, keeping the second pouring as a last on which to trim, mask, and paint the greenhouse.
With scissors, knife, or saw – never clipper which can cause cracks – remove XS acetate and bring the canopy close to its finish borders. Clip, snip, saw, or sand the same off the plaster last. Then glue the two together with a residue free temporary glue. Hint from Heloise: Elmer’s white stuff mixed with a few drops of dish detergent.
Trimming is best done with a low speed Dremel fitted with a mini drum sander bit. Remove material in slow, small passes, cutting at an angle until the final outline is almost reached. Stop about a crotch hair width outside of that, remove the canopy for dry fitting, and make final adjustments with a sanding stick.
Once happy with the fit, de-fuzzify the edge with 800 grit wet paper,
re-glue the transparency to the holder, clamp into a Panavise, and mask, paint,
or tape-frame according to preferred practice. Before fastening to t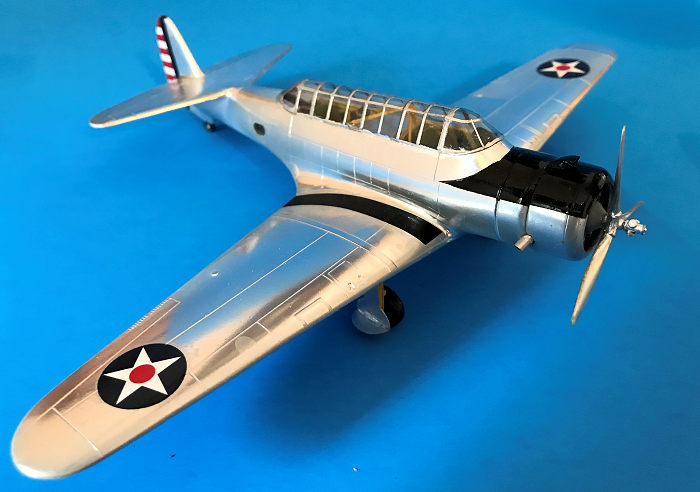 he
fuselage (assuming cockpit fixtures have been inserted) the inner and outer
surfaces of the vacanopy can be clear coated to improve clarity and stiffness.
The result is a greenhouse sharper, shinier, more see-through, and closer to
scale than anything popped out of an injection mold. Stick it in place with any
clear setting non-solvent glue. Caulk and fair gaps and mismatches with more
glue, touch-up paint, touch-up clear coat.
he
fuselage (assuming cockpit fixtures have been inserted) the inner and outer
surfaces of the vacanopy can be clear coated to improve clarity and stiffness.
The result is a greenhouse sharper, shinier, more see-through, and closer to
scale than anything popped out of an injection mold. Stick it in place with any
clear setting non-solvent glue. Caulk and fair gaps and mismatches with more
glue, touch-up paint, touch-up clear coat.
When last we left our intrepid glazier, he had closed off the window openings with clear plastic inside the fuselage and masked the depression with Blue Tack. This he now removed and positioned the model with the window opening horizontally upright. Having draped the surgical field with Post-It notes to avoid the agony of epoxy irrevocably dripping onto Alclad’s mirror finish, and using a straightpin applicator, he filled the depression with clear epoxy glue, to a level of slight convexity (meniscus) mimicking the bulge of real thing airplane windows. Avoid the temptation, as he did not, of using a quick setting compound, which may harden before properly leveling. After all that there was little left but to glue on the gear, add the engine, and sit it on a shelf.
| CONCLUSIONS |
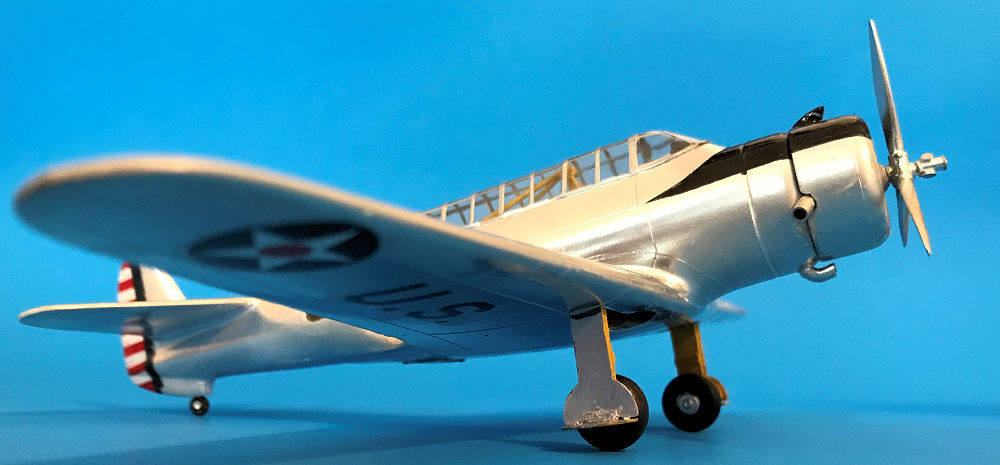
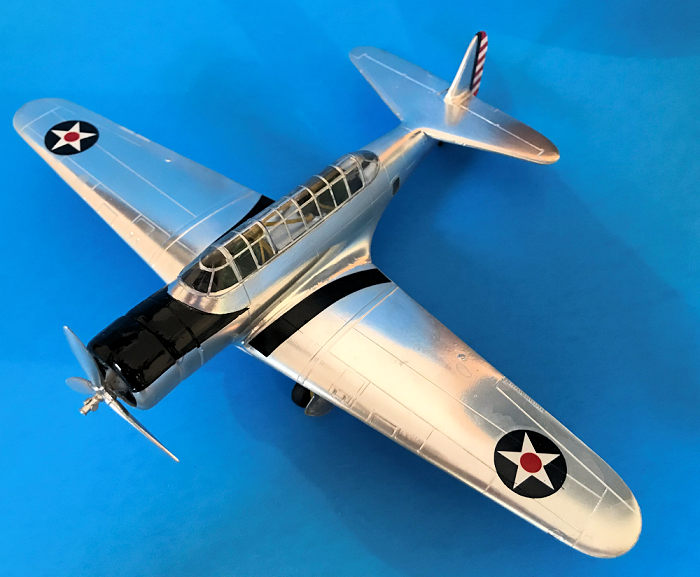
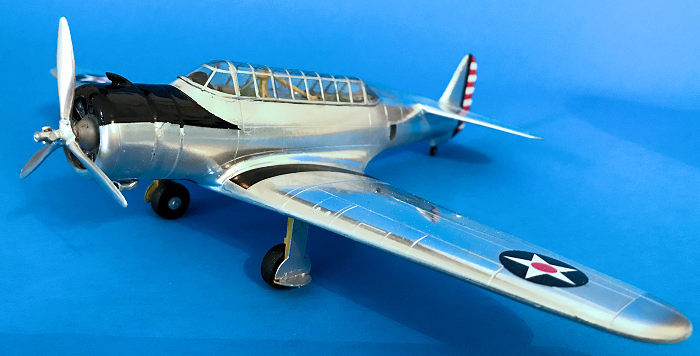
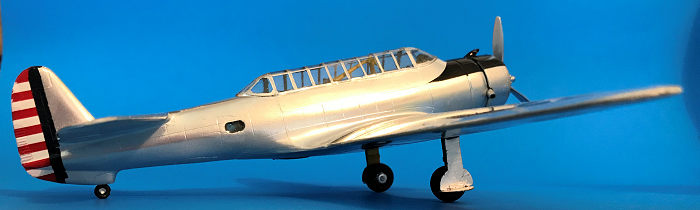
There is a certain attraction to these oddball inter-war abortions.
I’ve devoted attention to trimming, fitting, caulking, and fairing vacu-formed canopies to a perfect match with the fuselage; but the accompanying photos reveal wide open spaces where they meet. While not a photographic anomaly, they are an exaggeration not visible under unaided viewing.
17 September 2018
Copyright ModelingMadness.com
If you would like your product reviewed fairly and fairly quickly, please contact the editor or see other details in the Note to Contributors.
Back to the Main Page Back to the Review Index Page Back to the Previews Index Page