| KIT #: | ADM 7218 |
| PRICE: | $ |
| DECALS: | Three options |
| REVIEWER: | Johan deWolf |
| NOTES: |
Etched parts: Brengun BRL72056 Canopy: Rob-Taurus 72084 |
| HISTORY |
The story of this glider started shortly after World War Two when Vladimir Stros set out to design an aerobatic glider that would be capable of outperforming any other design. While working for the oldest aircraft factory in Czechoslovakia, Letov, Stros and his team designed a modern glider constructed almost entirely of plywood. The first prototype was ready early 1948, and made its first flight on 25 June that year. A second prototype followed in July. Flight testing showed the machine to have excellent characteristics. The prototypes were shown to the military and at international aviation events where it attracted a lot of attention as it was clearly superior to all other types at that time.
 Production
was approved by the Czech ministry of defence, and it ordered 50 for use in
aeroclubs and the military for training pilots in aerobatics. The production
machines had a few modifications including a slightly taller fin, longer wings
and a longer nose with a bubble canopy. Production started in 1950 and it was
designated LF-107 and for the air force it became type VT-7. Orders from outside
of the Czechoslovak republic also started coming in and the Letov factory
planned a production run of 200-250 examples. However with cold war tensions
setting in, the production of military aircraft was given a higher priority.
After only 70 examples built, production switched to the licence building of
Mig-15’s.
Production
was approved by the Czech ministry of defence, and it ordered 50 for use in
aeroclubs and the military for training pilots in aerobatics. The production
machines had a few modifications including a slightly taller fin, longer wings
and a longer nose with a bubble canopy. Production started in 1950 and it was
designated LF-107 and for the air force it became type VT-7. Orders from outside
of the Czechoslovak republic also started coming in and the Letov factory
planned a production run of 200-250 examples. However with cold war tensions
setting in, the production of military aircraft was given a higher priority.
After only 70 examples built, production switched to the licence building of
Mig-15’s.
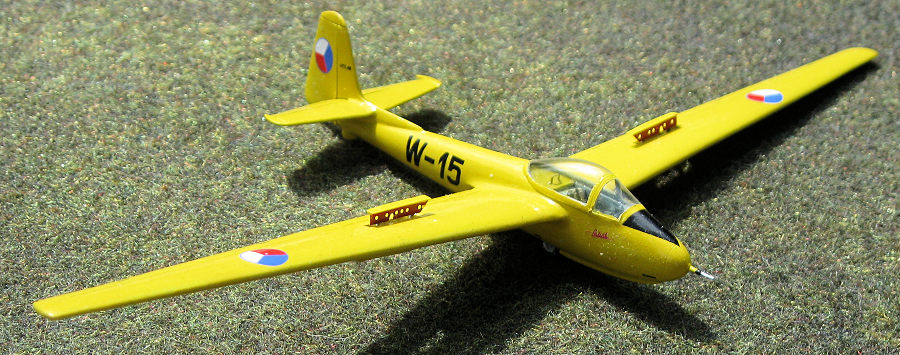
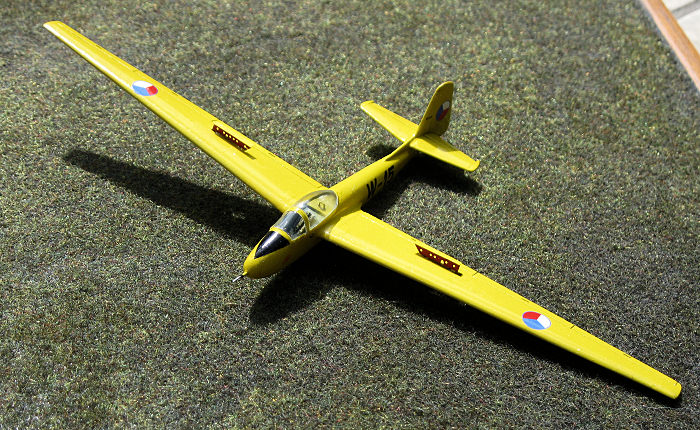
In service the Lunak proved to be quite popular and it was well liked for its excellent handling qualities. By the 1970’s the Czech authorities considered wooden gliders obsolete and most were scrapped. Today only a few remain, but almost all of these are still airworthy and are being flown regularly.
| THE KIT |
 The kit
consist of a single light grey sprue with just 13 parts. A transparent sprue
with the canopy and two cast resin parts. The decal sheet caters for 3 options;
two civil registered machines and one military plane. The single A5 sized
instruction sheet contains a brief history, a sprue diagram and an exploded view
showing where the parts should fit and some basic painting instructions for the
interior. The external paint schemes for the 3 decal options are shown on the
back of the box. In all it looks as this will be a quick and simple kit if built
oob.
The kit
consist of a single light grey sprue with just 13 parts. A transparent sprue
with the canopy and two cast resin parts. The decal sheet caters for 3 options;
two civil registered machines and one military plane. The single A5 sized
instruction sheet contains a brief history, a sprue diagram and an exploded view
showing where the parts should fit and some basic painting instructions for the
interior. The external paint schemes for the 3 decal options are shown on the
back of the box. In all it looks as this will be a quick and simple kit if built
oob.
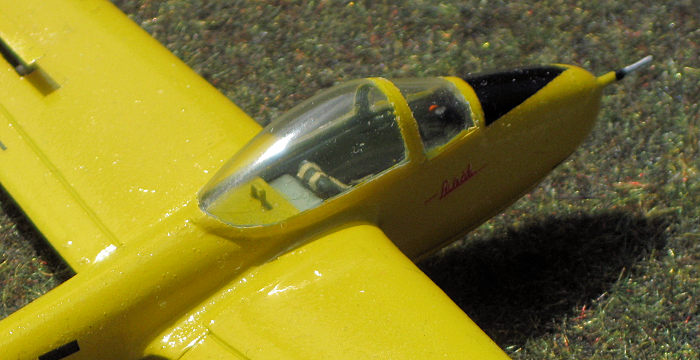
As the kit is pretty basic, I bought the Brengun etch set for this kit. This adds another 46, partly truly tiny, parts mainly for the cockpit and speed brakes. As the kit canopy is not too clear and offers a distorted view of the interior, I also invested on a Rob Taurus vacuform replacement canopy.
| CONSTRUCTION |
 I started
with thinning down the cockpit walls a bit. Then I folded the photo etch floor
and test fitted it between the fuselage halves. Luckily this needed very little
adjustment. I then built up the rest of the etched parts for the cockpit. From
thin plasticard I made some seat cushions. As usual the carpet monster made off
with the smallest parts. I replaced these with flattened copper wire. 14 parts
later and the interior was ready. These etched parts look far more realistic and
accurate then the four plastic parts provided with the kit. Contrary to the kit
instructions I painted most of the interior a light greenish grey. The seat
upholstering received a dark green coat with cream colored seatbelts. Sadly the
Brengun instructions give no colour info at all. I used pictures on the internet
for additional detail colour info. After everything had dried I placed the
cockpit in the fuselage and glued the halves together.
I started
with thinning down the cockpit walls a bit. Then I folded the photo etch floor
and test fitted it between the fuselage halves. Luckily this needed very little
adjustment. I then built up the rest of the etched parts for the cockpit. From
thin plasticard I made some seat cushions. As usual the carpet monster made off
with the smallest parts. I replaced these with flattened copper wire. 14 parts
later and the interior was ready. These etched parts look far more realistic and
accurate then the four plastic parts provided with the kit. Contrary to the kit
instructions I painted most of the interior a light greenish grey. The seat
upholstering received a dark green coat with cream colored seatbelts. Sadly the
Brengun instructions give no colour info at all. I used pictures on the internet
for additional detail colour info. After everything had dried I placed the
cockpit in the fuselage and glued the halves together.
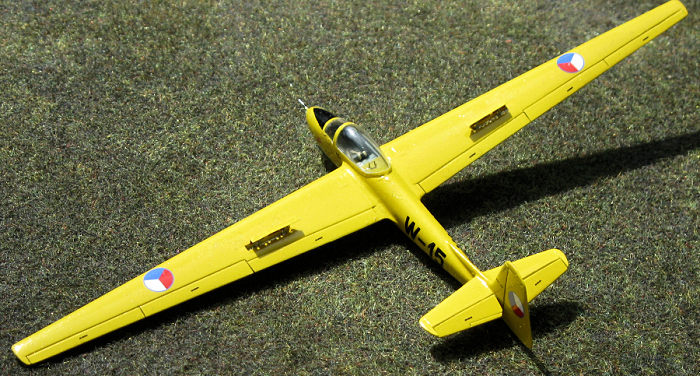
Next I scored the hinge lines on the tail surfaces a bit deeper so I could bend the rudder and elevators out of the neutral position. The fin and rear wings where then glued to the fuselage.
I needed a bit of filler to blend them in seamlessly. I also added the resin tail bumper. Before fitting the wings I cut out the airbrake slots. Note that these are not vertical, but diagonal. The wing to fuselage join needed a bit of filler too to smooth the transition. The vacuform canopy actually fitted better than the kit example and it was the last thing to be added before it was off to the paint booth. Note that the Brengun set includes a rail that should be mounted behind the canopy. I left this off as I found no pictures showing this detail on any of the surviving machines.
| COLORS & MARKINGS |
The factory fresh aircraft where
mostly painted in a very distinct yellow colour that was also used for early
Z-37 crop dusters. Other colour schemes where available, and were seen
especially on exported machines. As I wanted to build a VT-7 of the
Czecho-slovak air force I also needed this yellow colour. At first sight it is
similar to trainer yellow, but less orange and intense. However in certain types
of light is shows an ever so slight greenish hue. I have tried to mix this
colour but without much success. So the kit lingered for a while until a Czech
friend alerted me to the fact that the Czech firm Peewit, known for their
precision masks, also offers a range of paints specifically for Czech aircraft
and vehicles. These paints are mixed from Vallejo acrylics to exactly match
paint samples found on remaining aircraft (parts) in museums and private
collections. They are considered by Czech modellers to be the best match for the
original colours. Sadly the Peewit colour range is made in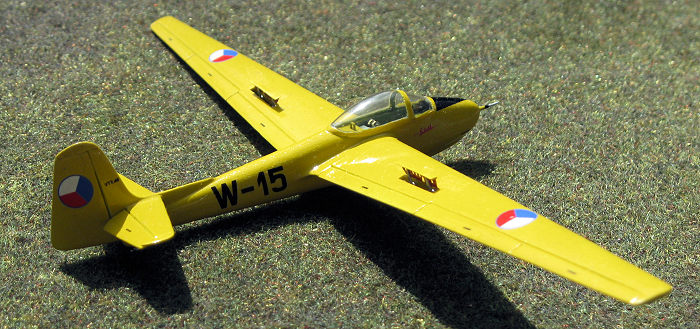 only small batches and availability is patchy. After a persistent search of the
internet I was lucky to find an online retailer that had several colours of the
Peewit range in stock, including the Letov yellow, and these were duly ordered.
After spraying a test sample I concluded that it was indeed a perfect match.
Before applying a base coat of grey primer I had polished the model as much as
possible and then masked the canopy. The primer went on smoothly and all looked
well. After this was left to dry for a few days I applied a first coat of the
yellow. As expected this was not enough to completely cover the primer. So a few
days later a second coat was sprayed on and now the yellow was nicely uniform.
To prepare the surface for decaling a coat of gloss was applied, and this is
when disaster struck. When I checked the model after the gloss coat had dried, I
found out that the model turned into a dust magnet. I have no idea where they
came from but several tiny black fibres had embedded themselves into the gloss
coat. I tried to remove these but they are so thin that I would need to destroy
the paint job to get rid of them. I decided it was better to leave them alone as
they are not that visible from a distance. Next the anti glare panel in front of
the windshield was outlined in masking tape and sprayed on in black. It would
have been nice to have this as a decal.
only small batches and availability is patchy. After a persistent search of the
internet I was lucky to find an online retailer that had several colours of the
Peewit range in stock, including the Letov yellow, and these were duly ordered.
After spraying a test sample I concluded that it was indeed a perfect match.
Before applying a base coat of grey primer I had polished the model as much as
possible and then masked the canopy. The primer went on smoothly and all looked
well. After this was left to dry for a few days I applied a first coat of the
yellow. As expected this was not enough to completely cover the primer. So a few
days later a second coat was sprayed on and now the yellow was nicely uniform.
To prepare the surface for decaling a coat of gloss was applied, and this is
when disaster struck. When I checked the model after the gloss coat had dried, I
found out that the model turned into a dust magnet. I have no idea where they
came from but several tiny black fibres had embedded themselves into the gloss
coat. I tried to remove these but they are so thin that I would need to destroy
the paint job to get rid of them. I decided it was better to leave them alone as
they are not that visible from a distance. Next the anti glare panel in front of
the windshield was outlined in masking tape and sprayed on in black. It would
have been nice to have this as a decal.
The decal set is quite comprehensive for such a small model. Although not mentioned anywhere in the instructions, it also includes some tiny stencils. With the help of online pictures I found where most of these should go, and I guestimated the remaining few. I found the decals are not the easiest to work with. They are nicely thin and adhere well, a bit too well. The tend to stick where they are placed and are hard to move. So make sure the area is nice and wet before putting down a decal. With all the decals in place I applied another coat of gloss to seal them in. This time I put the model in a closed box to dry, to prevent any more dust from embedding itself in the gloss coat.
| FINAL CONSTRUCTION |
The landing gear consists of a single wheel on the centreline. I had to make a support inside the fuselage, as there is nothing to glue it to. With this installed it was the turn of the very fiddly airbrakes. These are built up out of 8 etched parts per wing. Make sure you identify the parts correctly before you install them. The frontal view in the Brengun instructions are the clearest indication on how these should be positioned, the exploded view not so much. Having a few pictures of the real thing definitely helps as well. Note that when the airbrakes are closing, the top one swivels toward the wing tip while at the same time the bottom one swivels towards the fuselage. This is the reason why the slot in the wing is diagonal and not vertical. With the airbrakes in place the only thing left to install was the resin pitot. I managed to break it twice, so needless to say I am not a fan of resin pitots.
| CONCLUSIONS |
Where as in modern gliders the pilot more or less lays on his back, in the Lunak the pilot sits in a more upright position. The kit nicely reflects this. I am happy I used the Brengun etch set as it livens up the otherwise pretty simple and bland kit. It does add a level of complexity though and I would not recommend this set, unless you have some experience with tiny etched parts. To show off all that additional detail in the cockpit the Rob Taurus canopy is a must. If you build the kit oob then the kit canopy is fine as there is nothing much to look at inside. It now sits proudly in a display shelve where it is a welcome colourful break among all the camouflaged models. I never gave gliders much notice, but this kit has given me an appetite for more.
Johan deWolf
29 July 2025 Copyright ModelingMadness.com. All rights reserved. No
reproduction in part or in whole without express permission. If you would like your product reviewed fairly and fairly quickly, please
contact
the editor or see other details in the
Note to
Contributors.