Airfix 1/72 SuperFreighter
|
KIT # |
? |
|
PRICE: |
$? |
|
DECALS: |
Two options |
|
REVIEWER: |
Mark Fordham |
|
NOTES: |
I call her Fuggly |
|
HISTORY |
The
Bristol Freighter was an aircraft conceived by Wing
Commander Taffy Powel who opened a fascinating and innovative chapter in
British aviation. A keen and impatient traveler himself, Powel realized
that by adapting the design of the Bristol
 130 Bombay bomber, he
could fly passengers with their cars from Britain to continental Europe.
The aircraft he conceived was the Bristol Freighter and it allowed
motorists to take their cars abroad from Britain. On the July 7, 1948,
Powel's Silver City airline made the first ever British flight with a
car, from Lympne in Kent to Le Touquet on the northern coast of France.
The service was a resounding success and a larger derivative the Bristol
Superfreighter was soon developed. In turn that was replaced by a British
conversion of some Douglas DC-4 airliners known as the ATL-98 Carvair.
130 Bombay bomber, he
could fly passengers with their cars from Britain to continental Europe.
The aircraft he conceived was the Bristol Freighter and it allowed
motorists to take their cars abroad from Britain. On the July 7, 1948,
Powel's Silver City airline made the first ever British flight with a
car, from Lympne in Kent to Le Touquet on the northern coast of France.
The service was a resounding success and a larger derivative the Bristol
Superfreighter was soon developed. In turn that was replaced by a British
conversion of some Douglas DC-4 airliners known as the ATL-98 Carvair.
As ferries became faster and were supplemented by hovercraft and hydrofoils capable of carrying civilian vehicles, the economics of carrying small numbers of cars by air became uncompetitive so the Carvairs were not replaced and the airlines based around that concept faded from the scene, being taken over by others mainly focused on passenger traffic rather than cargo.
|
THE KIT |
On receiving this beastie from Tel McGrady I was first shocked it’s it size and ugliness, here was a huge model even in 1/72nd scale that only it’s mother could love, packed in the now standard flimsy end opening box , oh how I hate those sort of boxes, at least the plastic is wrapped in a plastic bag so none of the little pieces fall out of the box in transit.
My
first idea was to do the shorter Bristol Freighter 170 that was used by
the RNZAF as their main transport plane until the arrival of the Herky
birds in the late 60’s, but I was unable to find any decent information
on the net showing how to modify
 the tail lower
fuselage and nose to de-stretch the super freighter so I ended up
building this one out of the box only to have a mate from the model club
drop a photocopied article from an old (very) model mag showing how to
convert the Airfix super freighter into a 170 including 1/72nd
scale drawings of the tail and nose a week after I had finished the
Freighter out of the box arrrrrrrrrrrrrgggggggggggggg! Don’t you just
hate it when that happens!
the tail lower
fuselage and nose to de-stretch the super freighter so I ended up
building this one out of the box only to have a mate from the model club
drop a photocopied article from an old (very) model mag showing how to
convert the Airfix super freighter into a 170 including 1/72nd
scale drawings of the tail and nose a week after I had finished the
Freighter out of the box arrrrrrrrrrrrrgggggggggggggg! Don’t you just
hate it when that happens!
Being Airfix you know that all your going to get is a floor and a couple of seats in the cockpit if your lucky, well in this case you also get a nice instrument console and a decal for the control panel, considering how thick the canopy is that’s more than enough detail so the cockpit was assembled and painted dark grey! Moving onto the fuselage one point to watch for here is the plastic is very thick and the weight of the fuselage is quite considerable so it’s important to make sure that your glue joins are strong and wont crack open with the weight of the fuselage and wings, mine did about 15 minutes after painting so you have been warned!
|
CONSTRUCTION |
The nose comes in separate halves with working hinges enabling you to pose it open and drive your matchbox cars into the cavernous highly detailed interior, eerr not, what you get is some naff ramps and a whole lot of nothing behind that, so if you wish to show the Super Freighter with the nose opened be prepared for some serous scratch building. I for one decided that closed doors were easier on my blood pressure.
 With
the fuselage assembled sans the stupid “glass” windows which I added at
the end with Kristol Klear it was time to move onto the huge wings, man
this beast is Big , the wingspan is bigger than the Lancaster in the same
scale so make sure you have tidied your desk of at least once this year,
your going to need more than 4 inches of clear desktop to do this one.
Even though the Fuggly is big she’s simple and goes together in about the
same time as the average 1/72 scale single engine fighter.
With
the fuselage assembled sans the stupid “glass” windows which I added at
the end with Kristol Klear it was time to move onto the huge wings, man
this beast is Big , the wingspan is bigger than the Lancaster in the same
scale so make sure you have tidied your desk of at least once this year,
your going to need more than 4 inches of clear desktop to do this one.
Even though the Fuggly is big she’s simple and goes together in about the
same time as the average 1/72 scale single engine fighter.
 Fit
of the major components is pretty good considering the age of the
mouldings now, a little bit of filler was needed on the upper fuselage
and the fuselage to wing join and that’s was about it. The separate tail
fin and rudder fitted well as did the tail planes and engines, although
the moulding seam that runs around the undercarriage pylons was a bit of
a sod to clean up.
Fit
of the major components is pretty good considering the age of the
mouldings now, a little bit of filler was needed on the upper fuselage
and the fuselage to wing join and that’s was about it. The separate tail
fin and rudder fitted well as did the tail planes and engines, although
the moulding seam that runs around the undercarriage pylons was a bit of
a sod to clean up.
The canopy although thick and cloudy fits rather well, just needing a smidge of filler along the back of the canopy and a light sand to flair it into the fuselage. Some nasty sink marks around the edge of the cockpit and along the fuselage where the pins are were filled at this time and then the entire plane was given a good rub over with wet-n-dry to remove the 41 962 rivets.
Once
happy with the finish I went back over the airframe and re scribed the
panel lines, easy to do on this slab sided fuggly.
The engine pods were assembled and added to the wings after
scratchbuilding the top air filters on the account both of them went ping
zzzzzzzzzzzzzzzz clink, somewhere in the living room, the shape of the
original ones are round than the square one that I ended with but I
couldn’t find anything that was the right shape/cross section in the
spares box and had to resort to some cut down DC3 ones.
|
COLORS & MARKINGS |
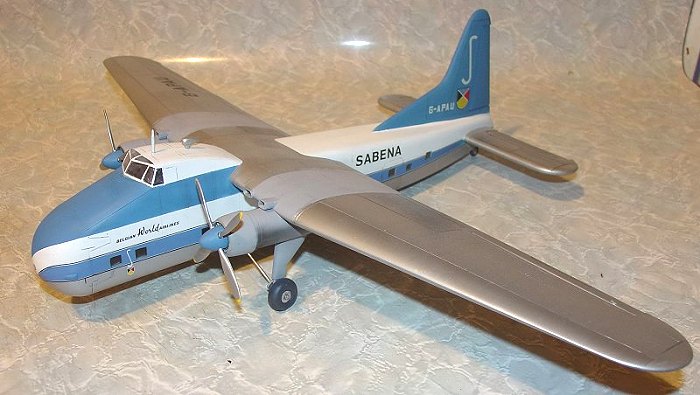
 Well being a
specialised aircraft built in small number limits the choice of finishes
so I had to flip a coin on the Sabena and Air France version supplied in
the decals, Sabena won after 4 re flips. With her white fuselage, natural
metal wings and blue rudder and cheat lines she most defiantly was the
smarter of the two fugglys.
Well being a
specialised aircraft built in small number limits the choice of finishes
so I had to flip a coin on the Sabena and Air France version supplied in
the decals, Sabena won after 4 re flips. With her white fuselage, natural
metal wings and blue rudder and cheat lines she most defiantly was the
smarter of the two fugglys.
First job was to paint all the natural metal areas with a Rattle can silver and left to dry, various panels were picked out and sprayed with Alclad II, Humbrol silver and Tamiya Chrome silver to add some panel variation, the engines and part of the wings are light grey so these were masked off and painted.
With
the natural metal done and masked off the White upper fuselage was the
sprayed next, a thick coat of matt white was sprayed on first and blocked
back with 1200 wet and dry before three thin coats were needed to get a
decent coverage of white. Please pay particular attention to the sweep on
 the nose as it’s very
easy to get it wrong and have to go back and re-mask the silver or white.
the nose as it’s very
easy to get it wrong and have to go back and re-mask the silver or white.
The big expanse of rudder is supposed to be the same shade of blue as the blue cheat lines on the decals, the closest match if not perfect match to this colour is Humbrol 109 blue which was sprayed on the rudder and used for touching up any ripped decals.
Talking of decals I sometimes wonder why people have such scathing remarks about Airfix decals, sure nine times out of ten they are out of register but when they are in register like theses ones they are as nice as any of the “big” name brands to apply, in fact the decals for the super freighter rate as some of the best that I have used in a long time, the one gripe I had with them was the fact that the window cut outs didn’t quite align with the decal holes but that might have been my fault by over stretching them on application and anyhow the unpainted bits can be touched up with the Humbrol paint after the decals have dried and have been trimmed around the windows, 9/10 for the Airfix decals.
|
CONCLUSIONS |
Big, ugly and simple sums over this monstrosity from Airfix, Why they released the highly specialised Super freighter that was built in very limited numbers rather than the common as dirt Freighter is a bit of a mystery, still with the right references or one of the vacuformed and resin conversion sets that were available and a bit of work it is possible to make a 170 Freighter out of this kit, I would have loved a 170 for my RNZAF collection and even now every time I look at the fuggly pinned to the wall I have to overcome the urge to rip it down and tear off the nose. Sigh, maybe one day I will do it.
|
REFERENCES |
Airfix painting guides
Google Bristol Freighter and Bristol Superfreighter
Mark FordhamJuly 2004
If you would like your product reviewed fairly and quickly, please contact me or see other details in the Note to Contributors.