Minicraft 1/200 HK-1 'Spruce Goose'
| KIT #: | 11607 |
| PRICE: | $25.00 MSRP |
| DECALS: | One option |
| REVIEWER: | Jarod Erickson |
| NOTES: | Perfect for beginner, novice, and master builders alike. |
| HISTORY |
The HK-1/H-4 Hercules was conceived as a
solution to the growing threat from German U-boats.
Allied ships were being sunk at an alarming rate, which motivated
shipbuilder Henry Kaiser to propose the idea of a flying boat.
The idea was approved by Congress and Kaiser teamed up with aircraft
designer Howard Hughes to build the plane.
Wartime restrictions placed limits on the use of metal, so the Hercules
was built primarily of wood. (Hence the name Spruce Goose)
Development and construction dragged on,
frustrating Kaiser, who laid part of the blame to the limitations on metal and
partly to Hughes insistence on “perfection.”
Eventually, Kaiser pulled out of the project and Hughes continued on
alone, changing the aircraft designation to H-4 (HK-1 designated the
Hughes-Kaiser collaboration).
Work and construction on the Hercules
proceeded so slowly that the plane wasn’t even finished by the time WW2 was
over.
Hughes was charged with
misappropriating government funds and called to testify before a Senate hearing.
On
“The Hercules was a monumental
undertaking.
It is over five stories
tall with a wingspan longer than a football field.
That’s more than a city block.
Now I put the sweat of my life into this thing.
I have my reputation all rolled up in it and I have stated several times
that if the Hercules fails to fly, I will probably leave this country and never
come back.
And I mean it!”
On
Hughes was cleared of all charges and
the Hercules was placed in an air-conditioned hangar, where it was kept in
flight-ready condition until Hughes’ death in 1976.
The plane was purchased by the
 Some stats on the Hercules
Length: 218 feet 8in. (66.65 meters)
Wingspan: 319 feet 11in. (97.54 meters)
Powerplant: Eight Pratt & Whitney R-4360
Wasp Major Radial Engines
Range: 3,000 miles
Cruise speed: 220 mph(353.98 km/h)
Propellers: four-bladed
Propeller diameter: 17 feet 2 in. (5.23
meters)
(specifications obtained from Wikipedia
Encyclopedia)
| THE KIT |
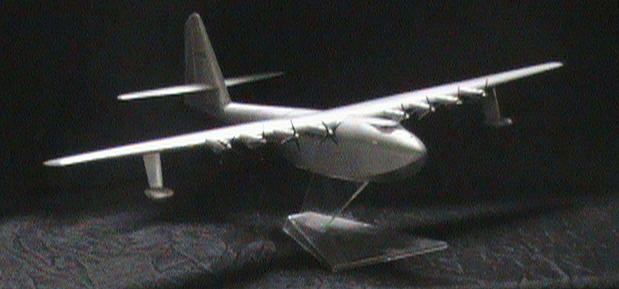
The Hercules is in my
opinion a fascinating plane.
For
the longest time it was the biggest airplane in the world, and even today it has
the longest wingspan of any airplane in the world.
Also, the fact that there is only one example in the entire world makes
it truly unique.
The kit has 39 parts
molded in a light gray, heavy duty (and I do mean HEAVY-DUTY) styrene; the two
fuselage halves,
two sprues
containing four wing sections, eight cowlings, eight propellers, eight air
intake scoops, four tailplane sections, and a clear sprue with the display stand
pieces and the canopy.
One sheet of
decals with markings for the single plane (naturally, of course!) is provided.
There really aren’t any panel lines, engraved or otherwise since the
Hercules was covered with sheets of laminated wood sealed with resinous glues,
but what is there is well done.
If I have one gripe
about this kit it’s the fact that it wasn’t molded in 1/144 scale.
This alone would have opened up so many doors for diorama possibilities
as there are several tanks, figures and even other airplanes readily available
in 1/144 scale.
Demand of this kit
must not be very high (I don’t think it is, anyways) but it would be nice to see
some aftermarket resin or photoetch detail sets or even some
aftermarket details for some hypothetical overseas transport markings.
Oh, well.
| CONSTRUCTION |
I had grand plans for this kit when I
started; scratchbuilt R-4360 engines, a full flight deck and a diorama depicting
the first and only flight of the Hercules, inspired by the box art.
Well, after I realized just how SMALL
these things would be, I decided against them, but I still haven’t entirely
thrown out the idea of a diorama.
I started by washing the parts in warm
water and dish detergent (just like washing dishes!) and letting them air-dry
under a fan.
Once dry, I wiped them
all down with distilled white vinegar.
This etches the plastic so that the paint and decals adhere better.
I then did a mock up assembly using rubber bands and small clamps to get
an idea of the final product.
Not
really necessary, but it gives you something to look forward to
 The cowlings have a layer of plastic
over the front of them with a hole in the center that the propeller shaft fits
into, where the keeper (my name for the little rings or tubes that holds the
propeller in place so that it’ll stay in place when it spins) fits onto the
shaft from the backside.
To remove
this I used a pin vise and progressively larger drill bits(.030” on up) to get
the open diameter I wanted.
The cowlings have a layer of plastic
over the front of them with a hole in the center that the propeller shaft fits
into, where the keeper (my name for the little rings or tubes that holds the
propeller in place so that it’ll stay in place when it spins) fits onto the
shaft from the backside.
To remove
this I used a pin vise and progressively larger drill bits(.030” on up) to get
the open diameter I wanted.
Next came the air intake scoops.
For some reason I thought they fit flush against the engine nacelles and
so I gouged a U shape in one to make it look hollow.
When I test-fitted it on the nacelle I saw how it actually went on and
cursed my stupidity.
So I moved on,
resolving to either scratchbuild a new one or see about replacement parts.
Next up came the canopy.
Now,
this is one teeny-tiny, itty-bitty little window we’re talking about here; I
mean, a real greenhouse-canopy nightmare.
Somehow, I got the brilliant idea to paint the entire thing silver and
scratch the paint off the panes with a toothpick when it dried.
Yeah, I know, I still don’t know where I came up with that one.
The toothpick didn’t work too well so I moved onto my modelling knife ( I
can hear the groans out there now!) which just scratched the heck out of it.
On top of all this, two of my propellers were broken. (In Minicraft’s
defense, I think it was a shipping error rather than the quality of the
plastic-remember I said it was heavy-duty)
Discouraged but not defeated, I went onto Minicraft’s website and saw
that they offered replacement parts so I went ahead and ordered two new canopies
(foresight in action!), two new propellers, and eight new intakes.
A week or so later they were in my hand and I was back in business!
Moving on, I decided to work on the
fuselage.
There is a row of
portholes engraved on each side of the fuselage, so I went ahead and drilled
these out with my hobby knife.
I
then glued both horizontal stabilizers together and glued them to the fuselage
halves.
The wings come in four parts, which make
up two halves just like the real airplane.
They interlock in the center, which adds rigidity and a solid feel.
As for the intakes, I found that by
drilling a hole in the center of the intake using a .020" drill bit and angling
it left and right makes a convincing hollow look.
Remember how I said I only gouged out one?
Luckily I had spares if I screwed one up (and I did screw several up) and
eventually I had eight good intakes.
| COLORS & MARKINGS |
This is one of the
easiest paint schemes ever; bright, shiny silver.
Because of the simplicity of this paint scheme, the model can be broken
down into two main segments; the fuselage and the wings.
I used a big can of Colorplace's Bright Silver spray paint (the cheap
Wal-Mart brand spray paint) for the whole plane (well, almost the whole plane).
I kept the fuselage halves separate till I got them painted.
 Since the fuselage is
already a light gray I didn't use any primer and went ahead and sprayed the
bright silver.
For some reason I
panicked and sprayed on a real heavy coat, obscuring the panel lines on the tail
of the right fuselage half.
Once
again cursing my stupidity, I tried to brush the paint smooth but left huge
brush marks. Finally, I took the biggest brush I had, some thinner, and some
paper towels and proceeded to clean up the paint.
I was lucky the paint was still wet so most of it came off.
I let the paint dry for 24 hours and sprayed the right fuselage half
again.
It still looked slightly
hideous, but after the previous day's fiasco I let it go.
Since the fuselage is
already a light gray I didn't use any primer and went ahead and sprayed the
bright silver.
For some reason I
panicked and sprayed on a real heavy coat, obscuring the panel lines on the tail
of the right fuselage half.
Once
again cursing my stupidity, I tried to brush the paint smooth but left huge
brush marks. Finally, I took the biggest brush I had, some thinner, and some
paper towels and proceeded to clean up the paint.
I was lucky the paint was still wet so most of it came off.
I let the paint dry for 24 hours and sprayed the right fuselage half
again.
It still looked slightly
hideous, but after the previous day's fiasco I let it go.
Next up was the wings.
I assembled the entire wing section (cowling, intakes, and wing floats)
leaving off the propellers and the keepers.
I masked off where the wings join the fuselage and sprayed away.
Because of the large size of the wings (19 inches!) I sprayed one side,
let it dry for 24 hours, then flipped it over, sprayed the other side, and let
it dry for another 24 hours.
All in
all, I think the wing section came out the best.
I painted the
propellers with Testors gloss black(#1147) spray paint and let that dry for 24
hours.
I then brush painted the
spinners with Testors silver (#1146) and the blade tips with Floquil Railbox
Yellow (#F110033).
| FINAL CONSTRUCTION |
Remember how I said I
drilled out the fronts of the cowlings?
In doing so, I also removed the only means of support for the propellers,
right?
WRONG!
The keepers (the little rings or tubes that fit onto the propeller shaft
and keep the propeller in place) were long tubes with a bulge at the end.
All I did was sand away the bulge to get a flat surface and glue them in
the center of the
 wing nacelles.
Then all you do is cement the cowling over the nacelle, add a drop of cement to
the tip of the propellor shaft, slide it into the keeper, and presto!
The end result is a more realistic appearance.
wing nacelles.
Then all you do is cement the cowling over the nacelle, add a drop of cement to
the tip of the propellor shaft, slide it into the keeper, and presto!
The end result is a more realistic appearance.
Minicraft suggests
using an old "D" cell battery to add balance to the plane once it's fully
assembled.
I didn't like the idea
of using batteries (leaking acid crosses the mind) so instead I used some
various good-sized hexnuts that I found here and there around the house.
I used Elmer's white glue to fasten these down along the inside length of
the fuselage.
I then glued the
wings to the fuselage and the basic construction was done.
The parts fit seamlessly together.
As for painting the canopy you have two
options, either cut tiny little masks for the tiny little panes or try brushing
the framework by hand.
I decided to
cut the masks.
I used blue painter's
masking tape for this.
It's actually
not that hard, just tedious.
Once I
had the masks burnished down I sprayed the canopy with the bright silver.
After removing the masks and wiping the canopy down with alcohol (I
didn't know about Future at the time, so I didn't use it) it came out looking
pretty good.
I used the kit's
decals, since there aren't any others available.
They were strong but stubborn, and there are two long lines that stretch
along the upper length of the wingspan that ripped so frequently that I just
left them off for good.
Fortunately, the other decals which are mostly FAA registration numbers went
down fine with a little coaxing and a lot of patience.
All that was left was the stand and the Hercules took to the air once again!!
| CONCLUSIONS |
This kit just might be
one of those models that absolutely anybody could build.
It's perfect for a first-timer glue project, or as the starting point for
a super-detailed masterpiece.
It
could even be a weekend slammer project, if you needed a break from that
super-detailed 1/72 Gato submarine or 1/35 Tiger I.
It makes me wonder how
different the war would have been if the Hercules had entered full-scale
production in time.
The U-boat wolf
packs might not have enjoyed as much success as they did.
We might never have had
Just one of those
things that makes you think.
| REFERENCES |
McDonald, John J.
Howard Hughes and the Spruce Goose
The Aviator, Miramax
Films 2004
Nicolau, Stephane Flying Boats and Seaplanes
May 2009
Copyright ModelingMadness.com. All rights reserved.
If you would like your product reviewed fairly and fairly quickly, please contact the editor or see other details in the Note to Contributors.
Back to the Review Index Page 2021