| KIT #: | PA 225 |
| PRICE: | @$10 or so 'used' |
| DECALS: | Three options |
| REVIEWER: | David Cummings |
| NOTES: | Red Pegasus decals for Cobra II, CMK Resin #G-480 12 stack exhausts, SBS P-39Q 4-blade prop and spinner. |
| HISTORY |
The National Air Races went on hiatus during
the WWII years as aviation turned its attention to more pressing matters. They
resumed back in Cleveland following the war in 1946. When WW II ended large
numbers of warplanes were declared surplus and could be bought cheap.
Ex-military pilots and mechanics
 formed race teams and modified the war birds
for speed by stripping them down, streamlining, and souping the engines. These
were generally wildcat operations operated on shoestring budgets. Three Bell
Aircraft test pilots, Tex Johnston, Jack Woolams, and Slick Goodlin went in
together to form Skylanes Unlimited race team. Bell sold them two new P-39Qs for
$1 each. Being Bell employees they also had use of Bell technical support and
hanger space, a distinct advantage. The two Airacobras were stripped of all
non-essential equipment. The Allison V-1710-85s were replaced with 2,000 hp
V-1710-135s that powered the larger P-63 Kingcobra. This transformed the little
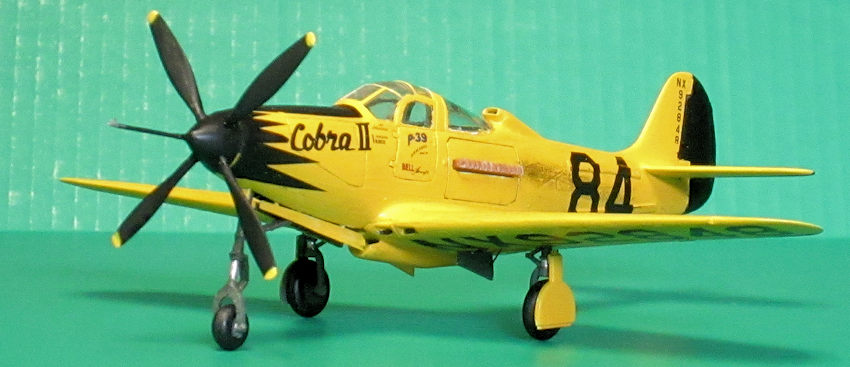
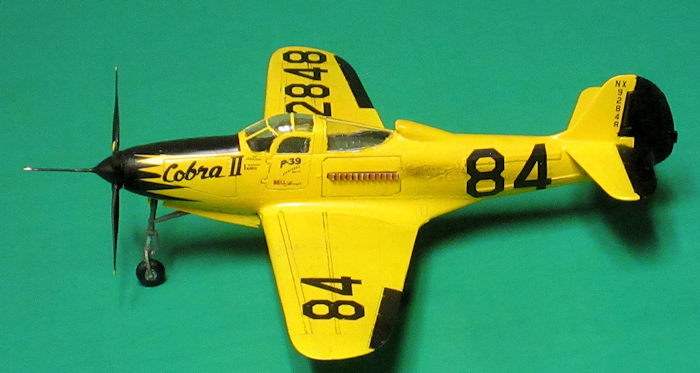
light weight P-39s, named Cobra I and Cobra II, into real hot rods. During
testing Cobra I crashed killing Woolams. Tex Johnston flying Cobra II won the
1946 Thompson Trophy with an average speed of 373.9 mph. He never trailed.
formed race teams and modified the war birds
for speed by stripping them down, streamlining, and souping the engines. These
were generally wildcat operations operated on shoestring budgets. Three Bell
Aircraft test pilots, Tex Johnston, Jack Woolams, and Slick Goodlin went in
together to form Skylanes Unlimited race team. Bell sold them two new P-39Qs for
$1 each. Being Bell employees they also had use of Bell technical support and
hanger space, a distinct advantage. The two Airacobras were stripped of all
non-essential equipment. The Allison V-1710-85s were replaced with 2,000 hp
V-1710-135s that powered the larger P-63 Kingcobra. This transformed the little
light weight P-39s, named Cobra I and Cobra II, into real hot rods. During
testing Cobra I crashed killing Woolams. Tex Johnston flying Cobra II won the
1946 Thompson Trophy with an average speed of 373.9 mph. He never trailed.
| THE KIT |
The Monogram P-39 has
been around since the late 60s and continued in production by Revell. It has
been superseded by better detailed, more modern kits such as those by Hasegawa
and Eduard. Hasegawa and
 Accurate Miniatures have both kitted their P-39s as the
Cobra racers. In them you get the belly radiator, decals, and 4-blade props (the
props are wrong in both), but you still cannot build an accurate racer from
these kits without modifications. So in light of that I decided to just use a
Monogram kit for the basis of this project because….it’s cheap. Despite the
raised panel lines and clunky landing gear the old Monogram kit still builds
well. They can be had for a song nowadays which offsets the purchase of the
aftermarket items listed above. The kit includes a 12 stack exhaust but the
pipes are round and kind of twinned and just don’t look the part so I opted to
replace them with the CMK set. Monogram Kit instructions are excellent.
Accurate Miniatures have both kitted their P-39s as the
Cobra racers. In them you get the belly radiator, decals, and 4-blade props (the
props are wrong in both), but you still cannot build an accurate racer from
these kits without modifications. So in light of that I decided to just use a
Monogram kit for the basis of this project because….it’s cheap. Despite the
raised panel lines and clunky landing gear the old Monogram kit still builds
well. They can be had for a song nowadays which offsets the purchase of the
aftermarket items listed above. The kit includes a 12 stack exhaust but the
pipes are round and kind of twinned and just don’t look the part so I opted to
replace them with the CMK set. Monogram Kit instructions are excellent.
| CONSTRUCTION |
The cockpit is built
on a chassis along with the armament bay and also serves as the roof of the nose
gear well. Obviously no guns needed so I glued a fishing weight to the chassis
so the plane will stand on its legs. Interior was painted an on-hand dark green
to represent Bell green. The .50 cal receiver detail and sight bracket were
removed from the instrument panel which was painted black. Instruments were
picked out by dry brushing with white then a drop of super glue on each dial for
the glass. The seat was painted aluminum and the molded on seat belts in white.
I didn’t do a lot of detailing because I planned to have the doors shut on this
one. Normal assembly sequence has you attach the exhausts from the inside but I
didn’t want to have to mask these for painting so decided to glue them on later
from the outside. The resin replacements are for the Hasegawa kit so they don’t
fit anyway . To facilitate this I glued a piece of scrap over the mounting points
inside the left fuselage half to back stop the hole. The engine block back stops
the right fuselage half.
. To facilitate this I glued a piece of scrap over the mounting points
inside the left fuselage half to back stop the hole. The engine block back stops
the right fuselage half.
I cut the nose gear strut at the oleo and CA’d them back together with 1/16 (1.57mm) aluminum tube cut ¼” long. I drilled a small hole with a pin vise in the cut ends of the strut and glued a small piece of plastic rod into the hollow of the tubing. These fit into the drilled holes to assist in alignment and add overall strength. The scissor link was pieced to fit. Cobra II had the nose gear oleo pumped up to the max for more ground clearance for a larger prop. Photos show the scissor link opened out wide as it will go and the aircraft has a distinct tail down crouch. The nose gear well and strut is painted Bell dark green. Going with the instructions the nose strut and gear doors are attached and the interior chassis glued to the right fuselage half. There are positive locating pins to position everything. The fuselage halves were glued together and the fit was excellent. Given a choice opt for an older Monogram made kit if you can find one, fit is better than the newer offerings. The fuselage glue seam needed very little filler. The gun bay cover, cockpit door, and engine covers were glued in place and again fit is good. The door windows were cemented and masked. The wing guns and pitot were glued in place to help seal the holes and the wing halves glued together. Then the gun barrels were cut off flush and filler applied to seal the gun ports. The wing was attached and again excellent fit with no gaps except that pesky trailing edge to belly seam that needed filling.
 With the basic
airframe complete it is now time to begin converting it to a racer. There is an
auxiliary radiator under the belly. Two bomb halves from the big box of stuff
were cut, ground to shape, fitted together, and gaps puttied up. The carburetor
air inlet scoop was extended over the rear of the canopy (you can see from the
picture that sometimes the old
With the basic
airframe complete it is now time to begin converting it to a racer. There is an
auxiliary radiator under the belly. Two bomb halves from the big box of stuff
were cut, ground to shape, fitted together, and gaps puttied up. The carburetor
air inlet scoop was extended over the rear of the canopy (you can see from the
picture that sometimes the old big box of junk just comes through for ya). In
light of the Cobra I crash four 3” X 6 foot stiffeners were attached to the rear
fuselage. I fabricated these from card stock attached with CA. The nose gun
troughs were filled and sanded smooth. All fabric covered control surface detail
has to be sanded off as these were skinned with aluminum. Then the tail planes
were attached. All running light detail was sanded off. Card stock was cut to
make the extended ground adjustable trim tabs for rudder and elevator. The
racers had the flaps sealed which is another plus for using the Monogram kit. It
has no recessed flap hinge line to eliminate (see, sometimes raised panel lines
are good). Cobra II had a cable running across the inside of the windshield to
reinforce it. I used a nylon broom straw for this. The canopy was masked with
Tamiya tape and the framing cut out with a surgical blade. It was then glued in
place.
big box of junk just comes through for ya). In
light of the Cobra I crash four 3” X 6 foot stiffeners were attached to the rear
fuselage. I fabricated these from card stock attached with CA. The nose gun
troughs were filled and sanded smooth. All fabric covered control surface detail
has to be sanded off as these were skinned with aluminum. Then the tail planes
were attached. All running light detail was sanded off. Card stock was cut to
make the extended ground adjustable trim tabs for rudder and elevator. The
racers had the flaps sealed which is another plus for using the Monogram kit. It
has no recessed flap hinge line to eliminate (see, sometimes raised panel lines
are good). Cobra II had a cable running across the inside of the windshield to
reinforce it. I used a nylon broom straw for this. The canopy was masked with
Tamiya tape and the framing cut out with a surgical blade. It was then glued in
place.
| COLORS & MARKINGS |
When satisfied all
the seams and gaps had been dealt with I sprayed all the control surfaces flat
black because it’s easier to use than gloss. Red Pegasus decals include a black
anti-glare panel so I didn’t have to deal with masking that. After curing I
masked the black control surfaces and plugged the nose gear well. The airframe
and landing gear doors were given a base coat of Testor’s flat white enamel.
After letting that c ure a couple days I sprayed three coats of Testor’s Blue
Angels Yellow acrylic. Personally I think this color looks more like chrome
yellow than their chrome yellow does. Takes a lot of yellow to get a good finish
so I let it cure for three days. The main gear wells and struts were brush
painted my close enough equivalent Bell interior green.
ure a couple days I sprayed three coats of Testor’s Blue
Angels Yellow acrylic. Personally I think this color looks more like chrome
yellow than their chrome yellow does. Takes a lot of yellow to get a good finish
so I let it cure for three days. The main gear wells and struts were brush
painted my close enough equivalent Bell interior green.
Red Pegasus Decals
include a good instruction sheet with 3-view drawings for decal placement. They
also list all of the modifications made to the P-39 that transform it into the
Cobra racer. The decals are Alps printed so they are not independent of the
carrier film. This requires close trimming of each marking. They are thin and
conform to panel lines very well. They are a bit fragile, keep them wet while
working them and get them in place quickly. I found that chasing small wrinkles
did more harm than good. They react very well to decal solvents and minor
wrinkles just melted away. They look great and are the closest t o painted-on
markings I have used. A coat of Testor’s Gloss lacquer sealed everything and
gives a high gloss finish. Black pastel was smeared on for exhaust stains and a
thinned black acrylic wash was applied to panel lines for accent. Then a final
clear coat of AV Satin Varnish to give it a more realistic semi-gloss look. When
dry the canopy masking was removed. Had a problem here, my windshield
reinforcing cable had come loose during handling. Oh well, sure as heck not
going to rip the canopy back off at this stage.
o painted-on
markings I have used. A coat of Testor’s Gloss lacquer sealed everything and
gives a high gloss finish. Black pastel was smeared on for exhaust stains and a
thinned black acrylic wash was applied to panel lines for accent. Then a final
clear coat of AV Satin Varnish to give it a more realistic semi-gloss look. When
dry the canopy masking was removed. Had a problem here, my windshield
reinforcing cable had come loose during handling. Oh well, sure as heck not
going to rip the canopy back off at this stage.
| FINAL CONSTRUCTION |
 The CMK resin
exhausts were trimmed to fit, painted, and glued in place. Some fiddling
required due to the non-standard parts but it was worth it. The main gear struts
and kit wheels were assembled. A plastic rod pitot probe was glued to the SBS
spinner in place of the cannon. Cobra II’s spinner is pointed. To accomplish
this I dripped some CA down the pitot shaft to seal the cannon hole. This seemed
to work OK so I repeated the process of dribbling CA to build up a point. This
was repeated innumerable times, a little bit at a time. Gravity was my friend
here as it built itself up in the correct shape requiring only a slight bit of
finger shaping (my finger tips are still sealed, hope no one needs a print).
Some final sanding and the spinner painted black. I used the SBS prop blades but
they are not correct. The Cobra racers used experimental Aeroproducts props
being evaluated by Bell and there are just no aftermarket replicas I am aware
of. I did square the tips up some to better look the part.
The CMK resin
exhausts were trimmed to fit, painted, and glued in place. Some fiddling
required due to the non-standard parts but it was worth it. The main gear struts
and kit wheels were assembled. A plastic rod pitot probe was glued to the SBS
spinner in place of the cannon. Cobra II’s spinner is pointed. To accomplish
this I dripped some CA down the pitot shaft to seal the cannon hole. This seemed
to work OK so I repeated the process of dribbling CA to build up a point. This
was repeated innumerable times, a little bit at a time. Gravity was my friend
here as it built itself up in the correct shape requiring only a slight bit of
finger shaping (my finger tips are still sealed, hope no one needs a print).
Some final sanding and the spinner painted black. I used the SBS prop blades but
they are not correct. The Cobra racers used experimental Aeroproducts props
being evaluated by Bell and there are just no aftermarket replicas I am aware
of. I did square the tips up some to better look the part.
| CONCLUSIONS |
I have always thought the Cobra II was one of, if not THE, coolest looking airplane ever. I enjoyed the project. The modifications were challenging but nothing anyone with moderate modeling skills and adequate tools could not handle. The Hasegawa Cobra kit may offer some advantages, I don’t know, but I really like the way mine turned out.
| REFERENCES |
Red Pegasus Decals instruction sheet,
|
|
21 November 2016
Copyright ModelingMadness.com. If you would like your product reviewed fairly and fairly quickly, please
contact
the editor or see other details in the
Note to
Contributors. Back to the Main Page
Back to the Review
Index Page
Back to the Previews Index Page