Glencoe 1/81 Curtiss T-32 Condor II
|
KIT: |
Glencoe 1/81 Curtiss T-32 Condor II |
|
KIT # |
6101 |
|
PRICE: |
$9.95 |
|
DECALS: |
One aircraft |
|
REVIEW & |
|
|
NOTES: |
Repop of an old ITC kit |
"AN ADVENTURE INTO MODELING HADES"
"THE RMS EXPRESS"
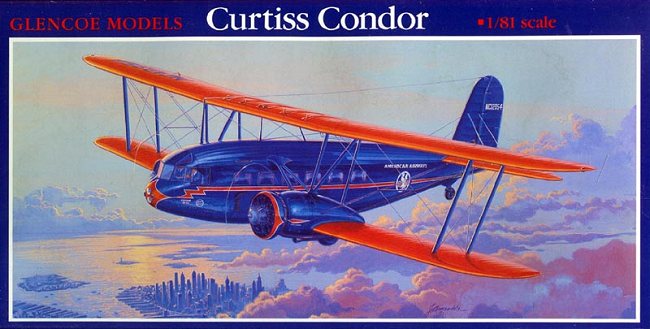
CURTISS T-32 "CONDOR II"
AMERICAN AIRWAYS
1934-37
|
HISTORY |
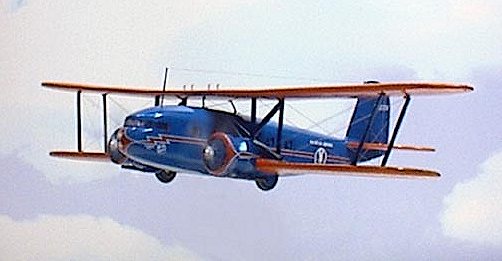
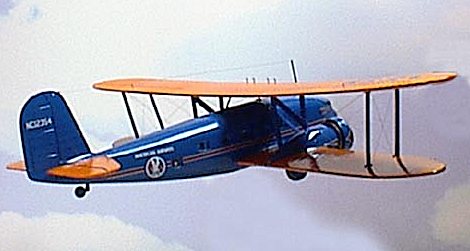
The Curtiss T-32 Condor II, also known as the Curtiss-Wright CW-4, biplane airliner was even more of an anachronism than its namesake, the Condor 18 of four years earlier. Its only concession was the landing gear, its main units retracting into the engine nacelles. A two-bay biplane of mixed construction, with a wire braced single fin and rudder assembly, the T-32 prototype made its maiden flight on January 30, 1933. Layout for most of the production batch of 21 aircraft that followed was as a luxury 12-passenger night sleeper airliner, and a number of T-32s flew with Eastern Air Transport and American Airways during the following three years of regular night service.
Two modified T-32s were commission by the US Army as transports and operated until 1938 under the designation YC-30. One Condor was finished with extra fuel tanks as a long-range version for use by the 1933 Byrd Antarctic Expedition. It was equipped with twin-floats, skis, or a fixed landing gear.
Ten T-32 were ultimately converted to AT-32 standards and these were designated T-32C. Four T-32s operated under British civil registrations. At the outbreak of World War II these were impressed into the RAF and flown as light transports. Swissair also operated one AT-32. It was the first airliner in Europe to have a Stewardess, but sadly met a tragic end shortly after beginning service in March of 1934, when it crashed killing all on board.
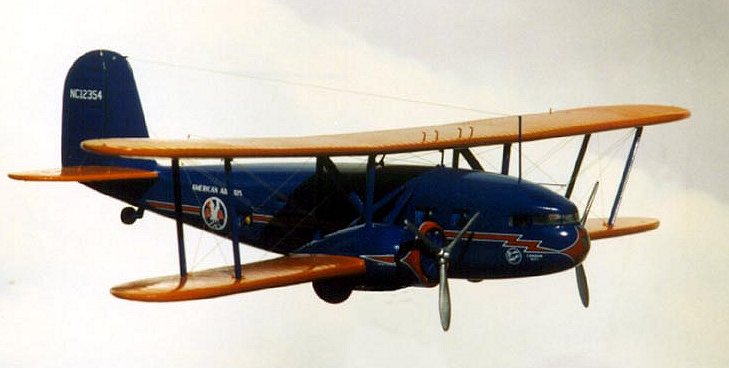
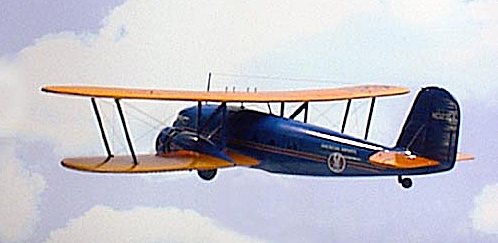
Many other variants of the T-32 existed. The AT-32 differed from the T-32 in having variable-pitch propellers and full NACA cowling, in lieu to the T-32's Townsend rings. The AT-32D was developed as a 15-passenger day airliner. Two AT-32E aircraft were built for the US Navy and operated under the designation R4C-1 by the Navy and Marines as 12-passenger deluxe transports. Both were used by the US Antarctic Survey and were finally forced to be abandoned in the Antarctic in 1941. Eight examples of the BT-32 were finish as a bomber variant and equipped to have five .303 caliber machine guns, two in manual operated turrets in the nose and above the rear fuselage, two in lateral fuselage ports and one in a ventral port. The prototype was sold to China and three aircraft were re-equipped with floats and sold to Colombia, with four more land variants sold to Peru. Finally there was the CT-32, which was built as a military cargo version with a large-loading door in the starboard rear fuselage, all three being sold to Argentina. I built my kit as the colorful American Airways T-32 airliner. Now let's discover the adventure that began, when I received this kit.
|
THE KIT |
 Upon opening
the kit after receiving it, I notice that several parts were broken off the
sprue very harshly and three parts, port exhaust ring, one of the nacelle to
fuselage struts, and one of the exhausts were missing. After contacting Nick at
GLENCOE, not only did I receive the missing parts and the damaged ones, but also
I got an entire new kit to boot, plus GLENCOE 's Martin MB-2! Now that's service
that makes me grin "like a mule eatin' briars". I'll try not to slam
this Condor kit too much Nick, as after all, the original molds did come out of
the Stone Age of injected plastic kits.
Upon opening
the kit after receiving it, I notice that several parts were broken off the
sprue very harshly and three parts, port exhaust ring, one of the nacelle to
fuselage struts, and one of the exhausts were missing. After contacting Nick at
GLENCOE, not only did I receive the missing parts and the damaged ones, but also
I got an entire new kit to boot, plus GLENCOE 's Martin MB-2! Now that's service
that makes me grin "like a mule eatin' briars". I'll try not to slam
this Condor kit too much Nick, as after all, the original molds did come out of
the Stone Age of injected plastic kits.
The GLENCOE kit gives one Scale-Master decal markings to build five variants: the original Byrd Antarctic Expedition YC-30, which can be equipped with floats or fixed landing gear (sorry, no skis), the American Airways T-32 12-passenger airliner, an International Air Freight T-32 (British civil variant), the ill fated Swissair AT-32 airliner, or as an Argentine Navy Cargo CT-32 (one will have to fill the windows and scribe a cargo door on the starboard fuselage half) variant. Parts are provided for both the NACA cowled AT-32 and the T-32 Townsend rings. Floats, fixed gear, and retractable main gear are included. Many of these are provided by GLENCOE molds, as the original kit from the stone age of plastic modeling only gave one the Byrd Expedition YC-30 with floats or fixed gear and NACA cowlings. All parts are on thick sprues, but the nibs are small enough to cut with Xuron snippers, with exception of the wing and fuselage nibs, these are best cut with a razor saw. Flash is minimal, but some parts have heavy mold lines. They look good on the sprue, but more on that later. Three two-sided pages provide assembly instructions, paint instructions, and decal placement for all five buildable variants. The instructions are a bit vague in spots, but suffice. The major down falling of the kit is the lack of placement marks for the many struts that are to be used. One is on his own when lining everything up and I pity anyone doing the floatplane version, where there are eight struts with 20 placements that need to be properly aligned!
|
CONSTRUCTION |
Interior:
The interior of the model is blank save for three figures in seats. I scratch built a bulkhead, and floor for the cockpit and a floor for the passenger area. I did not build an instrument panel nor control wheels, as they would not be seen behind GLENCOE's very thick clear plastic windshield canopy. I was able to clean the exterior of the canopy for a nice finish, but the interior could only be polished and glazed with Mequiar's Mirror Glaze and given a coat of FUTURE. There was still cloudy plastic between the inside and outside and shows on the starboard side. The passenger windows were a little easier to sand down and polish; they were also a little thinner. I cleaned, polished and glazed the inside and glue them in place. Once the glue had dried, I sanded the outside where the clear bulged out a bit back to the fuselage, then polished and glazed it (no FUTURE on the outside, as that's what I used for the final finish). The passenger windows were masked on the inside with small strips of masking tape and on the outside with a strip of tape covering the entire area. I painted all interior parts in Polly Scale RLM 24 Blue and removed the masking tape from the inside and outside.
 Attention
was then turned toward the figures. Since the three figures were to represent
the Byrd variant and I wanted 12 passengers, some other method would have to be
utilized. I primed all three figures and painted them using acrylic and ink
washes. The kit has indentations in the fuselage halves for placement, but on
dry fitting I found this placed the figures too close to the fuselage side. For
the pilot and co-pilot, I drilled holes for a 0.025-in wire to be inserted and
attached to a corresponding 0.025-in hole in the cockpit floor to give them a
more proper look.
Attention
was then turned toward the figures. Since the three figures were to represent
the Byrd variant and I wanted 12 passengers, some other method would have to be
utilized. I primed all three figures and painted them using acrylic and ink
washes. The kit has indentations in the fuselage halves for placement, but on
dry fitting I found this placed the figures too close to the fuselage side. For
the pilot and co-pilot, I drilled holes for a 0.025-in wire to be inserted and
attached to a corresponding 0.025-in hole in the cockpit floor to give them a
more proper look.
The passenger figure was painted also, but rather then make a mold and have to paint eleven more, I simply scanned the painted figure in the scale size, took it to Adobe first and polished up a bit. Since the file size was so small, I saved the image in a .TIFF format. I then opened up Corel Draw and imported the image into Corel, copied and pasted eleven more examples. These examples were doctored with to give the images different suits and hair color. I next copied each doctored image, mirrored it and pasted it to my sheet, which was formatted for a 4-in by 6-in index card. Once all were in place I printed the collective images onto 4-in by 6-in premium photo paper. When the inks of the print were dry, I sprayed them with an artist's fixative and let this set for several hours. I cut all 24 images out and place the mirrored image opposite the original, then cemented then with CNA glue. A piece of 0.025-in wire was also placed at the bottom of each image's seat for inserting into corresponding holes in the passenger compartment floor. The two-sided figures were touched up on the white edges with the correct color paint required before installing them into the floor.
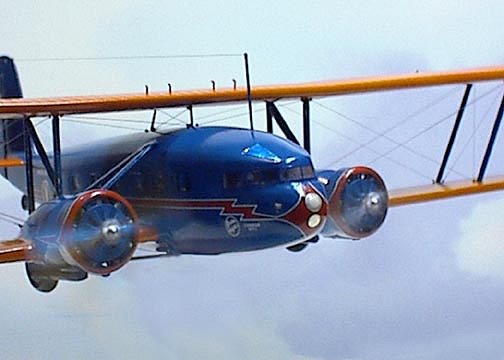
The Mon-key is another story! While I was encountering very few problems with the interior, the exterior was proving to be a trial in frustration, trial and error, and fortitude. As mentioned there are only location holes for the nacelle to upper wing mounts, everything else is up to the player in this chess game. So seeing as this model was imminently more challenging that the William Brothers B-10, I decided to add Dan's Mon-key to the Stewart's cabin. I found a really good frontal shot of a chimpanzee's head and upper torso with his arms raised and his hands on his head. I saved this image and took it into Adobe to resize it to scale. This was printed directly from Adobe after touching up, as I only required the one side. Thusly Mon-key was attached to the starboard read window :>).
Engines:
GLENCOE's kit provides two Wright Cyclone radials for the Townsand ringed versions, but the NACA cowls are closed in the front, much as they would be in flying in the Antarctic. I checked the engines and they will fit fine with a little cleaning out of the NACA cowling and I can see no reason why a moderate modeler could not cut out the closed front and install the engines in this cowl. The big problem occurred, when I fitted the engine attachment piece to the cemented lower wing nacelles. The piece for the NACA cowling fit very well, but the one I needed for the T-32 was entirely too small in diameter. Mon-key wrench number one!
 I ended up
chucking the piece I needed into my modeling lathe and cutting away the rounded
part I needed from the ill-fitting piece (I had to cut 0.285-in from the front).
After getting the piece (actually pieces, because I had to do two) in the lathe
and assuring myself everything was centered and spinning correctly, I cut the
piece by chucking a utility knife blade in my lathe cutting tool carrier and
lightly letting it cut through the plastic. One has to watch that motor speed on
soft plastic like this, as it will melt when cutting in higher speeds. Once the
fronts were cut. I chucked the NACA cowling attachment piece (pieces) in the
lathe and cut 0.285-in from the front of it. I next glue the cut fronts to the
NACA attachments, which needless to say left a large area to be filled and
cleaned in order to properly round out the two bashed pieces. Mon-key wrench
two! I filled the areas with gel type CNA and hit it with accelerator. The
pieces were each chucked into the lathe and rounded out with varying sizes of
sanding grit. A few areas required a little extra fill and had to be chucked
again and rounded. Once these were to my liking, I polished them with Mirror
Glaze and set them aside for attachment to the wing nacelles.
I ended up
chucking the piece I needed into my modeling lathe and cutting away the rounded
part I needed from the ill-fitting piece (I had to cut 0.285-in from the front).
After getting the piece (actually pieces, because I had to do two) in the lathe
and assuring myself everything was centered and spinning correctly, I cut the
piece by chucking a utility knife blade in my lathe cutting tool carrier and
lightly letting it cut through the plastic. One has to watch that motor speed on
soft plastic like this, as it will melt when cutting in higher speeds. Once the
fronts were cut. I chucked the NACA cowling attachment piece (pieces) in the
lathe and cut 0.285-in from the front of it. I next glue the cut fronts to the
NACA attachments, which needless to say left a large area to be filled and
cleaned in order to properly round out the two bashed pieces. Mon-key wrench
two! I filled the areas with gel type CNA and hit it with accelerator. The
pieces were each chucked into the lathe and rounded out with varying sizes of
sanding grit. A few areas required a little extra fill and had to be chucked
again and rounded. Once these were to my liking, I polished them with Mirror
Glaze and set them aside for attachment to the wing nacelles.
The engines were painted in the blue used for the exterior (more on that later), with the cylinders painted Polly Scale Oxidized Aluminum. I made pushrods for the engines from black-coated copper wire of 0.017 in diameter. The rear exhaust outlets to the kit's exhaust ring were done with 0.025-in styrene rod. Once mounted to the cylinders and the exhaust rings mounted, these were painted Gunze Burnt Iron. The exterior exhausts were painted Burnt Iron also, but these pieces were left off until final assembly. I did make mounts for the exhausts from very fine phonograph wire. All gear bay components; including the front nacelle pieces were given a coat of Polly Scale SF Silver (a model railroad paint).
Landing gear:
GLENCOE's landing gear fuselage bracing struts were incorrect and too big. I cut them and replaced them with 0.033 wire. I had already installed a piece of 0.025 wire in the inner nacelle bay's front for each strut to slide onto in final assembly. The struts were painted Polly Scale Graphite and oleos were done with strips of Bare-metal foil. The tires were painted Polly Scale Tire Black, with the inner wheel center painted Graphite and the outer painted the same blue as the fuselage (I'll get to that in a bit). The outer centers were also given a coat of FUTURE once the blue had dried. The rear wheel was painted fuselage blue and given a coat of FUTURE, with the tire being picked out in Tire Black. All was set aside until final assembly.
Exterior:
Yikes!!!! Here's where you will encounter all the demons modeldom has to offer. The upper wing halves were the only two pieces that did not present fit problems. These were cemented and cleaned long before I returned to the model for finish work. The lower wings were another story. If one is constructing the float version, the upper and lower wing halves fit fairly well. But GLENCOE molded the lower wing halves for the retractable gear variant and these two pieces are 1/16-in too narrow in chord width (1/32 on front and rear) to the upper wing halves. Not only that, but I had to remove an additional 1/8-in from the lower wing joins in the center for them to line up correctly with the nacelles. This in addition left the lower halves 1/8-in too short in span. Mon-key wrench three!
There was nothing to do, but align the halves and cement them keeping the nacelles lined up. Everything was filled with gel type CNA and sanded, cut, filed, and whittled. It was no easy task, but I pulled it off to my liking. No more complaints about the east European fit problems for me. They look like Tamiya compared to this kit.
 The
fuselage was rampant with nodules and dimples. I had to cut and sand the nodules
away and fill and sand the dimples. Once I joined the fuselage halves, I notice
that the vertical tail leaned to starboard ever so slightly. Mon-key wrench
four! I soaked the bugger in hot water and was able to twist the tail to a more
vertical position, but even this threw the horizontal tails slightly askew. The
clear windshield canopy was attached at this time also. It was oversized, but
this went to my liking, as I could sand it back to the fuselage when doing clean
up of the glued seams.
The
fuselage was rampant with nodules and dimples. I had to cut and sand the nodules
away and fill and sand the dimples. Once I joined the fuselage halves, I notice
that the vertical tail leaned to starboard ever so slightly. Mon-key wrench
four! I soaked the bugger in hot water and was able to twist the tail to a more
vertical position, but even this threw the horizontal tails slightly askew. The
clear windshield canopy was attached at this time also. It was oversized, but
this went to my liking, as I could sand it back to the fuselage when doing clean
up of the glued seams.
After cleaning the fuselage, I attached the lower wing. You guessed it, big gaps at the front and rear. I filled the gaps with styrene sheet of the appropriate size and filled the remainder with gel type CAN. This took a good session at the workbench to clean up. Aye-Yi-Yi! Was I never going to complete this kit?
The reworked nacelle fronts were attached and fortunately these only required filling in a couple of areas. They were cleaned up rather easily. The Townsand rings had to be cut a bit on the inside in order to get the engines to fit, but this was very minor and has to be done with many limited edition kit. The retracted landing gear were re-engineered at the start, so that I could paint the gear assemblies separate and install them in the final assembly. Maybe there is something about this foresight thing :>). Believe me, one had better use plenty on kits such as this. Lastly before going to the paint stage, I attached the nacelle to fuselage struts and the nacelle to upper wing struts, being sure that the top wing attached properly aligned and that the struts were at 90°. The model was now ready for exterior painting.
The exterior wing struts had locations on the lower wing, but left one in the dark on the upper wing. I dry fitted the entire upper wing and drilled location hole in the lower wing for small wire I had inserted into the strut bottoms. I fit each strut in their lower hole, then carefully lined each one at a time and marked where their location would be on the upper wing. I then drilled small holes in the upper wing to accept small wire that was next attached to the upper part of the strut. I had to turn attention to the fuselage wing braces that ran centerline. These were not represented in the kit and are most prominent on the box art and photos of the Condor. These were done with 0.025-in wire and holes were drilled in the fuselage and upper wing. Now the tedious work had to begin. I would need 44 wiring anchors for the wing and tail wire bracing. I did these by wrapping thin phono pickup wire around a sewing needle held in a pin vise and working it down to the smallest size I could render. This took one entire day at the workbench (a long, entire day). Once made I had to measure and mark 44 spots and drill these out with a #80 drill bit to accept the tiny rigging eyelets. This and the associated rigging were the most tedious task of the entire build, but by far not the hardest. This is almost necessary when using the very fine 0.004-in smoke-colored nylon invisible thread I use. The upper wing fuel vents were done with 0.017-in wire and the fuel filler caps represented with Waldron punched disks of silver decal trim film.
|
PAINT & DECALS |
I searched all of my model paints for one to match 25056 and found nothing, so it was off to my favorite hobby paint store, TRAINS UNLIMITED. They carry a full stock of Polly Scale railroad paints and nine out of ten times I can match or closely match any FS color. Well they had a paint called GTW Blue, which matched 35056 to a tee. Since I don't use enamels any longer and really did not want to deal with Testors PLA Orange, I also found a suitable acrylic replacement here. It is Polly Scale Daylight Orange, which is a bit darker than their Reefer Orange.
Thusly the wings were painted Daylight Orange and the fuselage, engine nacelles (after masking the dried orange), and outer struts were painted GTW Blue, after masking the clear glazings with strips of masking tape of course. Once dry, all masking was removed and all subassemblies were given a coat of FUTURE for gloss and decal prep.
 Kit decals
were used throughout. They were done by Scale Master and considering the amount
of curves on the fuselage and Townsend rings, they fit very well. I only used
decal setting solution, until I was completely please with the nose decal
placement. Once assured, I attached the fuselage side decals and rudder
registration numbers. The Townsend ring decals are best done one at a time. I
applied one to each ring, stayed with it and prodded and cut as required before
applying a little Microsol and leaving each to dry for a day. The next day I
went back and applied the other half. Believe me, it'll be much easier to handle
and get good decal line up. Once these had dried, I slipped the rings over the
engines and applied the four nacelle decals so as to line up with the ring
scallops. The decals have white, milky-like glue and I cleaned the surface glue
before applying the decals. My only complaint is that the orange in the decals
were not given a backing coat of white and shows up red-orange after the dark
blue bleed through. Curiously the white is very opaque. It's a nit pick, but a
backing of white would have rendered the orange more like the wing orange.
Kit decals
were used throughout. They were done by Scale Master and considering the amount
of curves on the fuselage and Townsend rings, they fit very well. I only used
decal setting solution, until I was completely please with the nose decal
placement. Once assured, I attached the fuselage side decals and rudder
registration numbers. The Townsend ring decals are best done one at a time. I
applied one to each ring, stayed with it and prodded and cut as required before
applying a little Microsol and leaving each to dry for a day. The next day I
went back and applied the other half. Believe me, it'll be much easier to handle
and get good decal line up. Once these had dried, I slipped the rings over the
engines and applied the four nacelle decals so as to line up with the ring
scallops. The decals have white, milky-like glue and I cleaned the surface glue
before applying the decals. My only complaint is that the orange in the decals
were not given a backing coat of white and shows up red-orange after the dark
blue bleed through. Curiously the white is very opaque. It's a nit pick, but a
backing of white would have rendered the orange more like the wing orange.
Finishing touches:
Now the tedium of attaching all that rigging was at hand. Although no fault of the kit, here Mon-key wrench five came into play. The upper wing to fuselage rigging required the most I could get out of Japanese body arrangement. I had to twist, turn, contort, and wince to get the dang thread into the eyelets. Once the upper wing fuselage rigging was completed, I commenced on the outer wing rigging. This was easier, but it seemed that for every wire I would get attached, another would break loose. I reckon I had ten such incidents and these really taxed one's patience and fortitude to get the job down. Since I am one of those obsessively determined people, the rigging would be completed, if I had to stay at the workbench all night. Well after five hours, it was and I touched up the rigging eyelets with orange or blue as required. Next I added the two landing lights from Waldron-punched Bare-metal foil. I didn't mention that the lights on the fuselage molds were off center and askew of each other, did I? I had to cut the away and sand the nose smooth. Needless to say it worked to my benefit, as that nose decal would have never lined up had it not been done. I also apply some Krystal Klear to the Bare-metal lights. Wing and tail navigation nights were done with Waldron-punched disks of silver decal, given a drop of Krystal Kleer, and the wing lights painted clear red and clear green leaving the vertical tail lights clear. I finished up by adding an antenna post from 0.025-in wire and aerial wiring from invisible thread. The finish touch were two outer landing and flying wire braces cut from 0.017-in wire, painted blue and glossed, then white glued to the intersection of the wires. Consommatum est!
November 2000
If you would like your product reviewed fairly and quickly by a site that has over 1,500 visits a day, please contact me or see other details in the Note to Contributors.