Huma 1/72 Klemm Kl-25
|
KIT #: |
3004 |
|
PRICE: |
$22.00 a few years back |
|
DECALS: |
Two options |
|
REVIEWER: |
Peter Burstow |
|
NOTES: |
Converted
to Swallow II
|
 The British Aircraft Swallow was a licence build version of the Klemm Kl 25
light aircraft. It differed from the Klemm built versions by having more
powerful engines and some structural strengthening. 135 were built by the
British Klemm Aeroplane Company, which later became the British Aircraft
Manufacturing Co.
The British Aircraft Swallow was a licence build version of the Klemm Kl 25
light aircraft. It differed from the Klemm built versions by having more
powerful engines and some structural strengthening. 135 were built by the
British Klemm Aeroplane Company, which later became the British Aircraft
Manufacturing Co.
The prototype of the licenced version first flew in 1933. In 1935
the Swallow II was introduced, it featured a revised top decking and
squared off wing and tail tips.
A number of Swallows were impressed by the RAF during the Second World
War, at least one being used for glider training with the propeller removed. It
was also operated by the Royal Navy and RNZAF.
Several Swallows survived the war and were returned to civil use. A few
are still airworthy.
Coming in a
large, top opening box, there are two sprues of 34 parts in light grey plastic,
one of the sprues is small and has tiny parts mainly for detailing the cockpit.
There are two injection moulded windscreens on a clear sprue. A single crew
figure is included.
 The parts are finely moulded, with
rather heavy engraved panel lines and a fabric effect on the flying surfaces.
There is a hint of flash on some of the parts, and a mould joint line is
visible. There are some ejector pin marks that will be hidden after
construction.
Ten of
the parts go up to make a very detailed two
seat cockpit, including rudder bars,
control sticks and what appears to be a Gosport tube.
The overall effect is of a
main-stream high pressure injected moulded kit, with small sprue attachment
points. Some of the parts are tiny. There are alignment pins on the fuselage and
cowling halves, and tabs for the wing to fuselage joint.
The parts are finely moulded, with
rather heavy engraved panel lines and a fabric effect on the flying surfaces.
There is a hint of flash on some of the parts, and a mould joint line is
visible. There are some ejector pin marks that will be hidden after
construction.
Ten of
the parts go up to make a very detailed two
seat cockpit, including rudder bars,
control sticks and what appears to be a Gosport tube.
The overall effect is of a
main-stream high pressure injected moulded kit, with small sprue attachment
points. Some of the parts are tiny. There are alignment pins on the fuselage and
cowling halves, and tabs for the wing to fuselage joint.
The
decals have options for two German aircraft, A civil racer in overall silver and
a military trainer in overall RLM 02 grey. “Make your own” hakenkruz are
supplied as are instrument panel decals.
The
instructions are 4 pages of A4, clearly printed on high quality paper. Two pages
of aircraft history and specifications in German, English and French. One colour
printed page of profiles and split plan views, specifying RLM paint numbers and
one page showing 5 exploded diagram construction steps and a detail drawing of
the cockpit showing the placement of part 18.
As I wanted to build a B.A. Swallow II, I started looking for plans. The best I
could find was in British Civil Aircraft which had a three view. I scanned the
plan at the highest resolution I could, and with a bit of trial and error I
printed out the plans to a scale which matched the kit. Changes that needed to
be made were, flat fuselage top deck behind and between the cockpits, reshaped
tail surfaces and wing tips. I found that I
 could trim the kit wings to suit,
but would have to make a new tailplane, elevators, fin and rudder. I decided
that the cowling was close enough to that used with a Blackburn Cirrus Minor
engine, but that I would have to change the arrangement of the front air
intakes.
could trim the kit wings to suit,
but would have to make a new tailplane, elevators, fin and rudder. I decided
that the cowling was close enough to that used with a Blackburn Cirrus Minor
engine, but that I would have to change the arrangement of the front air
intakes.
Not many sub-assemblies in this little kit. I started in the cockpit
adding the seats, control sticks, rudder bars and the Gosport tube. I painted
the cockpit light grey, the seats and instrument panels red-brown and picked out
details in black and silver. I didn't use the decal instrument panels, just put
a few silver spots on the panels. They are not really visible when the fuselage
is closed up. The seats are just a L-shaped piece of plastic, nothing like the
canvas sling type seats in the real aircraft.
The fuselage was closed up and it all fitted well, leaving a small gap
that could be dealt with easily, but then the fun started. One of the large
panel lines was on just one of the fuselage halves. I had a close look at these
panel lines, and a look at several photos of the real aircraft in the references
and my albums. The guys who built the real aircraft didn't leave three inch gaps
between the plywood sheets on the fuselage. The only obvious panel lines was
where the metal cowling met the ply fuselage and a small hatch behind the
cockpit which fitted neatly and would not be very visible in 1/72.
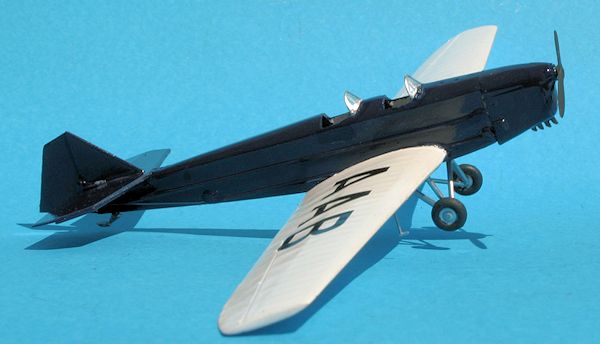
I reshaped the top deck to look more like the flat surface of the
Swallow. Then I filled all the panel lines using Tamiya putty. A quick sand and
a touch up with Mr Surfacer and the panel lines were gone.
Another obvious thing, shown in the photographs and plans, are two prominent
external stringers on each side of the fuselage. I made these from lengths of 10
lb. mono-filament fishing line, attached with superglue, and faired in with Mr
Surfacer. Looked a little rough when first done, but I hoped that a layer or two
of gloss paint would tidy it up.
 Using my scaled plans as a template I made new tail surfaces from
plastic-card, 2 pieces of 0.3 mm laminated for the tailplane, the fin from one
piece of 0.8mm and the elevators and rudder from 0.3mm. I sanded a sort of
aerodynamic profile to the new tail pieces. I removed the kit fin and attached
my new surfaces and left to dry. Later when about to fill the gaps and joints I
realised I had set the tailplane too far forward, so it was cut off and
repositioned back about 3mm. I ended up with a large gap between the top
fuselage deck and the leading edge of the tailplane, which was filled with
Tamiya putty and cleaned up when dry and hard.
Using my scaled plans as a template I made new tail surfaces from
plastic-card, 2 pieces of 0.3 mm laminated for the tailplane, the fin from one
piece of 0.8mm and the elevators and rudder from 0.3mm. I sanded a sort of
aerodynamic profile to the new tail pieces. I removed the kit fin and attached
my new surfaces and left to dry. Later when about to fill the gaps and joints I
realised I had set the tailplane too far forward, so it was cut off and
repositioned back about 3mm. I ended up with a large gap between the top
fuselage deck and the leading edge of the tailplane, which was filled with
Tamiya putty and cleaned up when dry and hard.
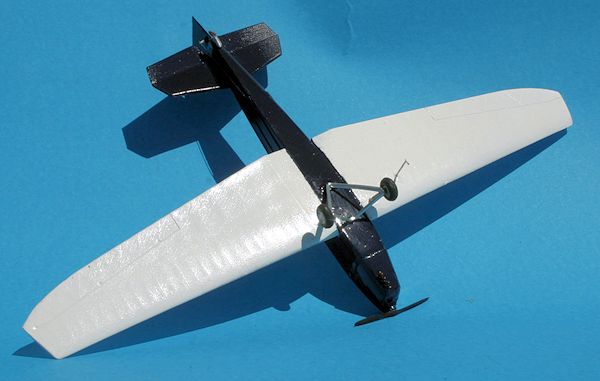
I cut the wingtips to match
the plans, changing the angle slightly to match up with the ribs moulded into
the kit, the new tip runs from the leading edge of the second rib to the
trailing edge of the first rib which looked better to me. When attaching the
wings there was a gap at the root on the underside which I filled with putty,
the top surface fitted well and just needed a bead of Mr Surfacer. I
then fitted the firewall, and assembled the cowling. I filled the existing
openings with thick superglue then cut an new opening on the left side. I
drilled out four exhaust ports and made exhaust pipes using evergreen rod. When
it was dry I cut the rod to about 3mm angled back.
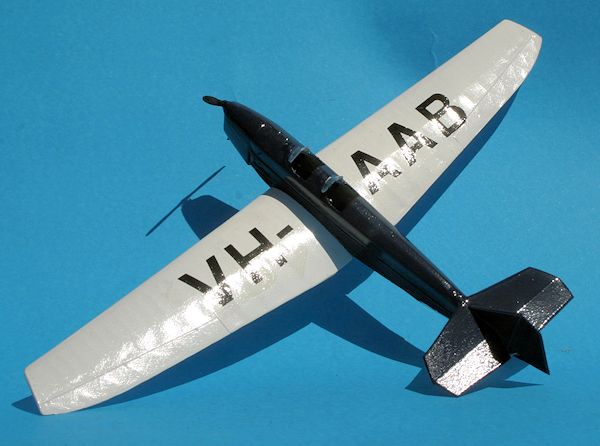
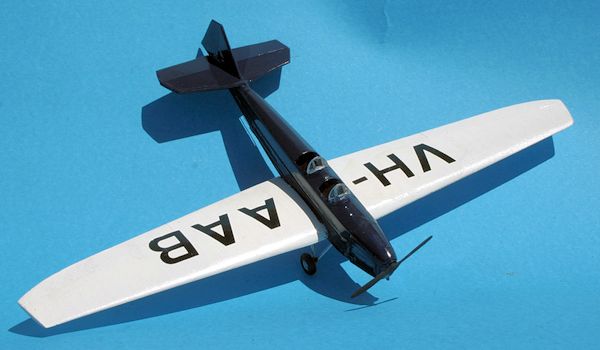
Looking through my albums I found a black and white photo of VH-AAB, in very
poor condition. Not sure when or where the photo was taken but must have been a
long time ago, as I got my first SLR camera and
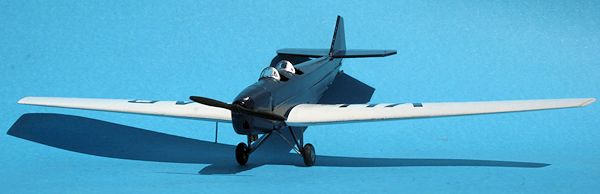 started using colour film in
1973. I decided to use my imagination and do a blue and white scheme based on my
local football team colours. British Civil Aircraft list this
aircraft as construction number 461, first registered in 1936. Sold to Australia
in 1937 and withdrawn from use in 1969.
started using colour film in
1973. I decided to use my imagination and do a blue and white scheme based on my
local football team colours. British Civil Aircraft list this
aircraft as construction number 461, first registered in 1936. Sold to Australia
in 1937 and withdrawn from use in 1969.
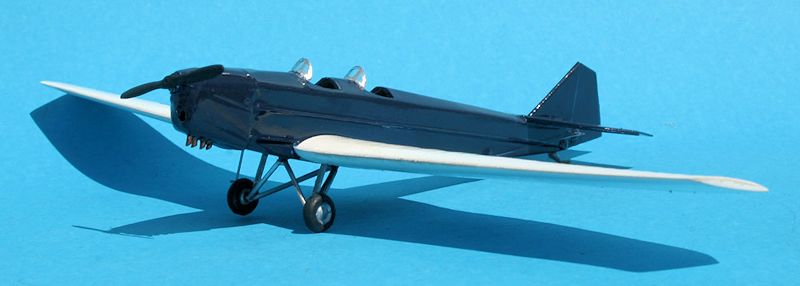
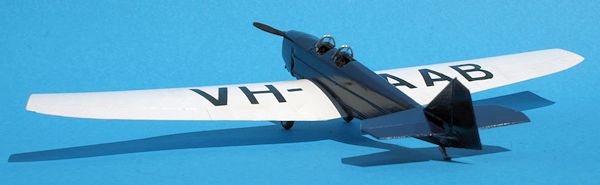
I sprayed the model overall gloss white. After the first few coats I
found a few glitches which needed fixing. After about 6 coats I was happy with
the finish. I then masked the wings and painted the fuselage in gloss royal
blue. I added registration letters using dry decals to
the wing upper surface only, I could not get them to conform to the external
detail on the fuselage. I then protected them with a coat of floor polish.
As often happens,
I found a photo of the real aircraft that has since been restored and painted in
an attractive red and silver scheme, but I'm not going to redo my model!
 I added the pre-painted undercarriage, tail skid and various other small
bits. I debated whether to use the kit windscreen or make my own, the Swallow
had a larger screen of three flat panels, quite unlike the Klemm's curved
windshield, I ended up using the kit windscreen, fitted upside down, with the
extra frame lines hand painted on. I then made some rudder control horns from
heavy aluminium foil, and added the prominent external cables using invisible
mending thread. There were kit supplied horns, on the tiny bits sprue, but I
managed to lose one on the one inch trip from the drop of glue to the kit. The
pitot on the Swallow was under the wing, not above, as supplied by Huma for the
Klemm, I didn't spot this until the last moment so had to do a little filling
and then drilled a new mounting hole.
A little touch up painting and it was done.
I added the pre-painted undercarriage, tail skid and various other small
bits. I debated whether to use the kit windscreen or make my own, the Swallow
had a larger screen of three flat panels, quite unlike the Klemm's curved
windshield, I ended up using the kit windscreen, fitted upside down, with the
extra frame lines hand painted on. I then made some rudder control horns from
heavy aluminium foil, and added the prominent external cables using invisible
mending thread. There were kit supplied horns, on the tiny bits sprue, but I
managed to lose one on the one inch trip from the drop of glue to the kit. The
pitot on the Swallow was under the wing, not above, as supplied by Huma for the
Klemm, I didn't spot this until the last moment so had to do a little filling
and then drilled a new mounting hole.
A little touch up painting and it was done.
This was a straight forward conversion
to make an aircraft of more interest to me. I don't think the B.A. Swallow II
has been kitted in 1/72. The original kit would certainly make up a nice model
but I couldn't resist cutting it up and making something different. I'm very
happy with the end result.
http://en.wikipedia.org/wiki/British_Klemm_B.K._Swallow
http://en.wikipedia.org/wiki/Klemm_Kl_25
A.J. Jackson, British Civil Aircraft 1919-1972: Volume I. Putnam, London, 1973.
Kit Instructions.
Peter
Burstow
March 2013
If you would like your product reviewed fairly and fairly quickly, please contact the editor or see other details in the
Note to
Contributors.
Back to the Main Page
Back to the Review
Index Page