Revell 1/48 Reno Racers
|
KIT: |
Revell 1/48 Reno Racers |
|
KIT # |
4347 |
|
PRICE: |
$13.50 MSRP |
|
DECALS: |
See review |
|
REVIEWER: |
|
|
NOTES: |
Two for one! |
|
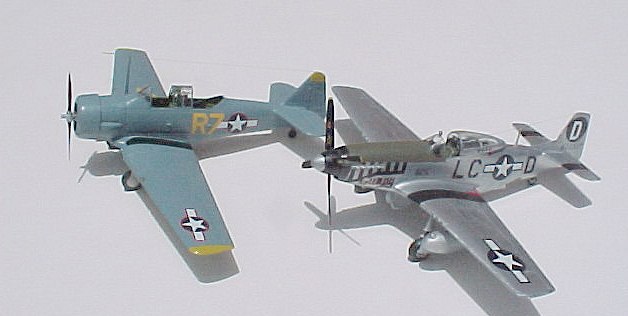
THE KITS |
 The set builds up two Reno air racers, a
P-51D "Miss America" and a T-6. I can't vouch for their accuracy as I
didn't plan on building them as boxed. I wanted to build an SNJ and saw
this as a chance to also experiment with a bare metal finish using SNJ
powder. If figured that I wouldn't be out much if the experiments
failed!
The set builds up two Reno air racers, a
P-51D "Miss America" and a T-6. I can't vouch for their accuracy as I
didn't plan on building them as boxed. I wanted to build an SNJ and saw
this as a chance to also experiment with a bare metal finish using SNJ
powder. If figured that I wouldn't be out much if the experiments
failed!|
CONSTRUCTION |
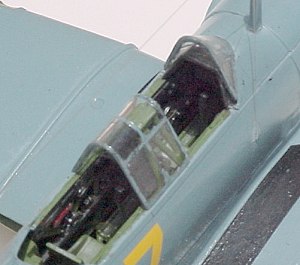 The T-6 has a nice cockpit with a
tubular frame. I painted the interior with Modelmaster Interior Green
enamel, with panels in matt black. Details were picked out with a
silver and a white pencil, with drops of Future on the instrument
faces. I used the silver pencil to show some wear along the seats and
rudder pedal troughs. As I wanted to model an SNJ, I needed to deviate
a bit from the kit's directions, which are well written and tell you
how to modify the kit to look like the racer. I found several pictures
on the web, and also found that the Decals Carpena directions were an
excellent reference in getting the correct details in place. I chose to
model an SNJ-4 as used 15 mile from me at NAS Alameda, in 1943. That
meant omitting the rear gun, adding the radio mast (included in the
kit) and using an engine cowl without a gun port (included) I replaced
the molded in pitot tubes, that I managed to snap off, with brass wire.
The kit provides dropped flaps which I used. It went together well,
although I did have to check the fit a bit when placing the interior
cockpit frame. I needed to use Mr Surfacer on the seam between the
cockpit and the tail, but the rest of the seams closed up snug. The
canopy sections were cast thick enough that I chose not to mount the
front cockpit canopy, as it rode up high on the mid section.
The T-6 has a nice cockpit with a
tubular frame. I painted the interior with Modelmaster Interior Green
enamel, with panels in matt black. Details were picked out with a
silver and a white pencil, with drops of Future on the instrument
faces. I used the silver pencil to show some wear along the seats and
rudder pedal troughs. As I wanted to model an SNJ, I needed to deviate
a bit from the kit's directions, which are well written and tell you
how to modify the kit to look like the racer. I found several pictures
on the web, and also found that the Decals Carpena directions were an
excellent reference in getting the correct details in place. I chose to
model an SNJ-4 as used 15 mile from me at NAS Alameda, in 1943. That
meant omitting the rear gun, adding the radio mast (included in the
kit) and using an engine cowl without a gun port (included) I replaced
the molded in pitot tubes, that I managed to snap off, with brass wire.
The kit provides dropped flaps which I used. It went together well,
although I did have to check the fit a bit when placing the interior
cockpit frame. I needed to use Mr Surfacer on the seam between the
cockpit and the tail, but the rest of the seams closed up snug. The
canopy sections were cast thick enough that I chose not to mount the
front cockpit canopy, as it rode up high on the mid section.
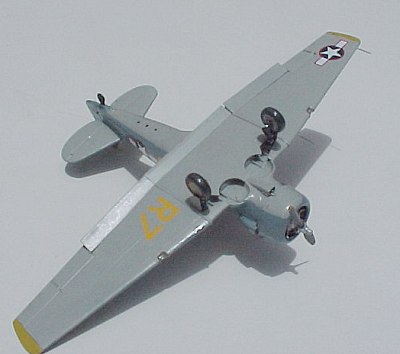
For the P-51 I again ignored the directions to demilitarize it,
choosing not to remove the gun ports, etc. The cockpit went together
easily, and I added a set of etched seat belts. I used Modelmaster
Interior green inside, picking out highlights with a white and silver
pencil, and some bits with red paint. Silver pencil was used to
highlight the edges of the radio boxes in back and the seat framing. I
painted the floor brown, then while still damp, pulled some tan across
to get a plywood look.
 The headrest was
painted with a leather color of Humbrol enamel. The panels were done in
matt black. The gun sight is pretty bad, but a bit of filing and paint
helped.
The headrest was
painted with a leather color of Humbrol enamel. The panels were done in
matt black. The gun sight is pretty bad, but a bit of filing and paint
helped.
|
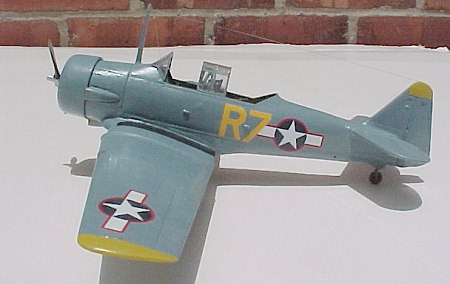
CAMOUFLAGE & MARKINGS |
 The SNJ was painted with Modelmaster
enamel Non-Specular light gray, FS 36440 underneath, and Non-specular
Blue gray FS 35189 above. The wing tips and prop tips were done with
Yellow, FS 33538, and the prop blades in a gloss black. After painting
I sprayed the plane with Future (a first) and found later a lot of
unevenness! A second lighter coat helped level things out. The Decals
went on easily and were very nicely printed. A final coat of future
went down over them. I tried using white glue for the landing lights
(if the pieces were there, I lost them before ever seeing them). -Not a
really satisfactory solution as one shrank in a bit. The other was ok.
Antennas were done with Invisible thread.
The SNJ was painted with Modelmaster
enamel Non-Specular light gray, FS 36440 underneath, and Non-specular
Blue gray FS 35189 above. The wing tips and prop tips were done with
Yellow, FS 33538, and the prop blades in a gloss black. After painting
I sprayed the plane with Future (a first) and found later a lot of
unevenness! A second lighter coat helped level things out. The Decals
went on easily and were very nicely printed. A final coat of future
went down over them. I tried using white glue for the landing lights
(if the pieces were there, I lost them before ever seeing them). -Not a
really satisfactory solution as one shrank in a bit. The other was ok.
Antennas were done with Invisible thread.
I had decided to try using the P-51 as a practice for a bare metal
finish. Boy, what an experience! Next time I am going to sand a LOT
more with finer grits! The SNJ spray and powder part went quickly and
easily, with it drying in minutes, with no primer coat. I tried rubbing
the powder on the control surfaces and access panels for a bit of
contrast. I had thought I could get away without masking everything and
hand painting the OD on top of the engine and the black wing walks.
Dumb! Should have covered up everything and sprayed! The contrast
between the SNJ and the brushwork is real obvious. That and some cat
dander...
The Aeromaster decals were excellent, with very good directions. The antenna was done with the invisible thread.
|
CONCLUSIONS |
I went into this project looking for some practice of new techniques: shooting Future and SNJ, using the invisible thread, using future as a decal setting solution (works really well, esp. if you put it down on the surface, then apply the decal, and then apply future on top too.), Drilling out the exhausts and wheels, etc. The kits didn't come out great, but the next ones benefited. So, all in all, I think I got a really good value from a pair of older kits. As my t-shirt says, "Learn by doing!"
Eric Bergh
July 2003
If you would like your product reviewed fairly and quickly, please contact me or see other details in the Note to Contributors.