| KIT #: | 1301 |
| PRICE: | $ Cheap |
| DECALS: | Two options |
| REVIEWER: | Brian Baker |
| NOTES: | Easy conversion. Other 1/72 kits are of TBF-1 Versio |
| HISTORY |
The
Grumman TBF-1 Avenger was the timely replacement for the Douglas TBD-1
Devastator, which proved its obsolescence at the Battle of Midway when VT-8 lost
all of the TBD’s and other squadrons had slightly smaller losses.
Even VT-8’s four TBF-1’s that flew from Midway lost three out of four.
The TBF
was produced in large numbers by the Grumman Corporation, but the emphasis on
F6F Hellcat production led to the Navy assigning production contracts to General
Motors Eastern Division, in  between the TBF-1/TBM-1 and the
TBM-3. The Royal Navy used the
aircraft as the Tarpon, which was later renamed the Avenger, the American name.
As the war drew down to a close, the TBM, now the major type in service,
was used less and less as a torpedo bomber as the Japanese Navy worked its way
into extinction, and even its role as a level bomber was somewhat usurped by the
bomb carrying Corsairs and Hellcats, which carried the same bomb load, and
unlike the TBM’s, became pure fighters once their bomb loads had been delivered.
between the TBF-1/TBM-1 and the
TBM-3. The Royal Navy used the
aircraft as the Tarpon, which was later renamed the Avenger, the American name.
As the war drew down to a close, the TBM, now the major type in service,
was used less and less as a torpedo bomber as the Japanese Navy worked its way
into extinction, and even its role as a level bomber was somewhat usurped by the
bomb carrying Corsairs and Hellcats, which carried the same bomb load, and
unlike the TBM’s, became pure fighters once their bomb loads had been delivered.
 1963, although it
was probably registered about 1958 or 1959.
It was registered to Aircraft Specialties Inc. at Sky Harbor Airport in
Phoenix, which was an interesting place to visit during that time period, as you
could see all sorts of exotic warbirds being converted to sprayers and tankers,
including B-17’s, P4Y-2’s, TBM-3’s, FM-2’s, PV-2’s, and even a J2F-6 which was
used as a tanker for a short time. I recall that
in 1957, the Babb Company, an aircraft broker in the Phoenix area, having a
large collection of TBM’s, closely
parked, wings folded, in a field
right on the edge of Sky Harbor Airport, and they were a common sight with
painted over Navy markings and a spray-can “N” number on the rear fuselage to
announce its new civilian status when they were eventually licensed by the FAA.
1963, although it
was probably registered about 1958 or 1959.
It was registered to Aircraft Specialties Inc. at Sky Harbor Airport in
Phoenix, which was an interesting place to visit during that time period, as you
could see all sorts of exotic warbirds being converted to sprayers and tankers,
including B-17’s, P4Y-2’s, TBM-3’s, FM-2’s, PV-2’s, and even a J2F-6 which was
used as a tanker for a short time. I recall that
in 1957, the Babb Company, an aircraft broker in the Phoenix area, having a
large collection of TBM’s, closely
parked, wings folded, in a field
right on the edge of Sky Harbor Airport, and they were a common sight with
painted over Navy markings and a spray-can “N” number on the rear fuselage to
announce its new civilian status when they were eventually licensed by the FAA.
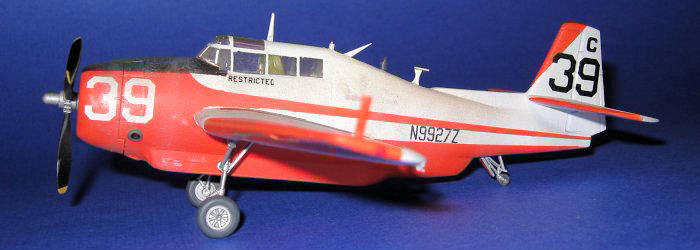
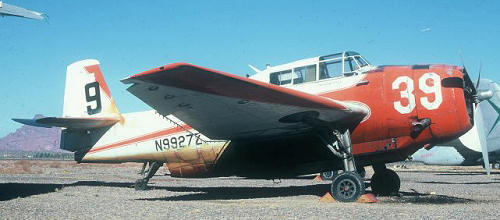
I
photographed N9927Z
for the first time
in May, 1966, after the company, now
Desert Aviation, had moved its base to Falcon Field, the old RAF training field
in
| THE KIT |
| CONSTRUCTION |
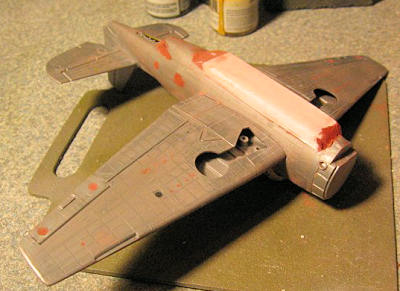
The kit
goes together quickly, and not much filler is needed to fill in the seams and
cracks. The cockpit needs to be
detailed first, with an instrument panel, stick, and sidewall throttle and radio
equipment, and it probably should be pretty grungy, as the only one I ever
recall sitting in years ago seemed to be pretty dirty, but visibility from the
 high
cockpit was fantastic. The only real
changes would be to cut out the bomb bay and construct whatever type of tank
arrangement that is required.
Some had cylindrical tanks, while others had different types of rounded fairings
with doors.
high
cockpit was fantastic. The only real
changes would be to cut out the bomb bay and construct whatever type of tank
arrangement that is required.
Some had cylindrical tanks, while others had different types of rounded fairings
with doors.
Of course, the sprayers had spray bars extending behind the trailing edges of the wings, while the tanker versions did not. But then, some were combination sprayer-tankers, so check your references. These spray units can be constructed from plastic rods and strips, making sure that the number of nozzles is correct. Again, refer to photographs. The engine detail is not too bad for this old a kit, and even the propeller looks pretty good once it is installed. The rear fuselage also needs to be rebuilt, and again, each one seems to be different, so photos are a must. I left out the turret, and then built up the structure with plastic card, filling in the holes with putty. It was a lot of work, but I think the effect is OK.
The
landing gear is solid, but check your sources, as these were sometimes painted
in the exterior color of the plane rather than the usual silver.
Also, check to see if your airplane has gear doors, as some did, and some
didn’t. The tailwheel needs to be installed before the fuselage halves are
joined, but this can then be rotated inside the fuselage in retracted position,
only being moved out when painting is required in the final assembly stages.
| COLORS & MARKINGS |
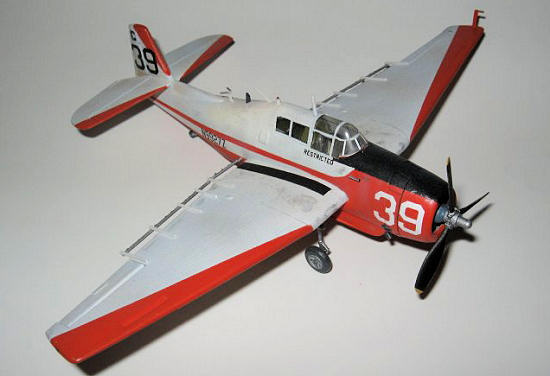
When this was done, I installed the
spray bar bracings on the upper trailing edges of the wings, and then installed
the spray bars. I also put on the
various little thingies on the top of the fuselage, which included VOR and VHF
radio antennas, a rotating beacon, and a filler nozzle for the spray tank.
A small venture tube is on the right side of the fuselage by the cockpit,
and this need to be added to the model, and also some kind of drain pipe under
the right side of the cowling.
After the decals were dry, I resprayed the plane with Dullcote, removed the
masking tape from the canopy, and used the airbrush to give the plane a coat of
dirt and grime, including oil around the engine. They used to say that if there
was no oil leaking out of a radial engine, there was no oil inside either. So
this plane needs to be heavily weathered and oiled to look right.
| CONCLUSIONS |
If you would like your product reviewed fairly and quickly, please contact me or see other details in the Note to Contributors.