Frog 1/72 Fokker F.VIIA/3m
|
KIT #: |
? |
|
PRICE: |
$ |
|
DECALS: |
One option |
|
REVIEWER: |
Brian Baker |
|
NOTES: |
|
Most
kits generally represent some historical article, be it an airplane, vehicle,
ship, or figure. Instructions often
have a diagram or color scheme, accompanied by a set of decals which, if applied
correctly, produce a reasonable representation of the subject.
However, sometimes kit-provided information is incorrect, or downright
fictional. One example, to pick on
Hasegawa here, is their recent issue of the Focke Wulf FW-190G-8, which
including painting instructions which described a G-8 of an “unknown unit”, and
another listed as “in markings that would have appeared on an FW-190G-8 assigned
to II/SG.2”. Translated, that means that they didn’t have any documentation, and
that these schemes were an educated guess.
Another goof is Hasegawa’s Brewster F2A-1 Buffalo, which is presented in
the markings of VF-3, USS Saratoga, during 1941,
The aircraft still carried the yellow wing upper surface and the tail,
fuselage, and cowling color codes for aircraft in that particular unit.
However, their decals are for ”3-F-18”, which would be the last airplane
in the squadron. According to my
references, the sequence of color
codes for Navy units at the time were red, white, true blue,
black, willow green, and lemon yellow.
In this case, “3-F-18” should have lemon yellow markings, not white as
stated on the Aeromaster decal sheet included in the kit.
Granted, in old photos, it would be difficult to tell lemon yellow from
white, especially with difficult lighting, but the numbers should have made it
obvious that lemon yellow, not white, were the correct colors.
They just didn’t do their homework.
They got this right on their ”yellow wing” Grumman F4F-3, but not on the
Buffalo.
So you have to check the references you have to be sure.
Information
Sources
Years
ago, I used to wonder why I built models, and why kids of my generation all
built them. Granted, there were no
computer games, and we had a lot more time on our hands, but my conclusion was
that we built model airplanes to learn about them.
We weren’t old enough to fly them, or work on them, but we could
certainly read about them, watch them when they were available,
go to airplane movies, watch airplane TV
programs, and certainly build models. When I was fairly young, I began
accumulating a library of aviation books, periodicals, and materials that I have
kept for well over 50 years, keeping a policy (that drives my wife nuts) of not
throwing anything away. I might
need it someday. So this is my
first axiom of model building:
Accumulate the best possible library.
That is not to say that you should buy every book you can, because this
is not economical, and we’re not the government;
we can’t print money. But
you will find, over the years, that there are some good references that have
stood the test of time, and they will be useful over and over again. I started
with the old Profile Publications, and bought every issue I thought I would ever
need. Squad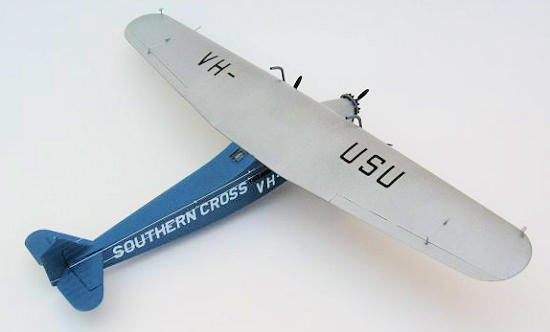 ron-Signal
In- Actions and Walkarounds fall into the same category.
And today, publishers like Osprey and
Midland
Publications produce some very useful material.
But there are many other publishers who produce books that have a lot of
useful information, and sometimes you can borrow materials if you can’t shell
out $50 for every new book that you drool over as it becomes available. Read the
on-line reviews and see if the publication fits your needs.
Then shell out the bucks, if you have any.
ron-Signal
In- Actions and Walkarounds fall into the same category.
And today, publishers like Osprey and
Midland
Publications produce some very useful material.
But there are many other publishers who produce books that have a lot of
useful information, and sometimes you can borrow materials if you can’t shell
out $50 for every new book that you drool over as it becomes available. Read the
on-line reviews and see if the publication fits your needs.
Then shell out the bucks, if you have any.
Another
source, of course, is the internet.
In the past ten years, an infinite amount of information has become available on
line, and merely googling a topic will bring hundreds of sources that might
contain useful information. And if
you are building a particular model, google the model, as you will get any
available kit reviews that will point out the strengths and weaknesses of a
particular kit. There are literally
hundreds of websites, including Modeling Madness and the IPMS-USA site, where
kit reviews and articles of interest are available on line, and you’ll save
yourself a lot of trouble by reading all available sources.
The
Research Process
When
I build a model, I like to know as much about the airplane as possible before I
begin. This means that I usually
read anything I can get my hands on concerning the airplane, who used it, and
how it was operated. I consider
this recreational reading, and it sure beats the heck out of watching TV.
An example is the project I am working on now.
I’ve always been attracted to Fokker aircraft, especially the older ones,
and have built over a dozen Fokker D.VII’s,
E-III’s,
and Dr.1 Triplanes. I’ve also kit
bashed a number of prototypes, including the five winged V.8 monstrosity that
was only flown once, and these require references for accuracy.
But the other day, I obtained a copy of a book entitled “Southern Cloud”
by I.R. Carter, published in
England
by Angus & Robertson,
London,
in 1964. I spent less than a day reading it, and was fascinated by the story.
It tells of a trimotor Fokker F.VII,
actually one of the British-built Avro Tens that was operated by Australian
National Airways.
ANA
was founded by Kingsford Smith and Charles Ulm after their successful flight
from Oakland, California, to
Australia
via
Hawaii
and
Fiji
in 1928. Another similar Fokker F.VII,
piloted by Lts. Hegenberger and Maitland of the
U.S.
Army Air Corps, made the first flight from
Oakland
to
Wheeler
Field,
Hawaii,
in 1926, but that is another story.
Smith and
Ulm
were impressed enough with the Fokkers to order five British-built F.VII’s,
called Avro Tens, from
England
and start an airline flying between the major cities in
Australia,
including
Sydney,
Canberra,
Melbourne,
and
Brisbane.
Five Avro Ten’s were used by
ANA
beginning in 1930, along with the original Southern Cross.
At that time, there were no navigational aids, and instrument flying was
in its infancy, and weather forecasting was very primitive. The planes did not
carry radios. Pilots were on their own,
usually flying over rough terrain in unpredictable weather conditions.
In 1931, one of the F.VII’s,
VH-UMF, crashed on flight between Sydney and Melbourne in atrocious weather
conditions. The pilot apparently got
into severe weather conditions in the mountains,
and flew into terrain not very far off course.
A long search was unsuccessful, and the
wreckage was not found until 1958. When the plane was lost, the airline stopped
operations, and the airplanes went their separate ways. The “Southern Cross”
survived, and was flown around
Australia
and to
New
Zealand
before it was retired. It is currently displayed in a glassed-in hangar at
Brisbane.
Later, in the mid-thirties, another firm operated as Australian National
Airways, but this was a different group of people.
Another
interesting footnote is that the original Fokker F.VII
was a single engine airplane, with the second and third engines only installed
by Fokker for the Ford reliability Tour of the
United
States
in 1925. The idea caught on, and most F.VII’s
were trimotors. Ford even took the
idea and built his all-metal Ford Trimotor, but this is another story.
 In
the seventies, Frog issued a kit of the “Southern Cross” in 1/72 scale, and this
is the kit I plan to use for my models.
I’m sure the molds for this kit went to
Russia
during that episode, and it was
issued by Nova and several other manufacturers over the years. The kit has been
recently reissued by Zvezda, but it is the same kit. My first question was, of
course, which airplane to build.
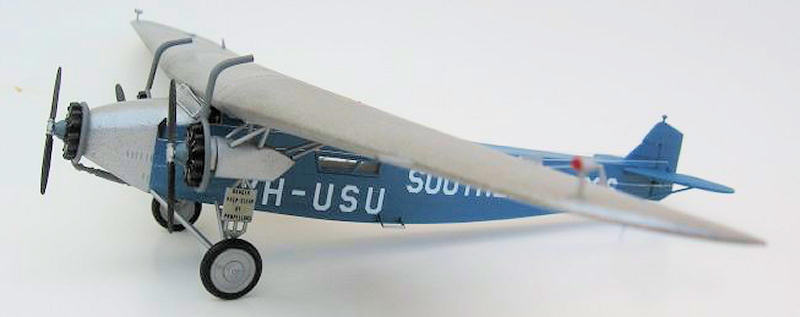
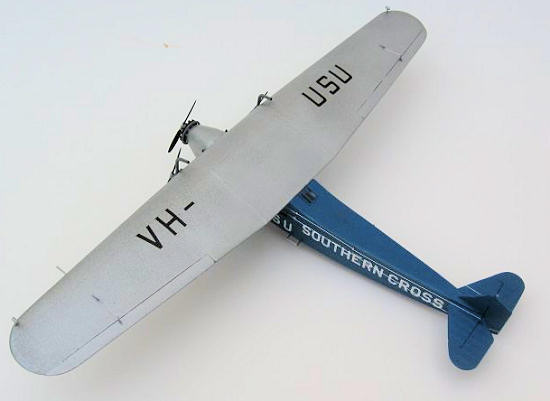
The Southern Cross went through several markings changes.
When it made its famous flight in
1928, the airplane carried an abbreviated
U.S.
registration, NC-1985, shortened to “1985” as shown on the airplane, but later,
for operations in
Australia,
it was reregistered VH-USU.
The kit decals give the 1985 marking, and this is the marking carried by
the airplane in its restored state.
In
the seventies, Frog issued a kit of the “Southern Cross” in 1/72 scale, and this
is the kit I plan to use for my models.
I’m sure the molds for this kit went to
Russia
during that episode, and it was
issued by Nova and several other manufacturers over the years. The kit has been
recently reissued by Zvezda, but it is the same kit. My first question was, of
course, which airplane to build.
The Southern Cross went through several markings changes.
When it made its famous flight in
1928, the airplane carried an abbreviated
U.S.
registration, NC-1985, shortened to “1985” as shown on the airplane, but later,
for operations in
Australia,
it was reregistered VH-USU.
The kit decals give the 1985 marking, and this is the marking carried by
the airplane in its restored state.
Since I actually have five kits, I plan to do several.
Fortunately, there is quite a bit of information available on these
airplanes, as they were probably the most important airliners of the early 20th
century, along with the Ford tri-Motors, Boeing 247’s, and
Douglas
DC-3’s. Here are some of the
sources I consulted:
Hegener,
Genri “Fokker-The Man and the
Aircraft”
Fallbrook,
CA:
Aero Publishers Inc. (Harleyford) 1961.
()Good account, with photos and a three view drawings.)
Gunston,
Bill (Ed.) “The Illustrated Encyclopedia of Propeller Airliners”
New York:
Exeter
Books, 1980 (Good historical
material, along with a three view drawing and an excellent cutaway drawing.)
Smith,
Myron J. Passenger Airliners of the
United States, 1926-1986.
Missoula,
MT:
Pictorial Histories Publishing Company, 1987. (Not much on the F.VII,
but some information on later models.)
I also
checked Juptner’s
U.S.
Civil Aircraft Series, but apparently the F.VII
never received a
U. S.
Approved Type Certificate, so the airplane is not listed there.
This is probably why it only carried the
number “1985” instead of the more usual “NC1985”. It was fairly common to see
airplanes from the late twenties
registered with the Department of Commerce, predecessor to the
CAA
and FAA, with registration numbers but no “NC” included. Another very useful
source of information was the website of a very good friend, Ed Coates, an
English-Australian American who was a prolific
aircraft photographer and historian.
His website,
www.edcoatescollection.com, contains a tremendous amount of information,
photos, and historical data, mainly on civil aircraft.
I obtained a lot of information on all of the Fokker F.VII’s
used in
Australia,
and I could spend weeks going through it and not get it all.
Even googling the notation provided a lot of information,
as the Fokker was operated throughout the world, and was used for
military as well as civilian purposes.
One
interesting postscript about the Fokker airliners is that some of them were
manufactured in the
United
States
during the twenties, and used by some of the major airlines of their day.
Fokker built some of their planes in New Jersey, including the massive
four engined F.X. On one flight, a
Fokker airliner was evidently flown into a thunderstorm, and it shed its wings,
as planes will do in that kind of turbulence. Unfortunately,
Notre Dame coach Knute Rockne was aboard
the plane when it crashed, and this prompted the Federal Government to ground
all wooden winged Fokkers as unsafe.
This was probably a political move to benefit American manufacturers, who
were now building metal airplanes, but it caused Fokker to retreat back to
Holland
and continue building airplanes there.
Ironically, later Fokker became the European distributor for the all
metal
Douglas
DC-2 airliner.
 Preparation
for Modeling
Preparation
for Modeling
My
objective was to get as much information about the airplanes as possible.
As these airplanes flew in a variety of markings, I have a lot of choices
of which plane to model. One
advantage of having a lot of photos is that I can check for details to make sure
that I have everything right. There were differences in window arrangement,
engine nacelles, landing gear, and, of course, markings.
There was even one F.VII
that operated with a large tailwheel, although most had tailskids. And, of
course, the American F.VII
used American Wright engines, while the British-built Avro Ten used Siddeley
Lynx radials instead, with the expected opposite rotation
wooden propellers.
Now
that I have amassed more information than I could possibly use, I will begin my
project.
After
some thought and consideration, I decided to build a later development of
Kingsford-Smith’s “Southern Cross”.
When I discovered that, although I had four unbuilt Frog kits in my stash, and
one I had built years ago and scrapped for spares,
I did not have a good set of decals
(they were at least thirty years old),
I decided to do the airplane in one of its later color schemes.
After arrival in
Australia
in June, 1928, the plane was
re-registered VH-USU,
and with this registration, it was flown to
New
Zealand,
where it made several local flights before returning to
Australia.
Later the plane made a tour of
Australia
before eventually being saved as a museum exhibit. It is now in an
air-conditioned, fully glass enclosed hangar in
Brisbane,
when it can be seen by the public. It also now carries the
US
registration that it carried when it made its record breaking flight, “1985”.
During
the course of the plane’s career in
Australia,
it was modified and repainted several times, and photos show not only the new
registration but also revised exhausts.
In addition, some photos show it with a three bladed prop on the nose
engine. I suspect that additional windows were installed in the sides of the
fuselage, so the detail differences have to be detected from available photos.
Fortunately, there are quite a few photos available of this airplane, so
it is mainly a question of picking one and going for it.
I found several photos on Ed Coates’ website that were very useful.
With
several new kits available, I still decided to rebuild the scrapped kit I
originally built in the early seventies.
I have done this several times in the past, and it is a lot of fun to
restore an old model. The kit I had was pretty complete and well preserved (I
store them with all of the parts in plastic bags) , so I started by
disassembling everything I could and removing all of the paint with automotive
brake fluid. A little soaking and
workover with an old toothbrush worked wonders, and shortly I had a model worth
rebuilding. The model is fairly
accurate in outline, although there are some issues.
A major problem is the shape of the engine nacelles, which should
probably be cone shaped rather than squared off and tapered.
This may have been the type of nacelle
used during the record breaking flight, but I’m not sure. Photos of later F.VII’s
show the later nacelle, so I’ll make that correction on future models.
I used the kit nacelles on this one.
The F.VII
used Wright J/6 radials which are not done well on the kit, so I replaced them
with the extra front engine sections
from old Hasegawa Zero kits , which
provide two engines of different types, and these look much better.
The props were OK, so I used these, although some later English-powered
F.VII’s
used British engines that rotated in the opposite direction, so they’ll have to
be replaced when I build one of the Avro Tens.
 One
major problem is the height of the cockpit floor.
It needs to be raised about three feet in scale to allow the pilots’
seats to be high enough so they could actually see out of the cockpit.
Instrument panel detail is minimal, and the control wheels are merely
stamped into the instrument panel, and these need to be scratchbuilt to be
completely accurate. However,
the way the wing is set against the fuselage, it is virtually impossible
to see inside the cockpit anyway, and the only thing you really need is the
seats and a built up rear cockpit bulkhead behind the seats.
But mine has the control wheels anyway, but you can’t see them from any
angle. The instrument panel and
cockpit floor come in one piece, so the floor needs to be cut off and reattached
about halfway up on the panel. The
side windows fit into the fuselage sides easily.
One
major problem is the height of the cockpit floor.
It needs to be raised about three feet in scale to allow the pilots’
seats to be high enough so they could actually see out of the cockpit.
Instrument panel detail is minimal, and the control wheels are merely
stamped into the instrument panel, and these need to be scratchbuilt to be
completely accurate. However,
the way the wing is set against the fuselage, it is virtually impossible
to see inside the cockpit anyway, and the only thing you really need is the
seats and a built up rear cockpit bulkhead behind the seats.
But mine has the control wheels anyway, but you can’t see them from any
angle. The instrument panel and
cockpit floor come in one piece, so the floor needs to be cut off and reattached
about halfway up on the panel. The
side windows fit into the fuselage sides easily.
Once
the fuselage interior is done, the fuselage halves can be joined.
A small window aft of the wing root needs to be installed at this point.
A problem I encountered here is the join line, which resists filling in for some
reason. I’d fill and sand, refill
and sand again, and finally got it after about the tenth attempt.
There are also a few indentations where the molding sags at the
attachment points, and these need filling also.
The tail unit lines up easily, and this should be done after the wing is
attached so it can be lined up perfectly.
The engine nacelles look like a difficult chore, but they are relatively
simple to attach, although the kit instructions are a little vague on exactly
how the parts are placed. I’d leave
off the wheels until later, as they have a decided inward cant, although this is
not provided in the kit.
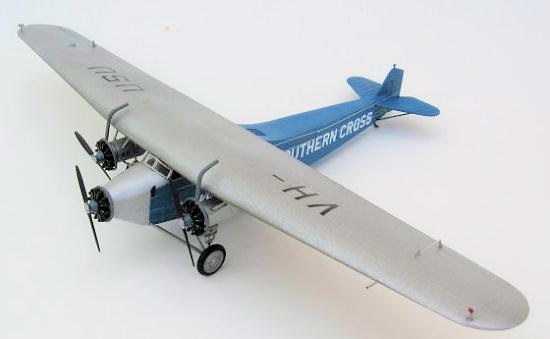
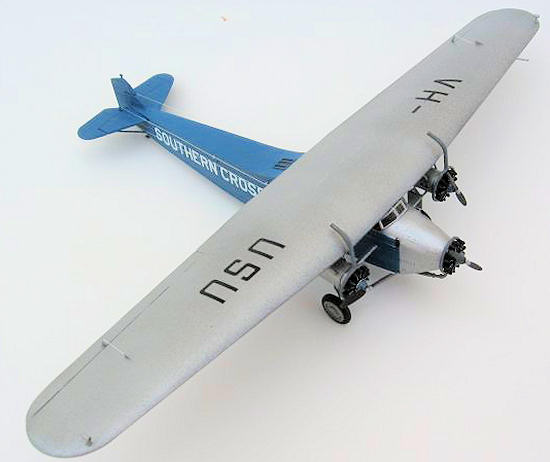
The
airplane was basically “true blue” and silver.
The wings, struts, engine nacelles and nose section were silver doped or
aluminum, and I painted these first.
The fuselage, tail section, tailskid, and stabilizer struts were true
blue, and these can be painted last.
The nacelles are a little hard to keep aligned properly, and for the
engines I used, I had to extend the nacelles slightly with small piece of card
plastic trimmed to the shape of the forward part of the nacelle.
This way, the engines stuck out far enough for the exhaust system.
The stacks were constructed using a couple of plastic rings from the
spares box, along with two pieces of bent plastic rod which go over the top of
the engine and bend backwards above the wing surface.
These are not on the record breaking version, but they do show in photos
of the airplane later in its career. I painted these
RAF
Dark
Sea
Grey, as they probably wouldn’t have flown the airplane with rusty stacks.
Once the
airplane was assembled and painted, it was time for the details.
The windshield fits into its position perfectly, and I used white glue
for this. In addition, and it’s not
mentioned in the kit, the control cables on this airplane were external, and ran
along the upper portion of the fuselage sides. I attached six small pieces of
plastic rod in three positions, simulating the rings that the cables ran
through. I also made a small
control horn for the front cockpit, and, of course, made control horns for the
ailerons, elevators, and rudder. I
ran electronic wire in sections along the sides to simulate the elevator control
cables. The rudder cables were
probably internal, so I ran these into the fuselage.
I also attached wingtip lights.
I could not find information on the location of the fuel tank filler caps
that must have been on the top section of the wing, so I excluded these, as they
don’t show in photos.
Although
this is an old kit, it does build up into an impressive model, and it is
relatively cheap, especially since there is the new Valom kit now available.
I have read reviews on it, and I hear it is good, but it is probably much
expensive that the old Frog kit. And besides, I like doing the older kits; they
are more of a challenge, and to my way of thinking, a lot more fun.
Try one. Now I’ve got to get started on an Avro Ten.
Brian Baker
October 2010
If you would like your product reviewed fairly and quickly, please
contact
me or see other details in the
Note to
Contributors.
Back to the Main Page
Back to the Review
Index Page