
| KIT #: | ? |
| PRICE: | HK$35.00 |
| DECALS: | One option: SAS |
| REVIEWER: | Richard F |
| NOTES: |
| HISTORY |
I've only flown in a DC-9 twice in my life - once as a kid,
which I don't remember, and once from the UK to Iceland, which was actually an
MD-82, a later incarnation of the plane. Inside it was similar to a Boeing or an
Airbus, except it's five seats to a row, rather than six. The coolest difference
was that the washroom had an external window. But no, you couldn't see out while
seated...believe me, I tried.
The DC-9 goes back to the early 1960s, when Douglas saw a market for a short
haul aircraft that could operate out of less-advanced airports and complement
its DC-8. The rear mounted engines allowed for a clean leading and trailing
edge, giving larger and more effective flaps and slats, which helped the short
field performance. The engines were also less vulnerable to foreign object
damage. DC-9s carried between 90 and 135 passengers depending on version,
cruised at about 900km/h, and all but the earliest version had a range of about
3,000 km. The USAF used the DC-9 as a cargo and medical transport, known as the
C-9A Nightingale, while the Navy C-9B was a standard cargo/airliner and known as
the Skytrain II.
The jet entered service with Delta in late 1965 and just under a thousand DC-9s
had been built when production ended in 1982. If you include the later MD-80/82
family, and the Boeing 717, the DC-9 family was the third most-produced
passenger jet family behind the Airbus A320 and Boeing 737 families.
 My DC-9 flies for SAS - Scandinavian Airlines. Founded in 1946, SAS broke ground
in 1954 with the first trans-polar airliner route, Copenhagen to Los Angeles via
the North Pole.
My DC-9 flies for SAS - Scandinavian Airlines. Founded in 1946, SAS broke ground
in 1954 with the first trans-polar airliner route, Copenhagen to Los Angeles via
the North Pole.
Scandinavian bought two versions of the DC-9. The DC-9-40 carried 125 passengers
and started with SAS in 1968. SAS also bought the hybrid DC-9-20, which had the
short fuselage of the original -10 version and the better wings of the
definitive -30 version, giving better short field performance with the lower
capacity cabin. It was known as the DC-9-21 in SAS service.
Scandinavian only lost one of its DC-9s, one of its special -21 versions. Taking
off from Oslo in winter 1973, the pilots tried to abort the take off run, but
the plane wasn't able to stop before the end of the runway and went hurtling
onto the frozen Oslofjord. Everyone evacuated safely, but then the ice cracked
and the plane sank. SAS still flies a large number of the DC-9's direct
descendants, the MD-81/82/87. Two of those have been lost in accidents, one with
the loss of all on board, but through no fault of the pilots or aircraft
(another aircraft collided with the SAS jet).
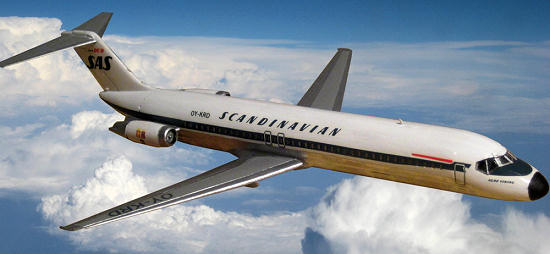
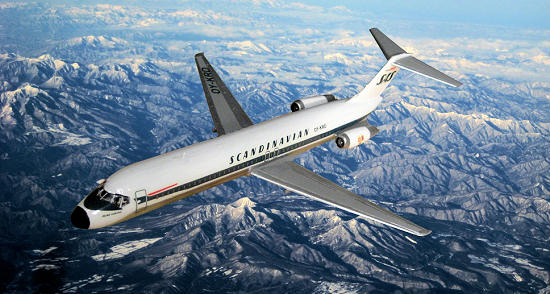
My guess is that this kit depicts the larger SAS DC-9. This is based only on the
tail marking "Super DC-9".
| THE KIT |
Modeling Madness previewed a different boxing of this kit here:
http://www.modelingmadness.com/scotts/civil/dc9preview.htm
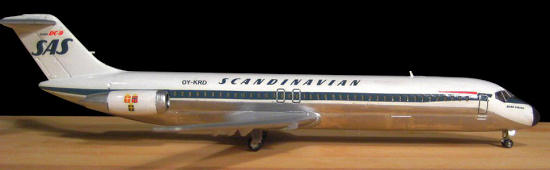
It's a neat, simple kit, with open passenger windows. The engines have inserts
for the turbine facings, and a plastic nose weight. Beyond that, it's just a
cleanly moulded, straightforward kit. It includes a stand for the wheels-up
option, but you'll need to do a little surgery on the moulded-on nosewheel
doors.
| CONSTRUCTION |
 I looked at the parts for a while, wondering where to start. No cockpit? How can
I build a model if I can't start with the cockpit? So, I worked on the engines,
which didn't take long, and then, just for fun, I cleaned up and painted all the
undercarriage. I hate doing that so I figured getting it finished first would be
a nice change. Needless to say, the wheels on this model are tiny.
I looked at the parts for a while, wondering where to start. No cockpit? How can
I build a model if I can't start with the cockpit? So, I worked on the engines,
which didn't take long, and then, just for fun, I cleaned up and painted all the
undercarriage. I hate doing that so I figured getting it finished first would be
a nice change. Needless to say, the wheels on this model are tiny.
The main thing to do before assembling the fuselage is to seal up the open
passenger windows. I suppose there are several ways to tackle this, but I cut a
strip of plastic card and glued it to the inside of the main cabin. Then I put
some tape above and below the windows on the outside of the airframe. I filled
up the windows with putty, and smoothed it off as well as I could before it
dried. Later, there was a little sanding, but not much.
I painted the inside of the cockpit black, inserted the provided noseweight,
plus a little extra just to be sure, and then put the fuselage together.
It fits together very well, and a little sanding was all that I needed to get a
nice smooth join.
Wings were next, then the T-tail.
I didn't install the engines until after the decals and painting - see below.
Remember this, because otherwise applying the blue side decal will be quite
tricky. Once the painting was done and the decals on, I slotted in the engines,
and then looked around for the undercarriage. "Ah, here's some I prepared
earlier". Now my DC-9 was ready for departure. "Kindly turn off all your
electronic devices..." Oh, wait, this was the seventies. "Sir, please, your
flared jeans are blocking the emergency exit!'
| COLORS & MARKINGS |
The kit only includes the SAS markings, though there are other boxings and
undoubtedly after-market options.
I painted the wings and tail first, using Tamiya XF-16 flat aluminium for the
metal surfaces and a grey for the main part of the wings and tail.
 Then I masked off the underside of the fuselage, and painted the upper body with
Tamiya gloss white acrylic. The engines got the same treatment, with XF-16 front
and rear and for the engine mounts.
Then I masked off the underside of the fuselage, and painted the upper body with
Tamiya gloss white acrylic. The engines got the same treatment, with XF-16 front
and rear and for the engine mounts.
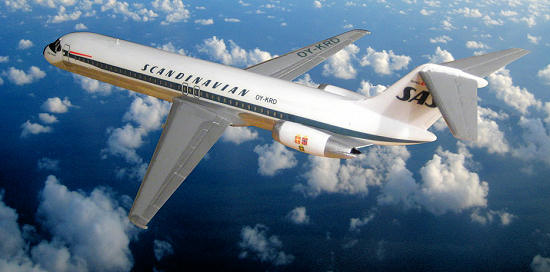
For the underside, I wanted a nice polished aluminium appearance. I don't have
an airbrush nor anywhere to use a spray can, and this kit is quite small anyway,
so I tried something I could brush on. Mr Metal Color 218 "Aluminium" was
perfect for the job. You need a smooth surface, of course, but you can then
brush it on smoothly with no trouble. I gave it two thin coats, and let it dry.
Then, taking a tissue folded over several times for strength, I buffed away like
a champion until I got a nice shiny, reflective finish.
Now, I am no expert modeler, especially in natural metal, but on a small scale
plane, this technique gives nice results for the modeler with average skills and
resources.
Warning: this stuff comes off very easily, even on your fingers from gently
handling the plane. It won't stand masking tape either. So, try to make it the
very last colour you apply, and do your best not to touch it. Also, it looks
pretty ugly before you start buffing ,so don't worry. Finally, buff lightly. If
you go too hard you'll actually wipe the paint off completely and go through to
the bare plastic. You're polishing, not sanding!
 Since building this, I have made another small plane with this paint, and found
a make-up removal pad to be a great buffing cloth. So, take your lady out for a
nice evening, then before bed, make sure you remind her of the health benefits
of removing her makeup at night. She'll thank you for noticing, and if you
cunningly watch where she stores her make-up removal kit, you can raid it later
when she's not looking. If you're a tightwad who can't spring for dinner because
you just dropped 80 bucks on resin, you can just rifle through her stuff when
she's on the phone to her girlfriends about how you don't pay her enough
attention! And if you don't have a girlfriend or wife, well, um, maybe ease off
the modeling and meet some chicks.
Since building this, I have made another small plane with this paint, and found
a make-up removal pad to be a great buffing cloth. So, take your lady out for a
nice evening, then before bed, make sure you remind her of the health benefits
of removing her makeup at night. She'll thank you for noticing, and if you
cunningly watch where she stores her make-up removal kit, you can raid it later
when she's not looking. If you're a tightwad who can't spring for dinner because
you just dropped 80 bucks on resin, you can just rifle through her stuff when
she's on the phone to her girlfriends about how you don't pay her enough
attention! And if you don't have a girlfriend or wife, well, um, maybe ease off
the modeling and meet some chicks.
And, of course, if you're a woman, then disregard the above! You already know
the benefits of make-up removal pads, both to your complexion and your bare
metal finishes.
The attractive SAS decals went on smoothly, no surprise given the nice gloss
finish on the fuselage.
Last of all, I painted the radome matt black.
| CONCLUSIONS |
A simple build that anyone can handle, except perhaps the youngest kids, who might struggle with the small parts. Recommended for a quick fun build that looks good and takes up less space than a 1/72 fighter jet.
September 2009
Copyright ModelingMadness.com. All rights reserved.
If you would like your product reviewed fairly and quickly, please contact the editor or see other details in the Note to Contributors.