Airfix 1/72 Heron II
| KIT #: | 03001 |
| PRICE: | $15.00 'used' |
| DECALS: | One option |
| REVIEWER: | John Summerford |
| NOTES: |
| HISTORY |
Courtesy of Simplyflying.com By Justin Haward and Dr. Omar Memon
Commercial aviation developed significantly after World War II, and de Havilland responded to this with new aircraft developments. It had already launched the DH.89 Dragon Rapide in the 1930s, popular with both military and civilian operators. It improved on the Rapide with the DH.104 Dove, launched in 1945.
This was a monoplane (the Rapide was a biplane), a metal design, and had a capacity of eight passengers. The Dove proved very popular, with over 500 aircraft delivered to both military and airline operators around the world.
Developing the Heron
 The DH.114
Heron was developed as a follow-on to the popular DH.104 Dove. It was designed
to be used in less developed regions as a more rugged four-engine upgrade. As
well as switching to four-engine, the Heron also had increased wingspan and a
longer fuselage. Passenger capacity as such was increased to 14. Other
modifications for more reliable use included a retractable undercarriage (the
Dove had fixed gear), and simpler engines without superchargers (it used the de
Havilland Gipsy Queen 60 engine).
The DH.114
Heron was developed as a follow-on to the popular DH.104 Dove. It was designed
to be used in less developed regions as a more rugged four-engine upgrade. As
well as switching to four-engine, the Heron also had increased wingspan and a
longer fuselage. Passenger capacity as such was increased to 14. Other
modifications for more reliable use included a retractable undercarriage (the
Dove had fixed gear), and simpler engines without superchargers (it used the de
Havilland Gipsy Queen 60 engine).
The Heron was introduced at the Farnborough Airshow in 1950, and entered service (as a prototype) with British European Airways in 1951. The Heron went on to operate many of the airline's more remote Scottish routes. The first of many overseas deliveries was to New Zealand operator National Airways Corporation in March 1952.
In use around the world
The Heron was designed for overseas use in more developing countries with less aviation infrastructure. And that is where it mostly served, although many UK operators also took on small fleets. It was operated by many African, Asian, and Australian airlines. Indonesian airline Garuda placed the largest order of any airline and operated up to 14 aircraft. Puerto Rican airline Prinair was also a major operator, with more than 20 Heron aircraft.
It also served as a transport aircraft with many countries' air forces. In the UK, four aircraft served in the RAF Queen’s Flight, replacing the Vickers Viscount. As is common with many aircraft, its use in military roles lasted a long time. Many retiring commercial aircraft found their way into military roles. In total, 149 Heron aircraft were built, with production ending in 1959.
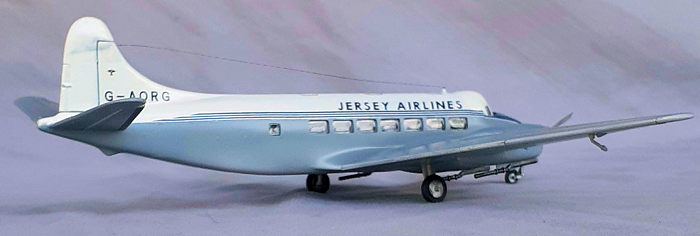
One aircraft remains airworthy, with a private owner - G-AORG, which was formerly with the RAF Queen’s Flight.
 Iconic
Duchess of Brittany saved from scrapheap. Excerpted from Emily Hubert
News
Published: Mar 18, 2021
Iconic
Duchess of Brittany saved from scrapheap. Excerpted from Emily Hubert
News
Published: Mar 18, 2021
JERSEY resident Matt Palmer saved a historic Channel Islands aeroplane from rot to protect it as a heritage asset. Named Duchess of Brittany, the de Havilland Heron (G-AORG) became subject to insolvency after restoration work took longer than expected. After hearing this, Mr Palmer submitted a personal bid of £1 to the liquidator, Grant Thornton, to save her for the CI community. ‘It certainly wasn’t an easy decision but it felt wrong to leave an important part of our local history to rot given how many people clearly care about her,’ Jersey Aero Club treasurer Mr Palmer said.
Before spending several years flying with the Royal Navy, the Duchess flew across the Channel Islands and beyond for Jersey Airlines from the 1950s. Mr. Palmer aims to return her to the skies as a historic flag-carrying aircraft in airshows, or protect her as a static historical exhibit.
The former Jersey Airlines De Havilland Heron took her maiden flight in 1956, before serving in the Royal Navy as a Sea Herron for almost 30 years. After her service in the military, she was eventually returned home by a team of local pilots. “She's a remarkable plane, she first flew in the 1950s for Jersey Airlines, after that she was sold to the Royal Navy, where she spent spent 30 flying for Her Majesty's Service before being bought by a group of local pilots and brought back to the Island. They did this remarkable restoration that you can see today.”
| THE KIT |
Scalemates reports that the kit was first released 1959. This example was released in 1993 as part of Airfix’s Classic Airliners series with new decals and updated into a Heron II. The last re-release was in 2019.
 Inside the
box are three skeletal sprues of hard light gray styrene holding 56 pieces, (at
least, to start with) and one clear sprue holding five. The six major pieces
were loose as were some parts that broke off the sprue. Two of the propellers
were broken in this example. Included in the parts are a pair of pilot figures,
one stewardess, (as was her title in those days) and four passengers. Cockpit
detail is an instrument panel and two seats. The only cabin detail is molded
into the rear bulkhead and the door can be displayed open.
Inside the
box are three skeletal sprues of hard light gray styrene holding 56 pieces, (at
least, to start with) and one clear sprue holding five. The six major pieces
were loose as were some parts that broke off the sprue. Two of the propellers
were broken in this example. Included in the parts are a pair of pilot figures,
one stewardess, (as was her title in those days) and four passengers. Cockpit
detail is an instrument panel and two seats. The only cabin detail is molded
into the rear bulkhead and the door can be displayed open.
The fuselage parts and wings have plenty of oversized rivets in neat rows, but otherwise acceptable detail and little flash.
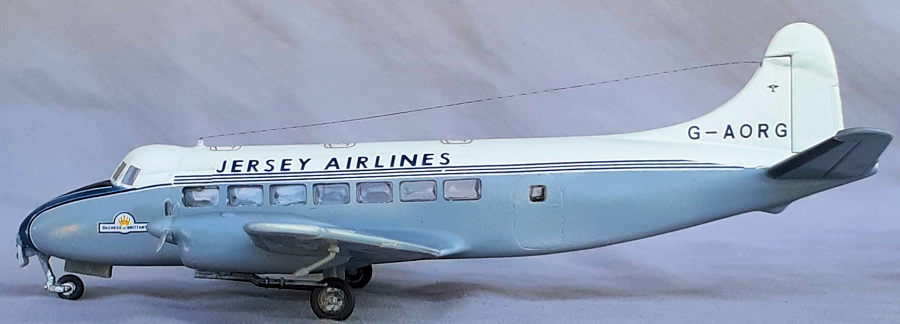
Decals are for G-AORG and are well printed on a single sheet of clear film. Instructions are on a single fold sheet broken down into seven steps and a page of paint diagrams. Colors are referenced to Humbrol paints.
| CONSTRUCTION |
The emphasis of this build was to produce an airliner livery scheme, so accurate detail was not a major concern. After sanding off the rivets, a notch was filed at the top of the fin for the installation of a radio aerial. The instrument panel and rear bulkhead was dispensed with as was interior painting. The cabin windows and door were cemented in place as was the cockpit floor and seats. Masking was placed over the windows to protect them during the rest of the build.
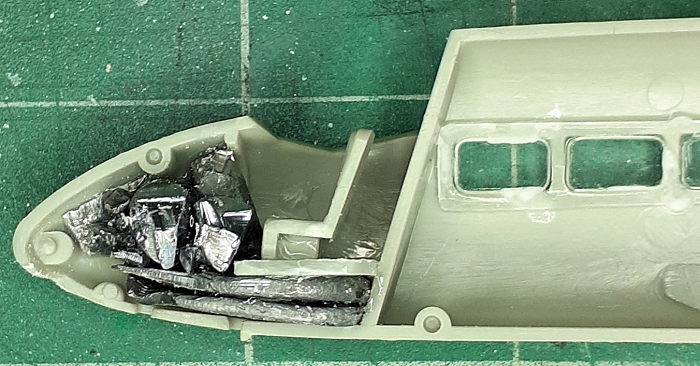 The
instructions are helpful in calling attention to 15 grams of ballast to be
installed in the nose. There is not much room for that, but bits of lead did the
trick.
The
instructions are helpful in calling attention to 15 grams of ballast to be
installed in the nose. There is not much room for that, but bits of lead did the
trick.
Unfortunately, the nose gear trunnion is trapped between the fuselage halves, which almost ensures that it would break off sometime during the build. Fortunately, it can retract if there is room in its well. After the fuselage halves were mated, the strut was retracted as much as possible. So of course, it was knocked off when dealing with the fuselage seam. It was saved for later. The windshield was installed and blended into the fuselage.
Next in the instructions was adding the tail feathers. Again, the rivet detail was removed before gluing. Some filler was needed in the stabilizer seams.
Assembly of the wings follows similar engineering regarding the landing gear. If the struts are extended, the trunnions are trapped in a mounting plate, then the halves glued together. This arrangement proved to be robust and, fortunately, not knocked off. Fit of the wings to the fuselage was good with just a dab of filler needed.
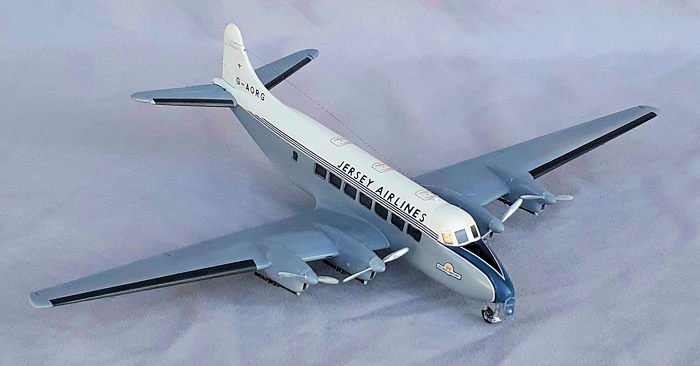
Most of the work filling and sanding during the build occurred when assembling the engine cowls and fitting them to the wings. The instructions called for the props and exhaust pipes to be installed during this step, but were left off for the final assembly. The airframe was ready for painting.
| COLORS & MARKINGS |
In my previous build, I used white paint from a rattle can of new Testors and what was remaining in the can was applied on upper portion of the fuselage. MRP paints, which are acrylic lacquer, were selected for the rest of the model save for the nose. The problem with this approach is that the acrylic lacquer did not adhere to the enamel, so the model was masked for the white paint. The first coat of the enamel was splotchy and the second coat resulted in an orange peel finish. (Possibly due to applying it in less than 24 hours after the first.) 800 grit sandpaper dipped in water smooth out the paint. For the third coat, the paint was decanted, thinned, and sprayed through the airbrush. That worked well.
 A printed
scan of the decal sheet was used to define the mask for the blue on the nose.
The compound curve made it tricky and the margin of error was about a
millimeter. That area was sprayed with some left-over blue mix that could have
been a bit darker, but looks good.
A printed
scan of the decal sheet was used to define the mask for the blue on the nose.
The compound curve made it tricky and the margin of error was about a
millimeter. That area was sprayed with some left-over blue mix that could have
been a bit darker, but looks good.
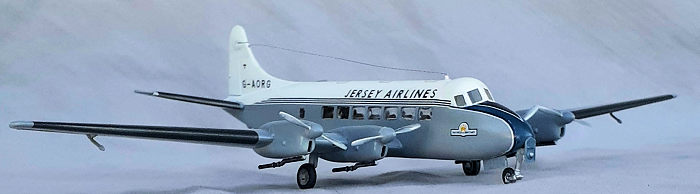
After a couple of days of curing, the fuselage was masked and a coat of Vallejo white primer straight from the bottle was sprayed over the rest of the model, followed by Dark Ghost Gray. The de-icing boots were masked off and sprayed in Rubber. When they were unmasked, the entire model was given a gloss coat, also from MRP.
Anticipating a problem of the 30-year-old decals shattering, they were given a coat decal fix first. They held together well but they needed 10 minutes to separate from the backing sheet. Nor did they maneuver into place easily. The first fuselage stripe broke just behind the lettering, which made it easier to move the pieces. Given that clue, the other stripe was cut in the same place, as were the cheat lines on the nose decals cut at the apex of their curves. Even with those cuts, they didn’t handle the compound curve well, even after several applications of Solve-A-Set. A couple of paint touch-ups helped hide the problems.
The next day the model was given another coat of gloss.
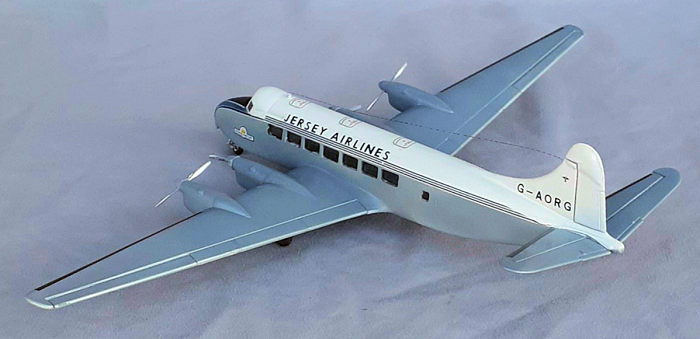
Once the painting was done, attention was given to the underside bits; exhaust pipes, main wheels, aileron mass balancers and the nose wheel strut and doors. A short bit of styrene rod was installed as an aerial mast and monofilament thread was glued into the notch in the fin and then to the top of the mast. After the two broken props were repaired, the installation of the four of them completed the model.
| CONCLUSIONS |
This is another example of old Airfix, meaning it takes a lot work to make a 21st century model. The overall size and shape look correct, detail is sparse and the fit is reasonably good. About 18 hours went into the project.
It is a coincidence that the kit decals are of the only flight worthy Herron left. Fresher decals for foreign operators and Air-Graphic Models, set # AIR72-023 for RAF Queen’s Flight can be sourced from Hannants.
3 June 2024
Copyright ModelingMadness.com. All rights reserved. No reproduction in part or in whole without express permission.
If you would like your product reviewed fairly and fairly quickly, please contact the editor or see other details in the Note to Contributors.