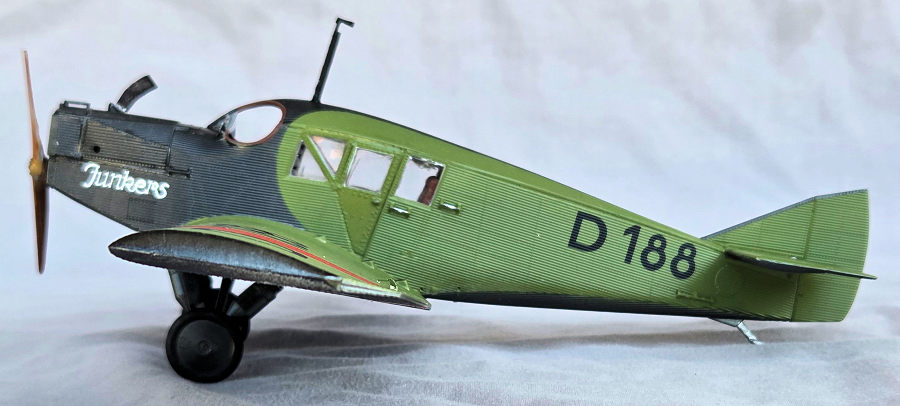
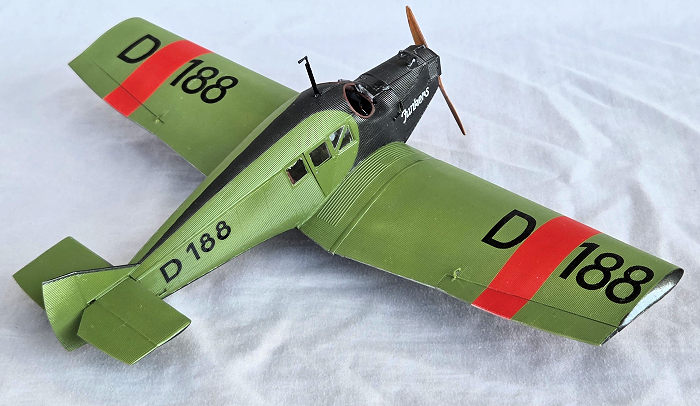
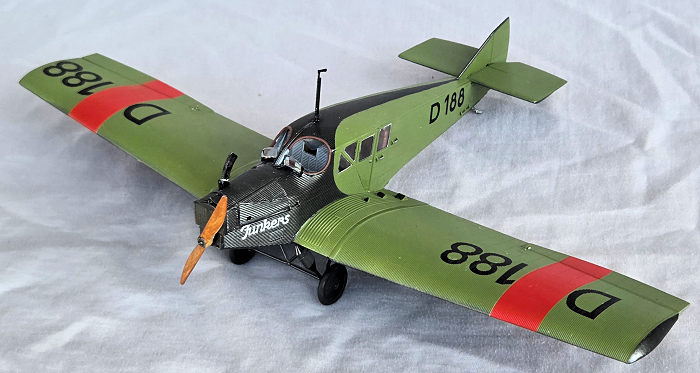
MiniArt 1/48 Junkers F.13
| KIT #: | 48002 |
| PRICE: | $55.00 |
| DECALS: | Three options |
| REVIEWER: | John Summerford |
| NOTES: |
| HISTORY |
Edited from Wikipedia
 The Junkers F 13 was the
world's first all-metal passenger airliner. Produced shortly after the end
of the First World War, it was a cantilever-wing monoplane with enclosed
accommodation for four passengers and a two-seat open cockpit. It had a
duralumin structure entirely covered with Junkers' characteristic corrugated
and stressed duralumin skin. Internally, the wing was built up on nine
circular cross-section duralumin spars with transverse bracing. All control
surfaces were horn balanced.
The Junkers F 13 was the
world's first all-metal passenger airliner. Produced shortly after the end
of the First World War, it was a cantilever-wing monoplane with enclosed
accommodation for four passengers and a two-seat open cockpit. It had a
duralumin structure entirely covered with Junkers' characteristic corrugated
and stressed duralumin skin. Internally, the wing was built up on nine
circular cross-section duralumin spars with transverse bracing. All control
surfaces were horn balanced.
A total of 322 aircraft were manufactured, a considerably large number for a commercial airliner of the era, and were operated all over the world. It accounted for over a third of air traffic in the early 1920s. It remained in production for thirteen years and in commercial service for more than thirty. There were many versions including floatplanes for water landing, skis, mailplane, and different engines.
| THE KIT |
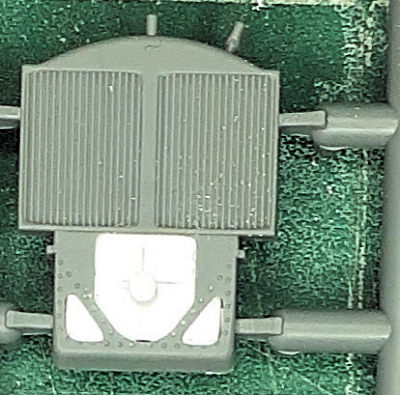
 A single bag holds 10 sprues with
another bag holding a photo-etch fret, clear sprue, and vinyl masks. A third bag
holds the decal sheet. The sprues are nicely molded with splendid detail. The
corrugations are in scale. There is an option to build the airframe with the
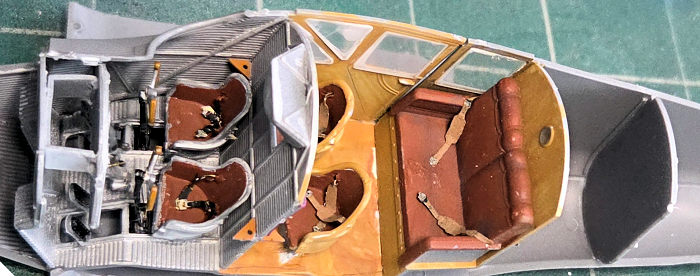
wings unattached for transport. The engine, cockpit, and cabin are very
detailed. This example came with disks with no corrugations on the fuselage
sides. More on that later. The total number of parts in the kit is 178.
A single bag holds 10 sprues with
another bag holding a photo-etch fret, clear sprue, and vinyl masks. A third bag
holds the decal sheet. The sprues are nicely molded with splendid detail. The
corrugations are in scale. There is an option to build the airframe with the
wings unattached for transport. The engine, cockpit, and cabin are very
detailed. This example came with disks with no corrugations on the fuselage
sides. More on that later. The total number of parts in the kit is 178.
Paint schemes are illustrated on the insides and back cover of the 10-page instructions. The front cover states that the hatches can be assembled in open or closed position, however there are no illustrations showing the doors or engine cover in the open position. On MiniArt’s website (discovered later) is a CAD illustration showing the engine cover open in the same way as the hood on an automobile. If the hatch is closed, there is no reason to build the engine other than to mount the prop. Assembly is done through 32 steps.
Paint brands called for are; Vallejo, Mr. Color, AK RC, Mission Models, AMMO MIG, and Tamiya.
| CONSTRUCTION |
Construction starts in the cabin, then moves to cockpit subassemblies. Before gluing any parts, the interior pieces were painted while on the sprues. The first sub assembly is bulkheads glued to the rear fuselage sides. It was at that time that the disks on each side piece were discovered. I sent an email to MiniArt for replacements. While waiting, as many subassemblies as possible, including the cockpit plus the cabin, seats, tail plane and wings were completed.
Ahead of the instrument panel is the cover piece with filler cap for the oil tank. It sits between the pivot rods for the engine cover, which don’t become obvious until later in the build sequence. The resulting gaps were filled in with shims, only to be ground out to accommodate the rods.
 Spars are part of the outer wing
assemblies and, in this example, they interfered with the fit of the upper and
lower pieces. A rotary tool was used to remove a couple of millimeters of
material from the top of the spars.
Spars are part of the outer wing
assemblies and, in this example, they interfered with the fit of the upper and
lower pieces. A rotary tool was used to remove a couple of millimeters of
material from the top of the spars.
Since the excellent 170 hp Mercedes engine was not going to be shown, the nose was built up by gluing a backing plate on the backside of the radiator part, drilling a hole for the prop shaft, and inserting a length of styrene rod. With that in place, lower sides were added and these informed how the engine cover should be assembled, after the channels for the pivot rods were ground out. At this point the project was paused.
When the build resumed with the correct fuselage sides on hand, the clear parts were installed and masked with the supplied vinyl, then the rear fuselage was assembled. The down side of modular pieces is that it adds complexity to the build with additional joints to align. The dado lips of the cabin to rear fuselage could have been more pronounced to ensure better alignment. In this instance, the assembled sides were not symmetrical and gaps resulted along the top and bottom seams. There were gaps for the doors also. One nit to pick here is that the door handles are separate pieces instead of molded as part of the doors. They both were knocked off subsequently, never to be seen again. Blobs of cyano acted as substitutes. After the fuselage was tidied up, the tail was installed and aligned easily.
 Care must be taken when adding the
outer wing panels to make sure that the dihedral is correct. Due to slight
differences in the spars, (from material being removed) the angles were
different and needed some adjusting as the glue cured.
Care must be taken when adding the
outer wing panels to make sure that the dihedral is correct. Due to slight
differences in the spars, (from material being removed) the angles were
different and needed some adjusting as the glue cured.
Various grab handles were added to the fuselage. There are options for either styrene or photoetch pieces. I opted for the plastic, as it is easier to work with.
MiniArt keyed the landing gear struts well, but they could be more robust, as one was damaged when removed from the sprue. The mounting pins and sockets could be larger too, but held up to subsequent handling.
Bits of foam rubber were stuffed into the cockpit and liquid mask brushed onto the windshields, so, finally, it was time to paint.
| COLORS & MARKINGS |
As is my usual practice, a rattle can of automotive primer was the first coat. Unusually for me, there was not any further work do on the seams. The red strips on the wings were masked and Mr. Color Aqueous sprayed on. They were masked and MIG Ammo Atomic line of green acrylic paint was sprayed over most of the model. This was my first time using that paint and I found that it worked very well.
Whole circles were cut from masking tape to act as the curve for the black around the cockpit. The upper surface of the wings and stab/elevator, plus the fin/rudder and fuselage were masked. Vallejo Model Air black was used in the airbrush. Unsurprisingly, unmasking revealed that some touchups were needed, but they were easily dealt with. An application of Vallejo’s acrylic gloss varnish from a rattle can prepared the model for decals.
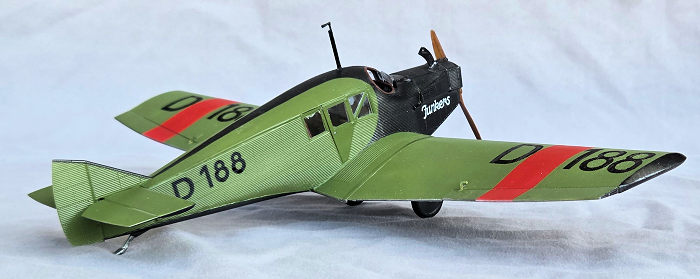 There are only 12 decals for this
scheme. They were applied over several sessions. A white “D” was laid down on
the underside of the right wing. That decal does not have any film inside the
“D”, which decreases the chances of silvering. It also makes it difficult to
slide the letter off the backing paper and tease it into the proper location and
shape. The best technique is to flood the area with water -- nothing stronger --
and locate the decal as close to the final position as possible and remove the
backing paper along the corrugations. Moving the decal across the corrugations
is difficult, but possible. The numbers are all on one piece of film, so they
are easier to deal with.
There are only 12 decals for this
scheme. They were applied over several sessions. A white “D” was laid down on
the underside of the right wing. That decal does not have any film inside the
“D”, which decreases the chances of silvering. It also makes it difficult to
slide the letter off the backing paper and tease it into the proper location and
shape. The best technique is to flood the area with water -- nothing stronger --
and locate the decal as close to the final position as possible and remove the
backing paper along the corrugations. Moving the decal across the corrugations
is difficult, but possible. The numbers are all on one piece of film, so they
are easier to deal with.
Applying the decals on the upper wing surface is made more difficult by the camber causing the water to run off, so constant, liberal, brushing on more water during the process was required. The fuselage decals were easy to apply compared to those on the wings.
Micro set was brushed over each decal when it was in place and that prevented silvering on all but the upper wing surfaces. Those were dealt with a razor blade and Solvaset. When everything settled down, another coat of gloss was sprayed on.
A leather color was hand painted over the coaming around the cockpit, then the wheels added. The photoetch aileron horns applied using UV light cured epoxy and then painted. The step behind the left wing is rendered by a photoetch piece that is bent to shape. The instructions are unclear as to which way to bend the piece, nor indicate which end is forward. Its installation was abandoned after four attempts. That left the mast for the venturi tube, exhaust pipe and prop to complete the model.
| CONCLUSIONS |
Kudos to MiniArt for producing this kit under war time conditions and correcting the wrong fuselage pieces. (It took MiniArt a week to respond to my email and they asked for more info. At the end of my reply, I added that an undesirable act be done to Putin. At the end of the email announcing the shipment of the replacement parts was a sentence stating that the venue for said action should be Hell.)
A splendid model is possible with this kit. Unfortunately, the instructions let the build down and some of the CAD engineering appears that measurements were taken from the on-center point and didn’t take into account the thickness of the plastic. A lot of the joints could be beefier to help with alignment. Recommended for experienced modelers.
John Summerford
2 June 2025 Copyright ModelingMadness.com. All rights reserved. No
reproduction in part or in whole without express permission from the editor. If you would like your product reviewed fairly and fairly quickly, please contact the editor or see other details in the
Note to
Contributors.