
Azur 1/72 Farman NC 223.1
| KIT #: | A004 |
| PRICE: | $84.00 |
| DECALS: | Three options |
| REVIEWER: | Chris Peachment |
| NOTES: | Short run kit with resin parts |
| HISTORY |
This thick-winged, four engined monoplane was derived from the Farman F.220, and based on the push-pull engine configuration which had been proven by the F.221. It first flew in May, 1932. The F.222 variant was the largest bomber to serve in France between the world wars.
 The F.223
(redesignated NC.223 when Farman was absorbed into SNCAC) had
significant changes, including a twin tail and a refined fuselage, and
was ordered as a long range mail carrier, operating for Air France on
the South Atlantic route. The Ministere d l'Air ordered a production run
of 8 of the NC.223.3 variation which was begun in 1939.
At the outbreak of
war, one was sent to Dakar for maritime reconnaissance but was lost
thanks to an accident on take-off.
The F.223
(redesignated NC.223 when Farman was absorbed into SNCAC) had
significant changes, including a twin tail and a refined fuselage, and
was ordered as a long range mail carrier, operating for Air France on
the South Atlantic route. The Ministere d l'Air ordered a production run
of 8 of the NC.223.3 variation which was begun in 1939.
At the outbreak of
war, one was sent to Dakar for maritime reconnaissance but was lost
thanks to an accident on take-off.
A variant NC. 223.4 Jules Verne of Naval Aviation French was the first Allied bomber to raid Berlin, on the night of 7 June 1940, dropping eight 250kg bombs. This was repeated three days later, but was mainly an exercise in psy-ops.
| THE KIT |
I have become fascinated
by the Farman company which had a long and honourable history in French
aviation, but has barely been covered by the kit manufacturers. If you check
Farman in the index of this website
 you will find that I have had to scratch
build most of them. So it was a great pleasure to open one of my Christmas
presents and find this, from a good friend who also makes model aircraft
when his children allow him enough time, which is hardly ever.
you will find that I have had to scratch
build most of them. So it was a great pleasure to open one of my Christmas
presents and find this, from a good friend who also makes model aircraft
when his children allow him enough time, which is hardly ever.
There was no flash here and the plastic is soft and workable, which is just as well as it is a short run kit, and so there are the usual lack of locating pins. Attachments to the sprues are large and need careful detaching. The builder is also expected to open the large windows on the side of the nose and glaze them himself. He is also to make up some of the tail struts. For this reason it might not be suitable for the beginner, although since it is a large kit, with not very many parts, it might be a good start for someone trying a short run kit for the first time, perhaps with some guidance.
| CONSTRUCTION |
 Putting it all together
takes the classic path. Cockpit first, which is perfectly sufficient for
what can be seen, although the nose glazing is extensive and there is no
furniture in there. I had no reference material to determine what this might
be and so left it bare. I imagine a navigator's table might be an obvious
choice. Interior colour is dark French blue, with some details such as the
quaint quadrant shaped rudder pedals picked out in black and aluminium.
Putting it all together
takes the classic path. Cockpit first, which is perfectly sufficient for
what can be seen, although the nose glazing is extensive and there is no
furniture in there. I had no reference material to determine what this might
be and so left it bare. I imagine a navigator's table might be an obvious
choice. Interior colour is dark French blue, with some details such as the
quaint quadrant shaped rudder pedals picked out in black and aluminium.
It is best to remove the nose side window at this point, which I did by chain drilling, as the plastic is thick. Because it is thick, I decided not to put glazing inside, since this would have left a wide sill all the way around the window.
Unlike many short run kits, the interior fitted well, and so the very long fuselage was glued shut and left to dry, before attacking the prominent seams with filler and sanding sticks. There is also a plug to fill the dorset turret hole for the later variants. This too needs filler.
 The tail unit is best
built separately and added at a later stage as it needs some complex
under-struts to be made from strut material. The tricolour decals should be
added to the fins at this point after they have been painted (see below).
The thin decals settled won well with some setting solution. Both underside wing
halves showed signs of warping, and since there are no locating pins, these
can be glued, held with rubber bands and clamps, and the warping corrected
by sliding each half around against the upper wing half until it disappears.
The tail unit is best
built separately and added at a later stage as it needs some complex
under-struts to be made from strut material. The tricolour decals should be
added to the fins at this point after they have been painted (see below).
The thin decals settled won well with some setting solution. Both underside wing
halves showed signs of warping, and since there are no locating pins, these
can be glued, held with rubber bands and clamps, and the warping corrected
by sliding each half around against the upper wing half until it disappears.
The very large wings have no locating tabs, and so they have to be butt jointed onto the fuselage at this stage. Take care over the dihedral, which will require some sanding of the shoulder joint to get right. The canopy and nose glassworks can now be fitted and masked, although the canopy does require a lot of trimming to get it to fit. This is always a problem when the canopy plastic is thick and brittle. A square sponge sanding block is handy for awkward corners.
| COLORS & MARKINGS |
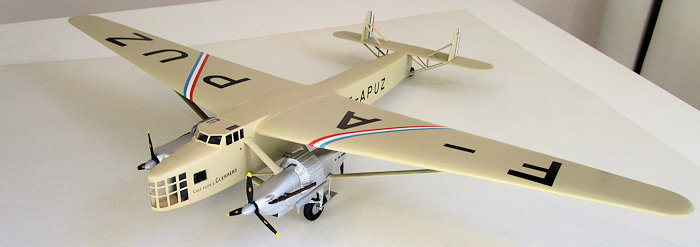
Once the wings and tail are in place, the huge beast can be painted. I wanted to use that lovely creamy colour which Air France sported before the war, and found that Vallajo Air 71.075 Sand (Ivory) looked to be a good match. The kit recommends Gunze Radome Tan which may work well, if you can find it.
 The push-pull engines are
separate items and present no problems, although you must carefully
distinguish between left and right nacelles. They differ slightly with their
intakes. The undercarriage is complex and best incorporated into the
nacelles at this stage. The beautiful fan shaped radiators are moulded in
PUR (For the rest of us, that means resin. Ed), and needed a little fettling to get them to fit. Incidentally, I found
that polystyrene cement will hold PUR in place, although it doesn't melt it
to make a good joint. Much as I hate the stuff, superglue is better.
The push-pull engines are
separate items and present no problems, although you must carefully
distinguish between left and right nacelles. They differ slightly with their
intakes. The undercarriage is complex and best incorporated into the
nacelles at this stage. The beautiful fan shaped radiators are moulded in
PUR (For the rest of us, that means resin. Ed), and needed a little fettling to get them to fit. Incidentally, I found
that polystyrene cement will hold PUR in place, although it doesn't melt it
to make a good joint. Much as I hate the stuff, superglue is better.
The whole lot was blasted with silver from a rattle can, and then weathered a little with a few greasy streaks to take the edge off the too shiny look. I wasn't about to use Alclad, as I don't like my engines looking like the polished chrome front end of a '57 Chevrolet. Exhausts were dark rust, again with some smokey streaks.
| FINAL CONSTRUCTION |
Now came the kit's major problem. There is always something that fights back at you in a short run kit. Dry fitting the engines to the fuselage by their struts revealed that the rear set are far too long, and would result in a severe toe-in of the front engines, making for a very knock-kneed look. I found the best way was to rest the model on its side by sticking one wing inside a tall coffee can, and secure the engines by the front struts only, while supporting them at the rear with a cardboard box lid. The lid from a rigid pack of 20 cigarettes works fine. If you don't smoke, you might consider taking it up.
Once dry, the rear struts have to be made up from thick strut material, the sort that sits in the pack but you rarely get around to using. The strut attachment fairings can be trimmed off the kit's offerings and added to your scratched struts.
 Once that is all done,
you can try and squeeze the wheels into their forks, discover that the forks
are built with the strength of a iron girder bridge, and so you have to
lever them open with a tire iron and suffer the consequent horror of having
them snap off. No matter, the wheels will now go where they belong, provided
the carpet monster hasn't feasted on them. Incidentally, a French modelling
website filled me in with the exciting news that the French for the carpet
monster is Le Carpet Monster. Which is nice to know.
Once that is all done,
you can try and squeeze the wheels into their forks, discover that the forks
are built with the strength of a iron girder bridge, and so you have to
lever them open with a tire iron and suffer the consequent horror of having
them snap off. No matter, the wheels will now go where they belong, provided
the carpet monster hasn't feasted on them. Incidentally, a French modelling
website filled me in with the exciting news that the French for the carpet
monster is Le Carpet Monster. Which is nice to know.
The nose windows I glazed with Scotch tape, stamped in place, and then trimmed around with a new blade. Have a care here, as the paint is prone to lifting when you remove the tape surround.
The decals go on fine, the only thing to watch out for is getting the wing pennants to line up neatly at the leading and trailing edges. Getting the colours the right way round. The lettering had large amounts of carrier film, so rather than risk silvering, I cut all around the letters. A tedious business, but worth doing. A handy tip for then aligning all the separate letters on the model is to use a strip of masking tape as a base line. When you remove it, it will rip off some of the paint, but don't worry as Vallejo Air brushes very well.
I always leave the props until last, from custom and habit. The blades are all separate, so watch out for the angles. Their mounting rod doesn't fit into the appropriate hole and needs to be replaced with thinner rod. The decal sheet has the maker's markings for the blades, which is nice.
| CONCLUSIONS |
You have been
wrestling with a big beast, so when it is finally done, and you step back to
view the finished item, you can let out a victorious sigh at having subdued
something above your usual weight and class. The whole mighty thing is
larger than a B-17 or Lancaster. It quite overshadows the pre-war fighters
in your collection, which can be posed under the wings. It sits alongs ide my
Heller Couzinet Arc-en-Ciel, and I don't know of any lovelier pre-war French
airliners. Unless it be the
Dewoitine 332 tri-motor, which I sincerely hope some manufacturer might kit
soon. Oh, and include a Bloch MB. 220 as well. The greed of some modellers
has no end.
ide my
Heller Couzinet Arc-en-Ciel, and I don't know of any lovelier pre-war French
airliners. Unless it be the
Dewoitine 332 tri-motor, which I sincerely hope some manufacturer might kit
soon. Oh, and include a Bloch MB. 220 as well. The greed of some modellers
has no end.
I see that the enterprising Azur are offering to do a subscription kit of the Breguet Bizerte flying boat, if enough modellers sign up to the idea and put a deposit on the kit before it is made. It is a clever way of proceeding, since any manufacturer these days can hardly take the risk of such a rare aircraft which might not sell well. I would sign up to it straight away if I felt sure that I would still be around in three years time when the kit might or might not appear.
| REFERENCES |
http://aviadejavu.ru/Site/Crafts/Craft26093.htm
http://www.vvsregiaavions.com/AvionsHTML/af2221.htm
http://www.airwar.ru/enc/bww2/nc223.html
January 2016
Copyright ModelingMadness.com
If you would like your product reviewed fairly and fairly quickly, please contact the editor or see other details in the Note to Contributors.