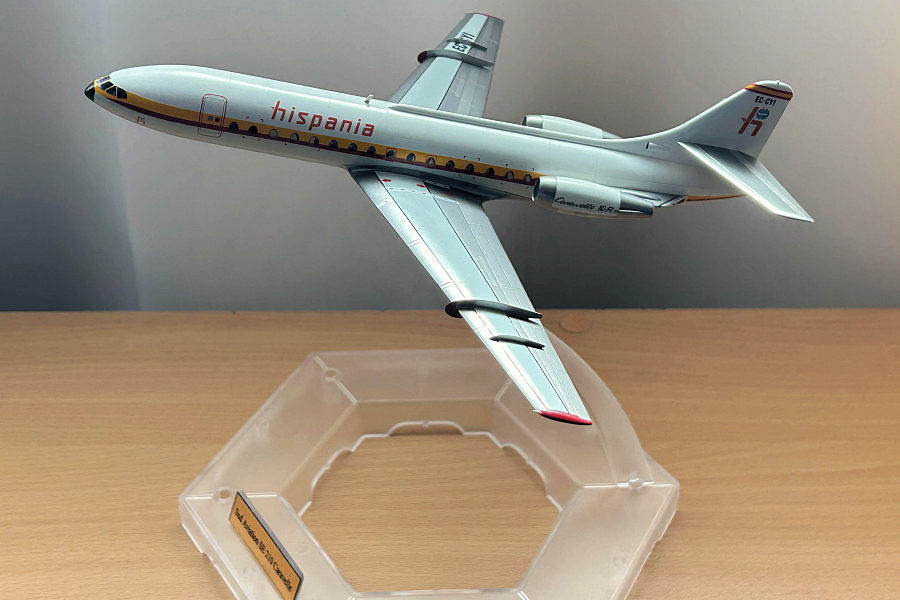
Amodel 1/144 Caravelle
| KIT #: | 1480 |
| PRICE: | $30.00 |
| DECALS: | Two options |
| REVIEWER: | Marcello Rosa |
| NOTES: | Authentic Airliner decals |
| HISTORY |
The Caravelle was the result of a competition launched by the French Secretariat for Civil and Commercial Aviation in 1951, when the French aeronautical industry was still emerging from the rubble left by World War II. Initially planned to be powered by 3 SNECMA Atar engines, the design was changed to accommodate 2 of the newly developed Rolls-Royce Avon, and the Caravelle as we know today was born. It was arguably the best and most successful of the first-generation jet airliners. And, almost certainly, the most beautiful.
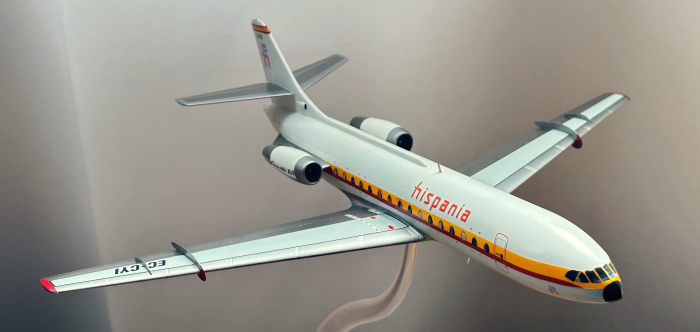 The design of the Caravelle was outstandingly
innovative for the time. In contrast with its contemporaries (e.g. de
Havilland Comet and Boeing 707), the flight controls in the Caravelle were
operated hydraulically, making flying a lot less taxing for the air crews.
They were also equipped with the first autopilot system ever deployed to
civilian aircraft, the Sud-Lear “Autoland”, which went into history as
allowing a Caravelle to execute the first fully automated landing in heavy
fog in 1969.
The design of the Caravelle was outstandingly
innovative for the time. In contrast with its contemporaries (e.g. de
Havilland Comet and Boeing 707), the flight controls in the Caravelle were
operated hydraulically, making flying a lot less taxing for the air crews.
They were also equipped with the first autopilot system ever deployed to
civilian aircraft, the Sud-Lear “Autoland”, which went into history as
allowing a Caravelle to execute the first fully automated landing in heavy
fog in 1969.
Caravelles also incorporated many solutions specifically designed to the reality of short- to medium-haul passenger traffic in Europe and in many other parts of the world, where short runways and basic facilities could be expected. These included a parachute which could be deployed from the rear to shorten the landing distance, and a retractable staircase incorporated to the rear centre of the fuselage. These contributed enormously to the Caravelle’s commercial success, which included operations in every continent except Australia
Finally, the Caravelle had well-deserved a reputation for safety, in comparison with contemporaries. These characteristics, as well as the quietude of the ride afforded by the rear mounted engines, made them endeared to a whole generation of travellers and pilots. 282 Caravelles were completed, with the last one was not being retired until 2005.
| THE KIT |
This is a short run kit made by a small company in Ukraine, although this fact is not advertised in the box art (instead, we get the address of the distributor in Poland). Therefore, you don't start a project like this expecting modern precision; you start it because you want to tackle a relatively niche subject, and because we thankfully have companies that take the risk of making kits for these. You get exactly what you signed up for: no alignment pins, significant gaps to fill, flash, and some parts that are slightly malformed and needed re-sculpting. As proudly stated in the instructions, "intended only for experienced modelers". Thus, you will not hear me complaining.
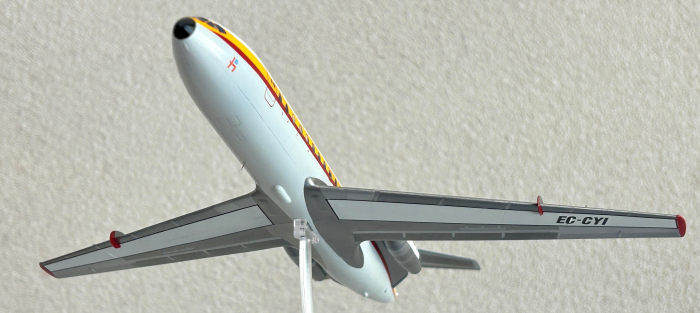 Instead, I will tell you about the good news. It is a
simple build in terms of numbers of parts, and the final product looks very much
like a Caravelle.
Instead, I will tell you about the good news. It is a
simple build in terms of numbers of parts, and the final product looks very much
like a Caravelle.
The kit includes 5 sprues in soft grey plastic and one clear sprue, to a total of 60 parts including some that you do not need to use for this version. It also includes masks for the pilot windows and for the unique near-triangular passenger windows, should you decide to keep them clear, as well as black decals for the passenger windows, should you decide to paint everything and deal with windows at the end. Strangely, though, there are not enough masks for the passenger windows. A small but high quality photoetch fret gives the wing fences and one of the antennas (the latter incorrectly shaped, as it turns out).
Here it is probably a good opportunity to say that the decals were a delightful surprise. Sharply printed, opaque, good density, and played well with Microsoft and Microsol. The kit comes with 2 options of markings, the Hispania one I chose to use, and another for Air Caledonie. Having been burned before by my interactions with other short-run kits from Easter Europe (looking at you, Roden!) I was expecting a battle, which did not eventuate. Top marks for this criterion.
| CONSTRUCTION |
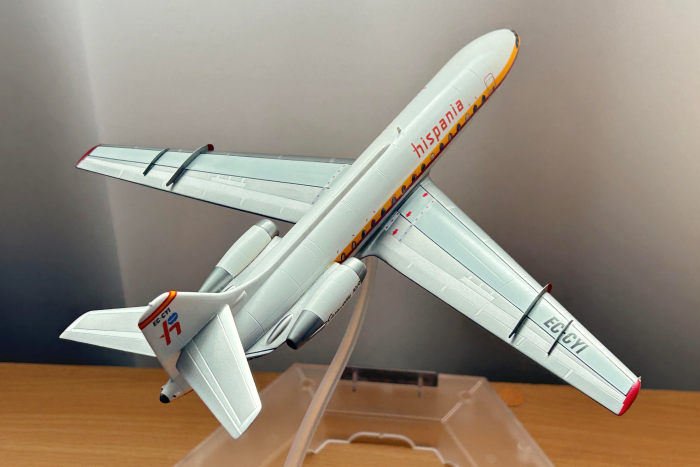 The basic construction steps are very simple, with
the only deviations from the instructions being due to my decision to represent
the Caravelle in flight. Here, I was trying to go for the looks of those model
airplanes that we used to see in the windows of travel agencies when I was a
kid. But, of course, in much smaller scale.
The basic construction steps are very simple, with
the only deviations from the instructions being due to my decision to represent
the Caravelle in flight. Here, I was trying to go for the looks of those model
airplanes that we used to see in the windows of travel agencies when I was a
kid. But, of course, in much smaller scale.
The construction starts with the very basic cockpit, which is just adequate considering that, even optimistically, not much will be seen through the tiny aircrew windows. This (lack of) detail eventually became completely irrelevant, after I decided to get aftermarket decals for the windows, as explained below. The instructions would then have you build the undercarriages, which I skipped.
The first challenges come with the step where you build the engine nacelles. These are not bad, including good representations of the fans, but are tricky to align properly and require a healthy amount of filling and sanding to become acceptable. In the process I ended being a bit too enthusiastic with the sanding of the rear cones, which forced me to do some tricky sculpting to restore the shape of the starboard nacelle.
Next comes joining the fuselage halves, which came with just a bit of filling, and some re-scribing, and adding the clear parts which include soft suggestions of the passenger windows. I painted the rectangular notches in the fuselage halves with glossy black and tried to stick these clear parts with Micro Krystal Klear, in the hope that I would later use the masks and end up with shiny transparent windows. To put simply, this did not work. Considerable filling and sanding was required to allow a smooth integration of these parts, so much so that in the end the window markings were completely obliterated. I persisted, carefully measuring the locations of the windows and placing masks as accurately as I could – but then run out of masks! This is when it dawned on me that the smart move would be just to ignore attempts to keep the windows clear and just use the decals at the end. After some attempt to cut my own extra masks from adhesive film, this decision was facilitated when I found that Authentic Airliner Decals, a company in Germany, sold aftermarket decals for the 1/144 Caravelle windows. End of drama.
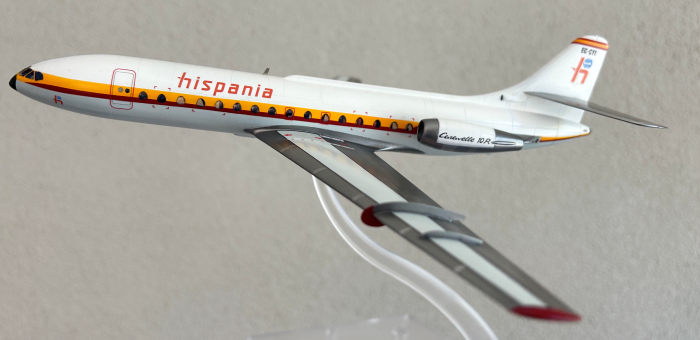 The next step was to add the wings. There was of
course a slight gap at the junction between the upper wing and fuselage, but
this was nothing to write home about. Just multiple cycles of filling and
sanding. The real tricky bit involved fitting the part that represents bottom
half of the wings, which is integrated with a portion of the bottom fuselage.
The joining here was nasty, leaving a very visible step. This required a lot of
sanding, so much so that a centreline oval-shaped compartment (which I think it
must have been something to house instruments) became obliterated and had to be
recreated with filler. The result was not perfect despite my best efforts.
Adding the photoetch wing fences went without any issues.
The next step was to add the wings. There was of
course a slight gap at the junction between the upper wing and fuselage, but
this was nothing to write home about. Just multiple cycles of filling and
sanding. The real tricky bit involved fitting the part that represents bottom
half of the wings, which is integrated with a portion of the bottom fuselage.
The joining here was nasty, leaving a very visible step. This required a lot of
sanding, so much so that a centreline oval-shaped compartment (which I think it
must have been something to house instruments) became obliterated and had to be
recreated with filler. The result was not perfect despite my best efforts.
Adding the photoetch wing fences went without any issues.
After that, the only steps were to add the nacelles to the back of the fuselage (more filling) and the horizontal stabilisers (not too bad).
The blade antenna provided for the lower starboard fuselage did not match my reference material, so I had it cut to a more accurate shape. Reference photos of my plane also showed a blade antenna on top of the fuselage, which was cut from spare bits of the photoetch sheet. The kit does not represent the wingtip navigation lights, so I tried to include these, made from a tiny bit of spare photoetch and Micro Krystal Klear. The display stand is from Academy. I had to drill a notch on the bottom of the fuselage to accommodate it.
| COLORS & MARKINGS |
Priming was done with SMS surfacer white (PLP03), after which the top half of the fuselage and vertical stabiliser were coated with SMS insignia white (PL72) and, to add a subtle variation in some panels, Mr Color Character white (C107). Between layers of paint a fine pacer was run along panel lines to give a subtle suggestion.
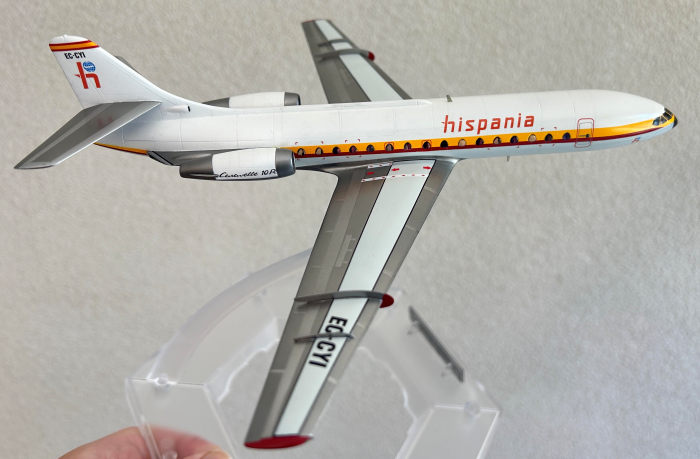 After that there was a lot of complex masking to be
done. First, following masking of the white areas, the bottom of the plane was
painted with SMS PL89 (Pale Blue Grey). Then the grey was also masked, to give
way to the metallic portions of the wings and wing roots. These were also done
with SMS paints, starting with Jet Black (PL30). Different panels had top coats
of super silver (PMT04), aluminium (PMT09) or stainless steel (PMT05). That
involved some tricky "progressive masking", but working with SMS has cured my
phobia of masking metallic stuff. I simply sprayed one metallic on top of the
previous one.
After that there was a lot of complex masking to be
done. First, following masking of the white areas, the bottom of the plane was
painted with SMS PL89 (Pale Blue Grey). Then the grey was also masked, to give
way to the metallic portions of the wings and wing roots. These were also done
with SMS paints, starting with Jet Black (PL30). Different panels had top coats
of super silver (PMT04), aluminium (PMT09) or stainless steel (PMT05). That
involved some tricky "progressive masking", but working with SMS has cured my
phobia of masking metallic stuff. I simply sprayed one metallic on top of the
previous one.
The wingtips and details of the wing fences were painted by hand with Gunze insignia red (H327), and the nose with Tamiya enamel X-1. Then it was time to tackle the long red and yellow stripes along the fuselage. Everything else was masked off, just leaving the combined stripe. At this stage, I had already given up on the masked windows, so these were painted over. First this was covered with a half and half mix of Mr. Color 58 (orange yellow) and 329 (Yellow FS13538), which I felt matched visually my reference picture. Then the upper half was masked, and the bottom was done with SMS insignia red (PL70).
Finally, SMS clear gloss everywhere (PL09), followed by decals, followed by more PL09 to seal.
| CONCLUSIONS |
This project was a nice combination of a straightforward build of a kit with few parts, and just enough challenge to keep it interesting. If I had to do it again, I would ignore the window masks entirely and perhaps try to use the kit decals for the red and yellow stripes. Here I planned, from the start, not to use the latter. This was purely out of caution, having been burned by previous interactions with short run kit decals.
On a more personal note, as a young boy, I remember the Caravelle being promoted by Brazilian airlines like VARIG as the pinnacle of sophistication in travel (a reputation certainly deserved in comparison with the planes I got to fly then, like the DC-3). This was a nostalgic build and I am happy that the model suggests a plane as elegant as the originals.
If you would like to see more pictures or ask questions please visit my modelling web site (www.marcellorosa.com).
| REFERENCES |
There are good walkaround sites for the Caravelle, which I used. For example, https://airlinercafe.com/walkaround/sud-aviation-se-210-caravelle-10r-walkaround/
I am a subscriber of the Hush-Kit Aviation, and they had a fantastic piece about the Caravelle which was a source for this article: https://hushkit.net/2022/05/26/10-reasons-the-sud-aviation-caravelle-jetliner-is-fantastic/
Excellent videos about the Caravelle can be found in Youtube, including:
https://www.youtube.com/watch?v=2iUlAtBzalM
https://www.youtube.com/watch?v=nUHglwLp16U
https://www.youtube.com/watch?v=vPGLiLXCgOs
Marcello Rosa
31 August 2026
Copyright ModelingMadness.com. All rights reserved. No reproduction in part or in whole without express permission from the editor.
If you would like your product reviewed fairly and fairly quickly, please contact the editor or see other details in the Note to Contributors.