| KIT #: | HC 1345 |
| PRICE: | $20.00 'used' |
| DECALS: | One livery |
| REVIEWER: | Pablo Calcaterra |
| NOTES: | Self made decals |
| HISTORY |
The De Havilland Dash 8 is a derivative of the Dash 7 but with 2 more powerful engines designed by Pratt and Whitney for this project (PW100) and without the STOL capability. First flight took place in 1983 and certification happened in December of the same year. NorOntair took the first planes in 1984 followed by Piedemont.
The plane has evolved from the original -100 version with 37 to 39 seats to the -200 with more powerful PW engines, then the -300 that has a stretched fuselage and capacity of 50-56 and then to the -400 that is even longer and with a capacity of 68-90 passengers and even more powerful engines. The latest version is the Q400.
By 2018 there were 844 Dash 8 of all types in service with 1319 planes ordered and 1258 delivered. Over the years there were 80 accidents involving Dash 8s with 180 people killed in total. The plane is still being manufactured in Toronto Downswiew and we can say that it has been a pretty successful product.
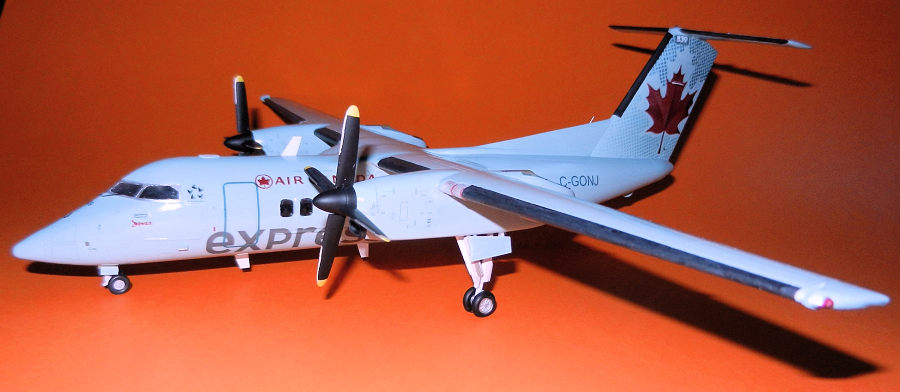
In the case of the subject of this article we are talking
about a De Havilland Canada DHC-8-100 which has sn 095 and Canadian registration
C-GONJ. It was manufactured in Toronto Downsview and was delivered in March 1988
to Air Ontario with fleet number 809. Configuration is 37 seats and range is
1,295 km. Then in March 2002 when Air Canada Jazz took over AirOntario fleet
number changed to 839. In February 2006 it was transferred to Jazz Air and
finally in April 2011 it became part of Air Canada Express operated by Jazz Air.
Due to the COVID situation the plane has been stored in North Bay, Ontario since
Mar 30 2020 with t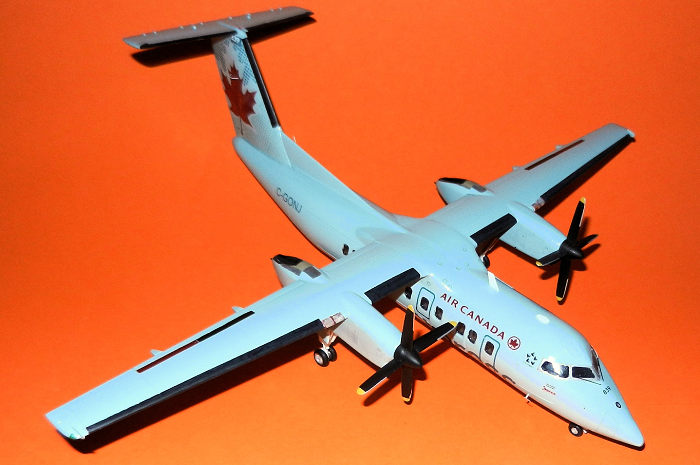 he
last commercial flight taking place on Mar 23 2020 from YCG to Toronto Pearson
(AC8474). It was one of the last 6 -100s still in service in Air Canada when the
COVID crisis hit the Globe. In total there had been 33 Dash 8-100 in service
with the Air Canada fleet.
he
last commercial flight taking place on Mar 23 2020 from YCG to Toronto Pearson
(AC8474). It was one of the last 6 -100s still in service in Air Canada when the
COVID crisis hit the Globe. In total there had been 33 Dash 8-100 in service
with the Air Canada fleet.
My personal connection with this plane is that I used to fly a lot on business (pre COVID) with Air Canada and many times in their Dash 8s. At one point I decided I had to build a Dash 8 to represent something that was part of my life for many years. I was always discouraged to buy the HC kit because of the prices being asked in Internet. Finally I found one at a very good price and went for it regardless of the decals that I knew I was not going to use.
839 (C-GONJ) in particular is the plane that I was travelling in from Toronto during a winter storm in the middle of a night in January 2019. A few minutes before landing and with the landing gear and flaps down we started to experience several banging noises on the fuselage. My fellow passenger sitting next to me looked at me puzzled and asked me what those noises were. I told him that ice was breaking off the plane and hitting the fuselage. He was not very happy with this. He mentioned he had been flying the same route twice a week for the last 10 years and it was the first time this had happened. With the farm houses below being as big as thumbs and probably no more than 90 seconds away from landing the pilots gave full power to climb back into the clouds with the landing gear still deployed. We orbited for 45 minutes above the snowsqualls and clouds and finally we landed in our destination. Snow plowers were still working on the runway and the tip of the propeller spinners were still full of white ice…I still have the boarding pass with me and it is framed along with a picture of the plane with the snow swirling around it, white propeller hub and all.
A few weeks later I saw 839 in Toronto again. This time I was able to take a look at the right side of the plane and there were some pretty significant areas of the paint that were missing on the fuselage in line with the right engine propellers…the premier was clearly visible. Could this be damage due to the ice being shot against the fuselage on that January night?
| THE KIT |
Hobby Craft launched their kit in 1990. This version with decals for Air Onario and Piedemont was launched in 1997.
For a good preview you can check Scott’s article here: https://modelingmadness.com/scott/civil/dash8preview.htm
| CONSTRUCTION |
Before you continue reading if you are still with me you will have to forgive me. My knowledge about parts, antennas and such for a civilian plane is even worse than for military planes. So apologies if parts are misrepresented or called…
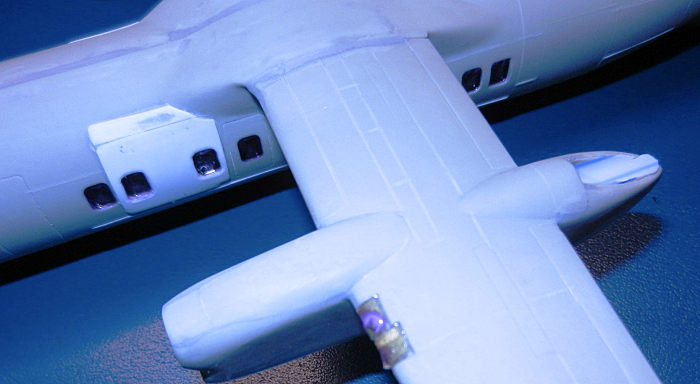
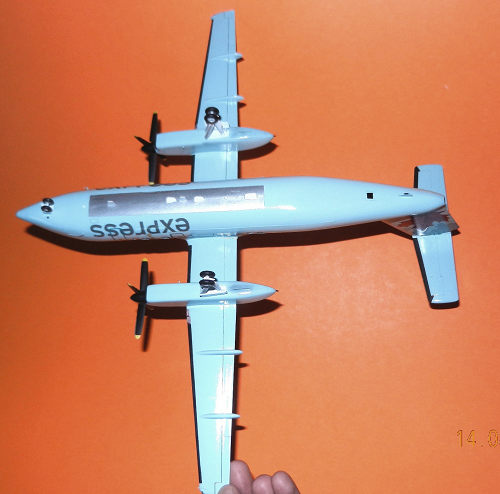
Being such a basic kit I decided to improve it by adding lots of panels missing on the wings, fuselage and the raised panels present ahead of the wings. As reference I used several pictures found on line as scale plans for the Dash 8 are almost non-existent or low quality.
 Once these
lines had been engraved and the raised panels and the “reinforcements” made with
Evergreen sheet and strips were glued in place I painted the interior with an
approximate blue used for the carpets n the actual Air Canada planes.
Once these
lines had been engraved and the raised panels and the “reinforcements” made with
Evergreen sheet and strips were glued in place I painted the interior with an
approximate blue used for the carpets n the actual Air Canada planes.
The cockpit is very basic with the pilots’ seats, back wall, floor, control columns, instrument panels and dash. I did not put a lot of effort on these.
A considerable amount of weight needs to be added in front of and below the pilot’s area (roughly 17 grams).
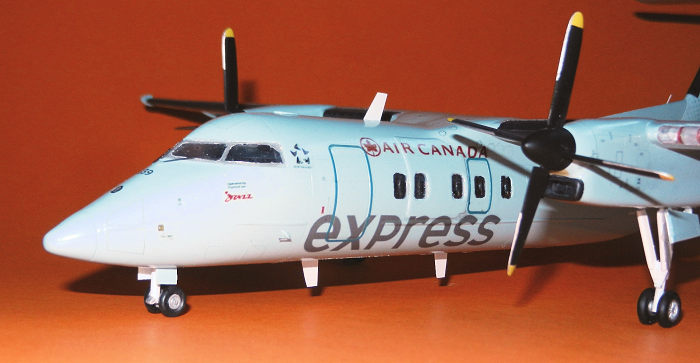
I glued the windows which are quite distorted due to the fact that they are somehow short shots. I masked them with Tamiya tape not to get them stained with glue (those accidents happen!) Fuselage halves were glued together with practically no problem. Once the seam lines were improved with putty I decided to add the windshields but then I realized that these, made up of two parts, are supposed to be attached to the fuselage BEFORE closing the halves. I tried to attach them using pliers and contortion movements but I failed miserably (hey Mr. Cleaver…I don’t follow the instructions as you are always telling us…and it has consequences!). Thus I was forced to carefully cut out the roof of the cockpit, glue the windshields and then restore the roof that now had a new seam to be sanded, puttied and fixed. As many others have said the fit of those windows leaves a lot to be desired as well…and they are not at the proper height in the fuselage. That would have been a surgery beyond what I was willing to do.
Engines were put together with no problem except that the fit
to the wing leaves large gaps under the wings and clo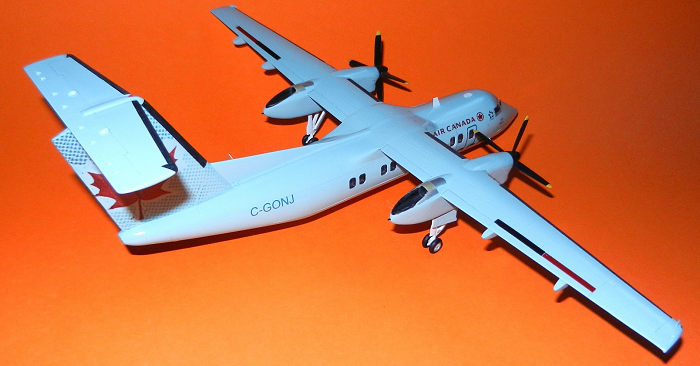 se
to the exhausts. These are very badly represented (just a hole) and I used
pieces of plastic straws (perfect diameter!) to crate them. The landing lights
were made with small rounded pieces of plastic and painted Silver. Then their
covers were glued and some more putty was required to ensure a good transition.
With thin pieces of Evergreen cut to shape I added the “shields” to the wingtip
navigation lights.
se
to the exhausts. These are very badly represented (just a hole) and I used
pieces of plastic straws (perfect diameter!) to crate them. The landing lights
were made with small rounded pieces of plastic and painted Silver. Then their
covers were glued and some more putty was required to ensure a good transition.
With thin pieces of Evergreen cut to shape I added the “shields” to the wingtip
navigation lights.
Fit of wings to fuselage is another low point of this kit. More sessions of putty and sanding. Several antennas and stuff like that were made with Evergreen and attached to the top and bottom of the fuselage.
The landing light on top of the nose fell thru the opening and I was not able to retrieve it. I had to resort to taking a piece of clear plastic tree, trim it and glue it in place and then sand it down to the surface of the nose.
The “bumper” under the tail is undersized and the wrong shape. I cut it out and replaced it with a thick piece of white plastic properly shaped.
Horizontal tail plane came next which also had some issues with gaps. Landing gear legs were added at this point and after masking the windows with a mix of tape and Maskol as I was able to give the plane the first coat of Vallejo Primer.
One technique that helped me tremendously was to use the tablet and shrink or expand the picture I was using as a reference to the same size of the kit itself. Then measuring parts or ensuring proper location was much easier.
| COLORS & MARKINGS |
I used Vallejo light grey primer and found there were no big issues with my work with Putty. Nothing to be fixed. Then I painted the landing gear bays, internal side of landing gear door, legs, and antennas with flat white.
I painted with Vallejo aluminum the large rectangle area below the fuselage and when dry I masked it. With the same colour I painted the main landing gear legs themselves (the fairings remaining in white)
The edges of the landing lights were painted in a mix of red and brown to represent the visible gaskets (?)
 With a brush
and a light beige colour I painted the area where the ice might have chipped
away the Air Canada livery paint. Then I put some little balls of blue tac
trying to represent the patterns I saw on the plane a few weeks after the
January night.
With a brush
and a light beige colour I painted the area where the ice might have chipped
away the Air Canada livery paint. Then I put some little balls of blue tac
trying to represent the patterns I saw on the plane a few weeks after the
January night.
The border of attack of all the surfaces was painted in black and then masked. It seems odd when in general you leave the darker colours for last but with my bad experiences when paint applied over gloss layers would crack I decided to take the hard route. That is because…
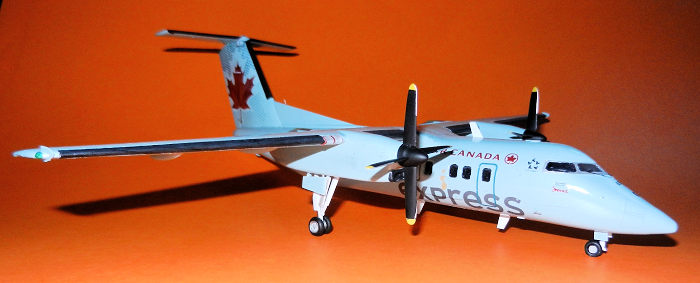
…once all the white and aluminum areas were also masked I painted the entire plane with a mix of green, light blue and GLOSS white to represent the “toothpaste” colour of the Air Canada livery. Ratio of paints was roughly 5% of the green and light blue mix and 95% white as per instructions found in a website dedicated to civilian planes modelling.
When this colour had set I then sprayed the plane with Future mixed with Vallejo Silver to give it the sparkling look. It worked pretty well but after 3 coats it was not as marked as I would have wanted. I should have used a couple of drops more of Silver but I can live with it.
The propeller tips were pained in yellow, followed by black and later on with a brush I carefully painted the border of attack of the blades using Vallejo Aluminum.
The bottom of the tail “bumper” was painted in black along with the small exhaust on the tail cone.
There are decals out there for this plane but they go for around US35. I am not spending more one decals than on the kit itself when I can give it a try myself.
Going thru the pics of the Air Canada Dash 8s on line, especially the ones on C-GONJ, and looking for the Air Canada Jazz, Star Alliance logos I was able to draw to scale and print in Testors clear decal film all the decals I needed. The only one that was printed on white decal paper was the “839” on the blueish rectangular background on the front top of the tail.
The decal that took the longest to research and make was the Maple Leaf on the tail because most of the pics had the shadow of the horizontal tail surfaces delivering an angled area with darker shades. I found one that did not have the shade but it was not as sharp as the others. Some of the details thus were lost but it was good enough (for me!)
 All the decals
that came from pictures of the actual plane were lightened to remove the
background colour and then adjusted to bring back the colour intensity without
showing the “toothpaste base”.
All the decals
that came from pictures of the actual plane were lightened to remove the
background colour and then adjusted to bring back the colour intensity without
showing the “toothpaste base”.
Making the decals was as difficult as building the plane and it took several nights of research, scale down, print, test again…but I have to say I am very pleased with the results.
There are several panels and access doors on the nose, engine nacelles that would have been quite tricky to engrave so I took pictures of the plane (mine and from the web), followed the contour of those panels with the PowerPoint tools and draw them. Then I deleted the picture in the background and was left with the panel lines I needed. These then became decals printed on clear decal paper.
Other decals included the lights under the horizontal tail surfaces, the lights around the main doors on both sides, some access panels and connectors to external wiring and the two rectangular “stickers” that seemed to have yellowed over time and that are located between the air intakes and the spinners.
The only decals I did not print but came from the spares are the two large red and black rectangles on top of the wings. And a “O” from a Carpena sheet that, cut in half and somehow bent helped to deliver the oval black gasket around the light on top of the nose (HC’s light is wider from left to right but it should be from top to bottom and I was able to fix this by carefully applying the two halves in which I had cut the “O”)
Once they had dried up and I had cleaned the decals these were sealed with 3 light coats of plain Future (no silver mixed in this time).
| FINAL CONSTRUCTION |
Navigation lights were painted using MM Acryl clear red and green over a base of aluminum. Some panels ahead of the main exhausts on top of the engines were painted in aluminum and burnt exhaust (a mix of several colours).
 There is a
long list of scratchbuilt details that were made and added at this time: three
VHF antennas, pitot tubes on the nose, two semicircular antennas on the tail on
the Maple Leaves, the red navigation light on top of the tail (using a piece of
a clear red plastic fork), vents on the inside and at the back end of the
engines, the actuating arm for the main landing gear doors, a tiny antenna on
the spine leading to the tail, The inflatable borders of attack were painted
with a brush using MM flat acrylic giving them a rough and uneven look.
There is a
long list of scratchbuilt details that were made and added at this time: three
VHF antennas, pitot tubes on the nose, two semicircular antennas on the tail on
the Maple Leaves, the red navigation light on top of the tail (using a piece of
a clear red plastic fork), vents on the inside and at the back end of the
engines, the actuating arm for the main landing gear doors, a tiny antenna on
the spine leading to the tail, The inflatable borders of attack were painted
with a brush using MM flat acrylic giving them a rough and uneven look.
Non scratch built final details included the attachment of the main wheels, the tiny nose wheels which were quite difficult to stick in place because I had to cut out and shorten the horizontal part of the main leg as HC would have you place them too far back) and propellers (the openings on the front of the engines are too small so I sanded down the stubs located being the spinners)
The last details added where windshield wipers using very thin pieces of stretched plastic.
| CONCLUSIONS |
A good kit in general terms that delivers a decent starting point for a Dash 8. I had fun building this plane in which I had some exciting moments one night back in Jan 2019 over SW Ontario…
Pablo
Calcaterra 5 February 2021 Copyright ModelingMadness.com. All rights reserved. If you would like your product reviewed fairly and fairly quickly, please
contact
the editor or see other details in the
Note to
Contributors. Back to the Main Page
Back to the Review
Index Page
Back to the Previews Index Page