
Welsh Models 1/144 Canadair Regional Jet
| KIT #: | SL 101 |
| PRICE: | £17.23 |
| DECALS: | Three liveries |
| REVIEWER: | Ben Brown |
| NOTES: |
Livery decals printed by Vincent Kermorgant, Detail decals by Nazca |
| HISTORY |
The Canadair Regional Jet was developed from Canadair’s successful Challenger corporate jet. Changes included a fuselage stretch, a new wing, stronger landing gear, and more fuel capacity. The CRJ’s first flight took place on May 10, 1991, and the first aircraft was delivered to Lufthansa in December, 1992. While the concept of a regional jet airliner wasn’t new, Canadair’s CRJ changed the face of the airline industry when it went into service. With it’s quiet, efficient engines and comfortable cabin, the CRJ was an instant hit with passengers who were hesitant to board the turboprops operated by most commuter airlines at the time. To the general public, propellers on an airplane means it is an “old, unsafe puddle jumper.” Slap jet engines on it, and all of a sudden a plane is much safer. Go figure.
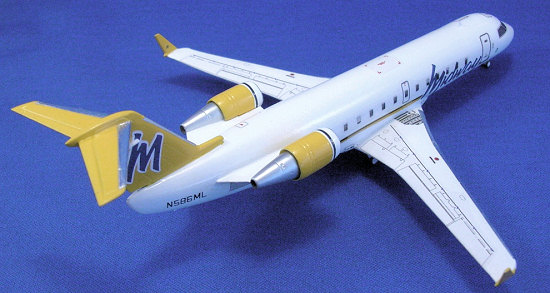
Midway Airlines, based at Raleigh-Durham International Airport in North Carolina, began purchasing CRJs in 1997 to supplement their fleet of Fokker 100s and Airbus A320s. By the time managerial incompetence ran the company into bankruptcy in 2001, Midway had a total of 24 CRJs. After a brief attempt to come back as an all-737-700 airline in 2002, Midway’s management tried a second makeover as a USAirways Express carrier, flying an all-CRJ fleet, in early 2003. A bankruptcy judge finally shut the company down for good in October of that year.
 From a pilot’s
perspective, the CRJ was a pretty good place to eak out a living from a stingy
employer. It’s cockpit was quiet and roomy, and the seats were almost
comfortable. It had a good autopilot, but our jets were not fitted with the
optional auto-throttles or head’s up display. The cabin heating/cooling system
was supposed to be fully automatic, but we found the system worked best in the
“Semi-Automatic” mode, where you put it in “Manual” and told the First Officer
to “keep the duct temps right there.” If you look in the cockpit
of a CRJ, the pilots will most likely have the right-center display set to the
air conditioning system diagnostics page so they can keep an eye on the duct
temperatures while the system is in “Manual.” The heat could get the cockpit
hot enough to cook a pizza, and on humid summer days, the air conditioning would
pelt you with little ice pellets from the eyeball vents on the sides of the
instrument panel. Somehow, the Canadians never quite got the hang of cabin air
conditioning, which had a hard time dealing with North Carolina summers.
Bombardier put the cold-air vents on the floor, so on a hot day, we ran the risk
of having passengers with a combination of heat stroke and frost-bitten ankles.
One theory was that Canadians are not familiar with the concept of Warm Air
Rises/Cold Air Settles because in Canada they only have Cold Air and Colder Air.
From a pilot’s
perspective, the CRJ was a pretty good place to eak out a living from a stingy
employer. It’s cockpit was quiet and roomy, and the seats were almost
comfortable. It had a good autopilot, but our jets were not fitted with the
optional auto-throttles or head’s up display. The cabin heating/cooling system
was supposed to be fully automatic, but we found the system worked best in the
“Semi-Automatic” mode, where you put it in “Manual” and told the First Officer
to “keep the duct temps right there.” If you look in the cockpit
of a CRJ, the pilots will most likely have the right-center display set to the
air conditioning system diagnostics page so they can keep an eye on the duct
temperatures while the system is in “Manual.” The heat could get the cockpit
hot enough to cook a pizza, and on humid summer days, the air conditioning would
pelt you with little ice pellets from the eyeball vents on the sides of the
instrument panel. Somehow, the Canadians never quite got the hang of cabin air
conditioning, which had a hard time dealing with North Carolina summers.
Bombardier put the cold-air vents on the floor, so on a hot day, we ran the risk
of having passengers with a combination of heat stroke and frost-bitten ankles.
One theory was that Canadians are not familiar with the concept of Warm Air
Rises/Cold Air Settles because in Canada they only have Cold Air and Colder Air.
The GPS-based navigation system was great. It had a neat vertical navigation function that would spoil you to the point where you would forget how to calculate crossing restriction descent rates in your head, then it would fail. “Midway 1, cross IRONS at 10,000ft, 250 knots.” “Er… ah… let’s see, was it three times the… uh…... aw hell, just start down now!”
There was an
aural warning system that could yell things at you, like “FIRE!!”, “WIND
SHEAR!!”, “BLEED… AIR… DUCT!!” (it would sometimes pause between words), or in
my case “SINK RATE!!” when it thought my landing was going to be worse than
 usual. It would also count down every 100 feet of your altitude for the last
500 feet of your approach, then from 50ft down, it would call out every ten
feet. A software update changed the voice for many of the warnings, including
the altitude countdown, from rough, tough John Wayne to the effeminate Johnny
from the movie “Airplane!” When we’d taxi off the runway, I half-expected it to
critique our landing with, “Oooooh, that landing was faaaaabulousss!” or
“Eeeeew, that landing was abstholutely hooorrible! I think I broke a ssstatic
wiiiick!” The Bombardier folks were very proud of their airplane, and I think
their engineers reprogrammed the voice that way to get back at some of us for
calling the CRJ the “Sky-Doo” when we’d go up to Montreal for training
(Bombardier also makes Sea-Doo watercraft and Ski-Doo snowmobiles.).
usual. It would also count down every 100 feet of your altitude for the last
500 feet of your approach, then from 50ft down, it would call out every ten
feet. A software update changed the voice for many of the warnings, including
the altitude countdown, from rough, tough John Wayne to the effeminate Johnny
from the movie “Airplane!” When we’d taxi off the runway, I half-expected it to
critique our landing with, “Oooooh, that landing was faaaaabulousss!” or
“Eeeeew, that landing was abstholutely hooorrible! I think I broke a ssstatic
wiiiick!” The Bombardier folks were very proud of their airplane, and I think
their engineers reprogrammed the voice that way to get back at some of us for
calling the CRJ the “Sky-Doo” when we’d go up to Montreal for training
(Bombardier also makes Sea-Doo watercraft and Ski-Doo snowmobiles.).
The CRJ’s flying qualities were pretty good, but it tended to oscillate in pitch, so hand-flying it for long distances could be a chore. Maneuvering for a landing was easy, because of the fighter-like handling, and the River Visual down the Potomac to Washington DC’s Runway 19 was always a lot of fun. My only real complaint about the jet was it’s lack of power. The engines are closely related to those found on the A-10, with a huge fan and a tiny core to drive it, so they worked great at low altitude but they quickly ran out of steam at high altitude. There was a noticeable drop in performance when passing through 18,000 feet. Above that altitude, the CRJ was a Lead Sled. A few more feet of wing and a few thousand pounds more thrust would have made this airplane a real champ.
In spite of her few flaws, I enjoyed almost every one of my 3000+ hours in the CRJ. Except for time it took us four-and-a-half-hours to taxi from the gate to the runway at La Guardia. Or that hot summer day in New Orleans with a busted APU and fifty passengers. Or any time in Newark….
| THE KIT |
Welsh’s CRJ comes in a zip-lock plastic bag containing six resin and eleven white metal parts. The wing, engines, and horizontal stabilizers are solid resin, while the radome, landing gear parts and winglets are metal. Decals have markings for a United Express jet and an Air France/Brit Air jet, as well as window decals and a few stencils. Welsh has also released this kit with Delta Connection decals, and several decal sheets of CRJ liveries are also available from Nazca and Jbot.
 The white
metal radome is provided to offset the weight of the resin engines. It is
slightly smaller than the surface it is supposed to mate to, so some shimming
will be required to get a smooth transition. The fuselage is engraved with fine
panel lines, and is within a millimeter or so of the published length. My copy
had a small run in the resin at the windscreen and the wings were a little
warped, but the rest of the casting quality was flawless, without a single
bubble or pinhole.
The white
metal radome is provided to offset the weight of the resin engines. It is
slightly smaller than the surface it is supposed to mate to, so some shimming
will be required to get a smooth transition. The fuselage is engraved with fine
panel lines, and is within a millimeter or so of the published length. My copy
had a small run in the resin at the windscreen and the wings were a little
warped, but the rest of the casting quality was flawless, without a single
bubble or pinhole.
There are no main gear wells, so these will need to be machined out of the wing if the model is to be built gear down. The scribed outlines of the wells are several millimeters too far apart, and the contours of this area are simplified.
Welsh’s CRJ has some accuracy issues, but fortunately, Revell/Germany has recently released an update set for it, in the form of their excellent Challenger 604 kit. The Challenger kit can’t be easily converted to a CRJ because in addition to the increased span, the CRJ’s wing is also greater in chord, and the wing/fuselage fairing is very different. One would have had to replace or heavily modify everything between the passenger door and the engines. Going the other direction, the 604’s winglets, nose, tail, and landing gear can be adapted to the CRJ kit. Both jets shared the CF-34-3B engines, so Revell’s can be used without modification. The Revell fuselage is slightly smaller in diameter than Welsh’s, but its more accurate nose section makes it just too tempting not to try to graft onto the Welsh kit.
| CONSTRUCTION |
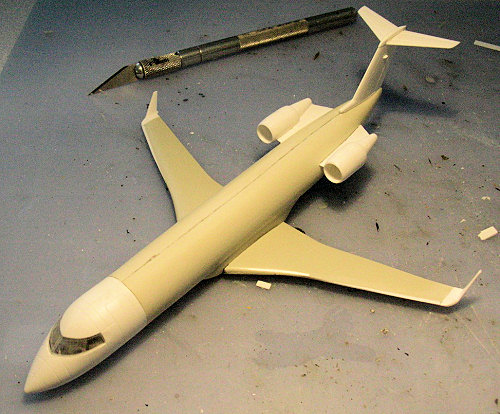
The Welsh
kit’s fuselage turned out to be oval in cross-section, as if it had been made
from a vacuformed master that wasn’t sanded down properly after the parts were
cut from the sheet, and was 1mm wider than the 604’s. I used a saw to split the
fuselage down the middle then sanded both halves to give it a proper round
cross-section. After some careful measuring, I cut the
 cockpit areas off of the
resin fuselage and the assembled Challenger fuselage. I test-fitted the resin
fuselage halves with the Revell parts, and for the first time in my modeling
career, the parts fit on the first try! I then glued the resin parts together,
filled the plastic nose with fishing weights, and super glued it to the Welsh
fuselage. The diameter of the Revell fuselage was still a little smaller than
the resin part, but I sanded the resin fuselage down almost all the way back to
the wing so there wouldn’t be a noticeable step between the two parts. The
Revell plastic was almost as soft as the resin, and I managed to take a little
too much off of one side, which gave the model a slight wasp waist forward of
the wings. Fortunately, I had recently stocked up on Milliput so I was able to
build the fuselage back up later while I was filling gaps around the wings.
cockpit areas off of the
resin fuselage and the assembled Challenger fuselage. I test-fitted the resin
fuselage halves with the Revell parts, and for the first time in my modeling
career, the parts fit on the first try! I then glued the resin parts together,
filled the plastic nose with fishing weights, and super glued it to the Welsh
fuselage. The diameter of the Revell fuselage was still a little smaller than
the resin part, but I sanded the resin fuselage down almost all the way back to
the wing so there wouldn’t be a noticeable step between the two parts. The
Revell plastic was almost as soft as the resin, and I managed to take a little
too much off of one side, which gave the model a slight wasp waist forward of
the wings. Fortunately, I had recently stocked up on Milliput so I was able to
build the fuselage back up later while I was filling gaps around the wings.
At first, the gap in the wing that the fuselage fits into was too narrow, but after correcting the width of the fuselage, it went right together. The CRJ doesn’t have much to look at inside the main gear wells. There are not very many exposed hydraulic lines and the wheels nest inside a fibreglass “bucket,” leaving the outsides of the outboard wheels exposed like those on a 737. A stiff black brush-like material surrounds the wheel wells, providing an aerodynamic seal between the fuselage and the tire when the gear is retracted. There is a slight bulge in the real jet’s belly around this area that is not present on the kit. I used a Dremel tool to dig out a section of the wing to match the Revell part with the main gear wells. The parts of the gear wells covered by the gear doors are oddly-shaped and would be very hard to rout out to the proper shape with the Dremel. I dug square sections out of the resin and then just cut the gear wells out of the Challenger wings. I glued the styrene parts into the wings and blended everything in with super glue. I then faired the Challenger wheel well part into the underside of the resin wing using super glue, styrene and Milliput. It sounds a lot harder to do than it actually was.
According to
my drawings, Welsh’s wing leading edge is swept back too much, making the it too
narrow in chord at the tips, but the wing span itself looks good. The metal
winglets are supposed to butt-join to the wing tips, and don’t really duplicate
the smooth transition of the real jet. The Revell winglets make up a part of
the wings themselves, so I cut the wing tips off of the Welsh wing, and glued
the Revell winglets in place, making sure the trailing edges of the wings and
the winglet parts lined up. I then glued some styrene strip on the leading
edges so I could correct the chord and sweep of the wings. After filling the
gaps with super I used a sanding stick to reshape the wing leading edges and
blend the winglets into the resin. This resulted in a strip of styrene on the
leading edge that was about 1mm wide at the wing tip and tapered down to nothing
where the wing sweep 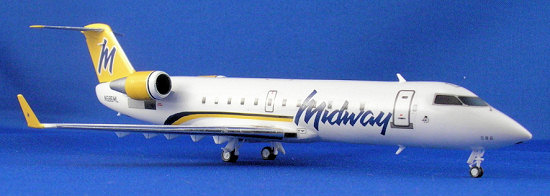 changes. Again, it sounds a lot harder to do that it
actually was, and only took a half-hour or so to do. The wing had the flap
actuators molded into the underside of the wing, but I cut them off and added
the more detailed ones from the Challenger.
changes. Again, it sounds a lot harder to do that it
actually was, and only took a half-hour or so to do. The wing had the flap
actuators molded into the underside of the wing, but I cut them off and added
the more detailed ones from the Challenger.
I built the Challenger’s engines and worked with the pylons until they fit the Welsh fuselage. There are two slots in the fuselage to help locate the engines, but one side is lower than the other, so I just filled both with Milliput. The fan cowlings fit well enough that I could leave them off until final assembly.
Welsh did a good job on the vertical and horizontal stabilizers, but Revell’s look better. The Challenger’s horizontal stabilizer has the same span as the CRJ’s, so I just grafted the entire Revell tail to the CRJ fuselage. This saved me from having to align the Welsh kit’s individual horizontal stabilizers. I was tempted to graft the Challenger’s entire aft fuselage section to the Welsh kit, but at this point I didn’t want to make even more work for myself.
| COLORS AND MARKINGS |
I primed
the model with Tamiya Grey Primer, to give the model a uniform color before
applying a couple of coats of Tamiya White Primer. Both primers go on very
smooth, and dry quickly. I normally just use the white primer, but I didn’t
want to take a chance on having dark and light areas around the tan resin and
white plastic. I masked the winglets, engine fan sections and tail, then
painted them using Testors Yellow from the little square bottle. Rather than
mask the fuselage stripes, I cut them out of decal film that I had painted
yellow and Xtracolor Insignia Blue. That was semi-successful, but touching up
was easy. If I were to do it again, I’d just go ahead and mask the stripes. I
painted the natural metal leading edges of the wings and tail with Alclad White
Aluminum, 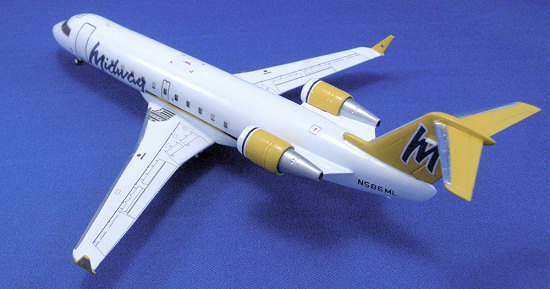 somehow getting the masks all crooked and generally making a mess of
that operation. I decided to bury the disaster under Bare Metal foil, even
though I had sworn off using the stuff at least twice already. At the time, it
seemed easier than repainting everything. The engine fans were painted various
shades of silver, then I put a couple of strips of decal film that I had painted
grey inside the intake ducts. This gives a nice, sharp edge to the colors
without having to mask the insides of the tiny engines.
somehow getting the masks all crooked and generally making a mess of
that operation. I decided to bury the disaster under Bare Metal foil, even
though I had sworn off using the stuff at least twice already. At the time, it
seemed easier than repainting everything. The engine fans were painted various
shades of silver, then I put a couple of strips of decal film that I had painted
grey inside the intake ducts. This gives a nice, sharp edge to the colors
without having to mask the insides of the tiny engines.
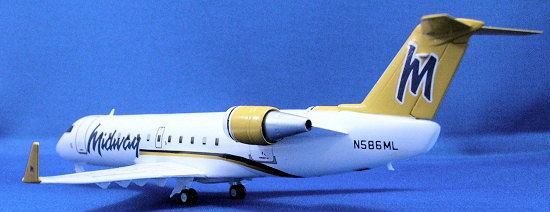
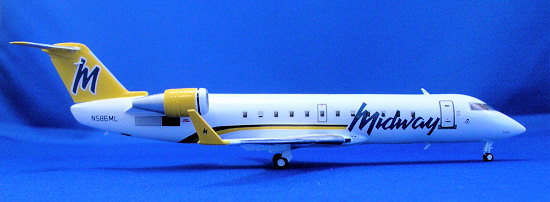
As is the case with most airliner kits, most of the details and markings are decals. The windows, access panels and stencils are from Nazca’s Lufthansa CRJ decal sheet. I left off many of the access panel and pitot probe decals because they were a little too prominent against the white fuselage and gave the model a cluttered appearance. Vincent Kermorgant came to my rescue on the livery decals by printing the Midway logos for me, and I cut the engine stripes from dark blue decal film. The decals for the N-number came from a Liveries Unlimited Midway Fokker 100 sheet. I picked up N586ML new from the factory in Montreal, and over the next couple of years had several interesting mechanically-related adventures with her, so I figured that jet was as good a subject as any. I always thought 586 should have been named “Christine,” after the bloodthirsty ‘58 Plymouth Fury in the Steven King novel of the same name, since it always seemed like something was never quite right with the jet.
By this point I was thinking I would finally get away with building a model without running into any major (usually self-induced) problems. I sprayed the model with a coat of Polly Scale Clear Gloss to seal the decals and hide the clear carrier film. The film from Vincent’s decals and the Liveries sheet were invisible on the model’s white surface even without the clear coat, but unfortunately, the clear areas on Nazca’s decals were not quite so clear, so the carrier film is very visible on the model’s white and yellow paint. I tested a section of the decal sheet on a light grey wing of a scrapped model, and the decal film still showed, as if it was slightly tinted. I guess the ghost of 586 will live on in this model.
| FINAL BITS |
Once the clear coat was dry and the echoes of swearing had dissipated, all that was left was to add the landing gear, beacons, and some antennae. Welsh’s main gear struts are straight, but they should be the trailing link type like an F/A-18’s struts, so I just substituted the Challenger’s landing gear. The engine fan sections slid into place and I was done.
| CONCLUSIONS |
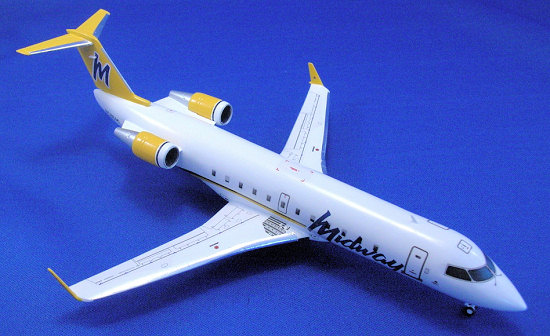 Whew! I
finally have a CRJ in 1/144 scale to go with the rest of my Midway Airlines
fleet. Welsh makes some of the most accurate airliner kits on the market, but
they were slightly off the mark with this one. The kit’s solid resin fuselage
adds to the price, but will make a lot of people who don’t like vacuforms
happy. Stealing parts from the Revell Challenger will help fix just about all
of the kit’s accuracy problems, and it was surprisingly easy to bash with the
CRJ kit. I was disappointed with Nazca’s decals. They are easy to work with,
but the nature of the printing process allows underlying dark areas to show
through, so you have to apply them to light-colored backgrounds, but then the
tinted carrier film remains visible on light-colored backgrounds.
Whew! I
finally have a CRJ in 1/144 scale to go with the rest of my Midway Airlines
fleet. Welsh makes some of the most accurate airliner kits on the market, but
they were slightly off the mark with this one. The kit’s solid resin fuselage
adds to the price, but will make a lot of people who don’t like vacuforms
happy. Stealing parts from the Revell Challenger will help fix just about all
of the kit’s accuracy problems, and it was surprisingly easy to bash with the
CRJ kit. I was disappointed with Nazca’s decals. They are easy to work with,
but the nature of the printing process allows underlying dark areas to show
through, so you have to apply them to light-colored backgrounds, but then the
tinted carrier film remains visible on light-colored backgrounds.
Most limited-run kits take some extra work, but be ready to spend more time on this one than you normally would for a Welsh kit if you want a truly accurate 1/144 CRJ. Or you can just wait a few months and pick up Kurt Lehmann’s resin CRJ-200, which was announced soon after I started this kit.
Models and decals courtesy of my wallet.
Sources:
AHS http://www.airline-hobby.com/
Nazca http://www.nazca-decals.com/
| REFERENCES |
Airliners.net www.airliners.net
Personal photos
CL-65 Flight Manual
February 2008
Copyright ModelingMadness.com. All rights reserved.
If you would like your product reviewed fairly and quickly, please contact the editor or see other details in the Note to Contributors.