ERTL/ESCI 1/72 DC-3A
|
KIT #: |
8246 |
|
PRICE: |
£ |
|
DECALS: |
Three options |
|
REVIEWER: |
Brian Baker |
|
NOTES: |
Excellent civilian DC-3 kit |
The
Douglas DC-3 and C-47 series is probably one of the best known transport planes
in the history of aviation, so I will refrain from repeating the well known
story of this aircraft. From the middle thirties, the series, beginning with
DC-1 and DC-2, was produced in small numbers, rendering the Boeing 247 obsolete.
The final production model, the DC-3, became the major type to equip U.S. and
foreign airlines in the late thirties, and when war clouds appeared on the
horizon, the military began ordering the type. When the war broke out, many
airline DC-3’s were commandeered by the U.S. Army and Navy for transport duties,
resulting in a confusing array of designations,
since each airline seemed to have
its own variant, differing mainly in door location, interior, and engine type.
 Before World War II,
Douglas produced two developments as bombers, the B-18 and B-18A “Bolo” and the
B-23 “Dragon”. These types had undistinguished careers during the war, but many
were sold surplus after the war, with many B-18’s becoming freighters and
agricultural sprayers, while the higher performing B-23’s mainly served as
corporate executive transports until the middle fifties. By the sixties, these
types were rarely seen at local airports, being replaced by more modern and
economical aircraft.
Before World War II,
Douglas produced two developments as bombers, the B-18 and B-18A “Bolo” and the
B-23 “Dragon”. These types had undistinguished careers during the war, but many
were sold surplus after the war, with many B-18’s becoming freighters and
agricultural sprayers, while the higher performing B-23’s mainly served as
corporate executive transports until the middle fifties. By the sixties, these
types were rarely seen at local airports, being replaced by more modern and
economical aircraft.
The
DC-3’s, however, were produced and obtained by the military in an array of
variants, including the DST sleeper transport used by American Airlines, the
C-41A, the C-47-DL , the DC-3 (Wright R-1820) and DC-3A (Pratt and Whitney
R-1830), the C-47A, C-47B, C-47C, C-47D, C-48, C-49, C-50, C-84, C-53, and
numerous Navy variants designated R4D-1 through R4D-8. There was also a cargo
glider version, the XCG-17, but only one was modified, mainly by the removal of
its engines. The type was also used by a large number of foreign air forces and
airlines, with a few even operated on amphibious floats. Many were used postwar
by various airlines and for numerous other purposes. I will refer you to two
sources, Peter Bowers’ The DC-3, 50
Years of Legendary Flight, and
Squadron-Signal’s C-47 Skytrain in
Action, one of the excellent series
written by Larry Davis. There are many other sources of information for this
aircraft.
I decided to do this review
because I could not find a serious review of the ERTL kit, only the Italeri and
the Airfix kits. There are some comments on various reviews, but no detailed
review of this kit. Finding one in my stash, I decided to build it and do a
review.
The first 1/72 scale
C-47/DC-3 kit was the old Airfix kit, which dates from the early sixties. It was
rather crude, and went out of production later. A number of years ago, Italeri
produced a very nice C-47A in the true intellectual scale. This was basically
the military version, with the cargo door and the bench seats. Reviews I have
read state that the panel lines, while sunken, are a little bit deep, although
with a good coat of paint, they might be acceptable for most modelers. I have
seen several reviews of the Italeri kit, which are basically complimentary. The
Italeri kit is basically a military aircraft, whereas the ERTL kit is primarily
civilian, although it can be made as a military aircraft. Airfix has re-released
their kit in a retooled version, but I have not seen that one yet.
Detail is very good on this
kit, with two cargo doors, one without the hinges so that an airline type can be
made, while the other has the large cargo doors common to the C-47 variants. A
cabin floor is provided, along with two rows of seats so that the airliner can
be done, although both sets of seats are two rows, a total of 28 seats, while
the actual DC-3 airliners of the period were mainly 21 passenger types. . One
problem here is that with the cabin windows as they are, it is impossible to see
any detail inside the cabin, so omitting the seats would not be noticeable in
most cases, unless you choose to leave the cabin door open. The cockpit consists
of two seats, a control column with two accurate wheels, an instrument panel,
and another part which is supposed to be another part of the instrument panel.
There are three fuselage bulkheads, with inscribed detail, which fit quite well
within the fuselage.
 The cabin door can be left
open, or closed, and the small baggage compartment door on the left side of the
nose, is also molded separately. I can recall, years ago, loading baggage
through one of those doors into Capital Airlines’ DC-3’s that I loaded back in
the fifties, so this brought back memories. The rear baggage compartment t door
on the airline version is not represented. The wings include top and bottom
halves, along with a center section that attaches to the fuselage. The engine
nacelles are molded in very nicely, although there isn’t much detail in the
wheel wells. A forward section of the engine nacelles fits onto the assembled
wing section, and the engines are mounted to that unit. The cowling fits over,
making a very nice engine unit. The prop slips over the crankshafts, and a small
exhaust stack fits on the outside of each nacelle. Several topside air intakes
are provided for different variants, including the supercharger intakes for the
C-47B variant, although C-47A’s sometimes had these also. Check your photographs
before deciding which parts to install.
The cabin door can be left
open, or closed, and the small baggage compartment door on the left side of the
nose, is also molded separately. I can recall, years ago, loading baggage
through one of those doors into Capital Airlines’ DC-3’s that I loaded back in
the fifties, so this brought back memories. The rear baggage compartment t door
on the airline version is not represented. The wings include top and bottom
halves, along with a center section that attaches to the fuselage. The engine
nacelles are molded in very nicely, although there isn’t much detail in the
wheel wells. A forward section of the engine nacelles fits onto the assembled
wing section, and the engines are mounted to that unit. The cowling fits over,
making a very nice engine unit. The prop slips over the crankshafts, and a small
exhaust stack fits on the outside of each nacelle. Several topside air intakes
are provided for different variants, including the supercharger intakes for the
C-47B variant, although C-47A’s sometimes had these also. Check your photographs
before deciding which parts to install.
The wings and tail units
have textured fabric moveable control surfaces, but these are fairly realistic
looking. Each landing gear unit consists of a main strut, a rear bracing strut,
and two piece wheel assemblies. The tailwheel is in three parts, but it looks
too long. I trimmed mine to get it to look like the real thing.
The ERTL kit comes with an
8 page full size instruction booklet, providing a historical background, no
sprue diagram, a series of 4 pages of exploded assembly drawings,, and two sets
of four view drawings illustrating the two aircraft depicted by the decals. The
decals are very colorful, on register, and look very good. I’ll get back to
those later. The first aircraft, a DC-3A operated by TWA, NC49551, serial no.
4940, was manufactured in 1942 for the military, and was sold postwar to TWA,
who operated the airplane into the 1950’s. When replaced by Convair 240’s and
Martin 202/404 types, this airplane was sold to Zantop, who used it for cargo
operations until the late sixties. It was stricken off register in 1970,
although it may have been re-registered and used by another owner after that.
The other decal set is for OO-AWL, a Belgian Sabina plane. The instructions do
not give any history of either specific aircraft.
 The assembly process of
this kit is rather straightforward, with very clear exploded drawings provided
in the instructions. They even mention that the interior should be painted
before the windows are installed on the fuselage halves. One thing not mentioned
is that the fuselage halves are very thin, and there is not much surface to
attach the surfaces to. It will be quite difficult to get everything lined up
without requiring a little filler to clear up the seams. The wings are molded in
five pieces, with the outer surfaces fitting together and the center section
attaching to the lower part of the fuselage. Fit is somewhat dicey, but it can
be done. Fortunately, the civilian version is alclad/silver overall, so
installing the landing gear can be done before painting. After painting, the
wheels can be snapped in place on the gear struts. The engines are nicely
detailed, and should obviously be painted before being snapped on to the nacelle
faces. The crankshafts can be installed before engine installation, and after
the cowlings are in place, the propellers can be attached. The props are one
piece and look very nice, although they look like the paddle-bladed variety
common to most military types. The cabin doors are on the left side, where most
DC-3’s had them, and the kit comes with a cargo door and a passenger door
assembly so you can choose. I suspect that another issue of this kit is the
military C-47 version, as the kit only provides for the civilian door
arrangement. Keep in mind that these airplanes were produced in small numbers up
until the beginning of World War II, with each airline demanding slight
differences in such things as engine type, radio antennas, astrodomes, windows,
passenger doors, and interiors.
The assembly process of
this kit is rather straightforward, with very clear exploded drawings provided
in the instructions. They even mention that the interior should be painted
before the windows are installed on the fuselage halves. One thing not mentioned
is that the fuselage halves are very thin, and there is not much surface to
attach the surfaces to. It will be quite difficult to get everything lined up
without requiring a little filler to clear up the seams. The wings are molded in
five pieces, with the outer surfaces fitting together and the center section
attaching to the lower part of the fuselage. Fit is somewhat dicey, but it can
be done. Fortunately, the civilian version is alclad/silver overall, so
installing the landing gear can be done before painting. After painting, the
wheels can be snapped in place on the gear struts. The engines are nicely
detailed, and should obviously be painted before being snapped on to the nacelle
faces. The crankshafts can be installed before engine installation, and after
the cowlings are in place, the propellers can be attached. The props are one
piece and look very nice, although they look like the paddle-bladed variety
common to most military types. The cabin doors are on the left side, where most
DC-3’s had them, and the kit comes with a cargo door and a passenger door
assembly so you can choose. I suspect that another issue of this kit is the
military C-47 version, as the kit only provides for the civilian door
arrangement. Keep in mind that these airplanes were produced in small numbers up
until the beginning of World War II, with each airline demanding slight
differences in such things as engine type, radio antennas, astrodomes, windows,
passenger doors, and interiors.
When I started this model, I intended to build the TWA
version. The decals were old, as the kit was probably 20 years old, but the
decals looked OK. Before major assembly, I cut out the instrument panel decal,
and after a good soaking, it came loose from the paper and slid onto the
instrument panel correctly. Assuming that the TWA version was possible, I
painted the entire airplane silver, masking off the windows and painting the
wing and tail deicer boots black. However, when I tried to get the rest of the
TWA decals to work out, they refused to budge, so I was back to square one. I
had an all silver airplane with doors on the left side. Then I discovered a
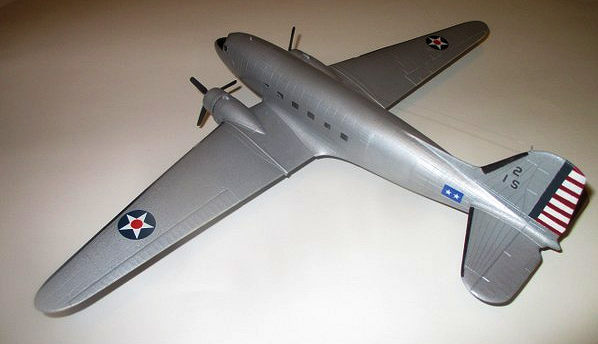
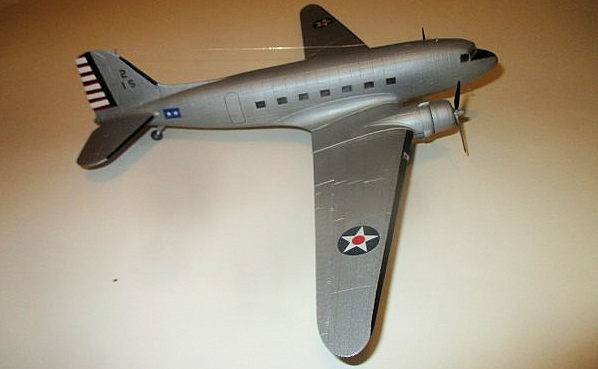
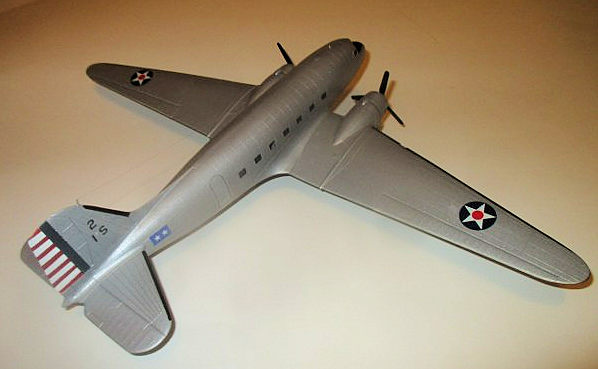
photo of the one and only C-48 in the Peter Bowers book on the DC-3. Actually,
there was a
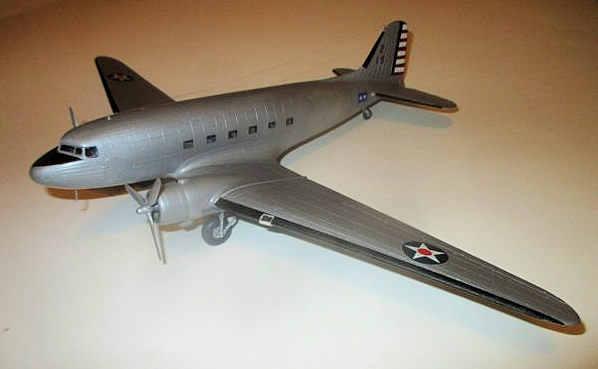 Bowers photo apparently taken on the West Coast in early 1942. The
C-48 was a 21 passenger DC-3A built originally for United Airlines, and was one
of the planes impressed into the USAAF at the beginning of the war, as was a
DC-3A-197D, AF serial no. 41-2681. It was originally intended for United as
NC25612. The airplane lasted throughout the war, and after, it was sold to U.S.
civilian operators, before being sent to Canada as CF-QBD. It crashed and was
destroyed on July 13, 1958. The photo showed the airplane in overall silver with
standard 1940-1941 Army markings and a tailcode of 2, 1-S, which was the 1st
Staff Squadron based at Bolling Field, DC. It had the pre-war tail stripes ,
which I masked and painted. Four 1939 style star and ball insignias were on the
wings, and a black “U.S. Army was painted underneath the wings. It also carried
the badge of a 2 Star General on the rear fuselage. Although it’s not a TWA
airplane, it is colorful, and a nice addition to my model collection.
Bowers photo apparently taken on the West Coast in early 1942. The
C-48 was a 21 passenger DC-3A built originally for United Airlines, and was one
of the planes impressed into the USAAF at the beginning of the war, as was a
DC-3A-197D, AF serial no. 41-2681. It was originally intended for United as
NC25612. The airplane lasted throughout the war, and after, it was sold to U.S.
civilian operators, before being sent to Canada as CF-QBD. It crashed and was
destroyed on July 13, 1958. The photo showed the airplane in overall silver with
standard 1940-1941 Army markings and a tailcode of 2, 1-S, which was the 1st
Staff Squadron based at Bolling Field, DC. It had the pre-war tail stripes ,
which I masked and painted. Four 1939 style star and ball insignias were on the
wings, and a black “U.S. Army was painted underneath the wings. It also carried
the badge of a 2 Star General on the rear fuselage. Although it’s not a TWA
airplane, it is colorful, and a nice addition to my model collection.
One major change I had to
make was the smoothing over of the left side passenger door, as this one had the
door on the right side. I made a decal for the door outline, and this worked out
pretty well.
 Overall,
this is a pretty good kit of a famous airplane. I can recall seeing them from my
earliest childhood, and even today, I run across one occasionally. Quite a few
are still flying, and they will probably continue flying for at least a hundred
years. I would suspect that given their reputation, the new-tool Airfix kit will
probably become the definitive DC-3/C-47 kit, but along with the Italeri kit,
this one is certainly worth getting as it is probably cheaper, and it will
certainly build up into an acceptable model without undue effort. There are a
few listed on E-Bay. Be careful with the decals, although there are probably
some aftermarket sets that could be available. If you have one of these in your
stash, by all means, build it. It will become rare in years to come.
Overall,
this is a pretty good kit of a famous airplane. I can recall seeing them from my
earliest childhood, and even today, I run across one occasionally. Quite a few
are still flying, and they will probably continue flying for at least a hundred
years. I would suspect that given their reputation, the new-tool Airfix kit will
probably become the definitive DC-3/C-47 kit, but along with the Italeri kit,
this one is certainly worth getting as it is probably cheaper, and it will
certainly build up into an acceptable model without undue effort. There are a
few listed on E-Bay. Be careful with the decals, although there are probably
some aftermarket sets that could be available. If you have one of these in your
stash, by all means, build it. It will become rare in years to come.
There
are many sources of information on the DC-3. I found three of them particularly
useful. First was the Peter Bowers book,
The DC-3, 50 Years of Legendary Flight,Tab Books, 1986.
Also the Larry Davis booklet,
C-47 Skytrain in Action,
Squadron Signal Aircraft Number 149, 1995. There is
also a Profile Publication on the type.
Brian Baker
13 August 2019
Copyright ModelingMadness.com
If you would like your product reviewed fairly and
fairly quickly, please
contact
the editor
or see other details in the
Note to
Contributors.
Back to the Main Page
Back to the Review
Index Page
Back to the Previews Index Page