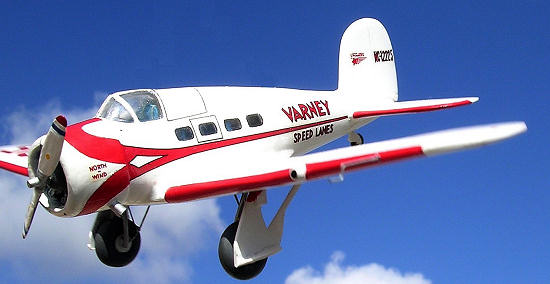
Merlin Models 1/72 Lockheed Orion
| KIT: | Merlin Models 1/72 Lockheed Orion |
| KIT #: | ? |
| PRICE: | $25.00 when new |
| DECALS: | Two options |
| REVIEWER: | Carmel J. Attard |
| NOTES: | Short run to the max with metal parts |
| HISTORY |
 mph,
its performance was equal to many fighters of the period. It’s design with
retractable undercarriage ahead of many of them. The Orion was in fact the last
of many of famous line of passenger and mail planes stemming from the Vega.
mph,
its performance was equal to many fighters of the period. It’s design with
retractable undercarriage ahead of many of them. The Orion was in fact the last
of many of famous line of passenger and mail planes stemming from the Vega.
Wing span 43’ 9.25”
Length 28’ 4”
Height 9’ 8”
| THE KIT |
 The kit
was released by Merlin Models as an injection moulded type. It comes packed in a
sturdy cardboard box measuring 6.5”x 3.25” x 11” having an Orion depicted in
Varney livery as box art cover. The fuselage halves moulded in thick transparent
plastic while the main and tail planes, tail unit, cabin floor are all in grey
plastic. Detail parts which include passenger and crew seats, undercarriage
legs, wheels, well doors, a two-blade propeller and a radial engine as well as
wheels are all cast in white metal. These required a certain amount of cleaning
from flash. The overall look is that the kit is rather crude by today’s standard
but then this is a short run kit and offered a good basis to build an Orion 9
either as a light passenger transport or as a military liaison and light
transport aircraft.
The kit
was released by Merlin Models as an injection moulded type. It comes packed in a
sturdy cardboard box measuring 6.5”x 3.25” x 11” having an Orion depicted in
Varney livery as box art cover. The fuselage halves moulded in thick transparent
plastic while the main and tail planes, tail unit, cabin floor are all in grey
plastic. Detail parts which include passenger and crew seats, undercarriage
legs, wheels, well doors, a two-blade propeller and a radial engine as well as
wheels are all cast in white metal. These required a certain amount of cleaning
from flash. The overall look is that the kit is rather crude by today’s standard
but then this is a short run kit and offered a good basis to build an Orion 9
either as a light passenger transport or as a military liaison and light
transport aircraft.
| CONSTRUCTION |
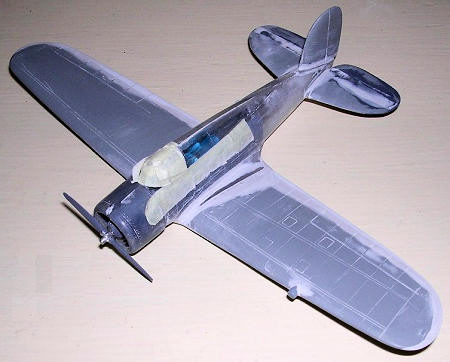
Construction commences with assembly of the cockpit
and passenger area. A double passenger seat is situated at the very back of the
long cockpit floor. Before fitting the seats these require a little adjustment
by filing from sides that is adjacent to the fuselage so that the halves will
close correctly.. There are two more single passenger seats further up the
cabin. These all face forward. A pilot seat is fixed to the cockpit floor which
is elevated at a level higher than that of the passenger floor level. The metal
radial engine was cleaned from excess flash, checked for fitting inside the
cowling and painted silver and grey before glued in place using a tiny drop of
super glue. As one could see the cockpit interior from between the engine
detail, I added a round
 section
firewall made from thin plastic card which was painted matt black both sides.
Some detail as rudder pedals, control column were added and seat straps were
also attached to pilot seat. Pilot seat was leather colour while that of the
passengers was bright blue. With all these items fitted to one half of the
fuselage it was turn to close the fuselage using liquid cement and taking care
not to spoil the clear plastic and windows. While the fuselage was drying I then
concentrated on the other parts as wings, tail unit which definitely needed
rework.
section
firewall made from thin plastic card which was painted matt black both sides.
Some detail as rudder pedals, control column were added and seat straps were
also attached to pilot seat. Pilot seat was leather colour while that of the
passengers was bright blue. With all these items fitted to one half of the
fuselage it was turn to close the fuselage using liquid cement and taking care
not to spoil the clear plastic and windows. While the fuselage was drying I then
concentrated on the other parts as wings, tail unit which definitely needed
rework.
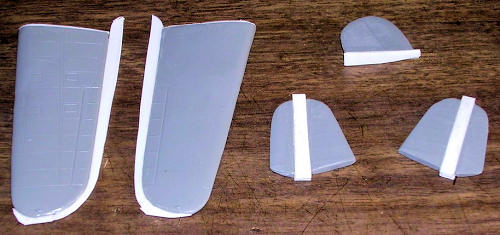
 m
wide plastic card was added to the trailing edge of the wings. This will in the
end be reduced to 2mm added width chord wise. The tail planes also required a 5
mm plastic insert at the middle. This first needed to be split at the middle and
the insert glued in place. The fin and rudder height was 2mm too short and an
insert added at the base. The items were then trimmed and faired to correct
shape adding filler wherever needed. The panel lines were then engraved to the
added parts. The main planes were butt jointed. This required a jig made of
cardboard so that the wings will set at the correct dihedral. These also
required checking from the front to ensure they have the same level at the root.
m
wide plastic card was added to the trailing edge of the wings. This will in the
end be reduced to 2mm added width chord wise. The tail planes also required a 5
mm plastic insert at the middle. This first needed to be split at the middle and
the insert glued in place. The fin and rudder height was 2mm too short and an
insert added at the base. The items were then trimmed and faired to correct
shape adding filler wherever needed. The panel lines were then engraved to the
added parts. The main planes were butt jointed. This required a jig made of
cardboard so that the wings will set at the correct dihedral. These also
required checking from the front to ensure they have the same level at the root.
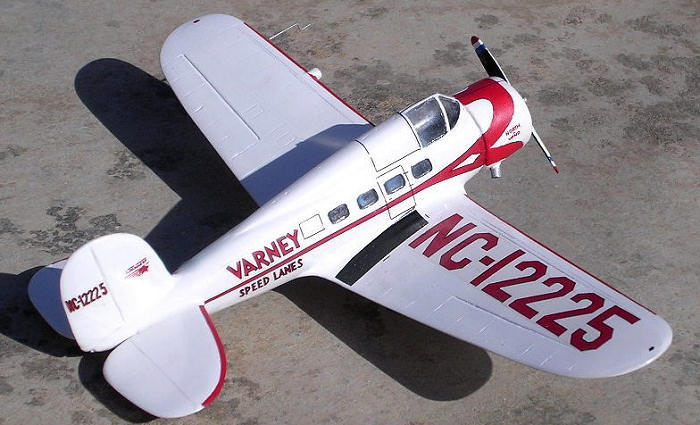
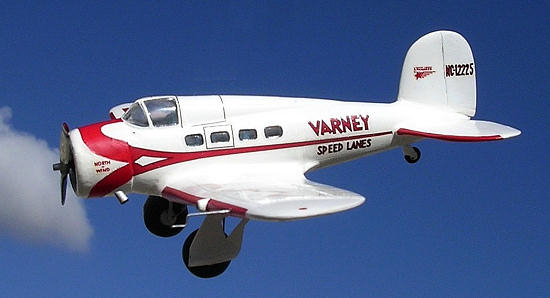
| COLORS & MARKINGS |
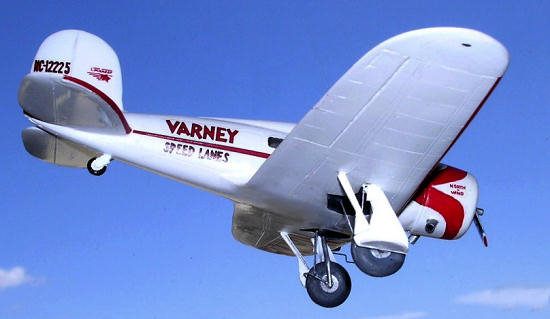 Although
I painted the cabin seats in bright blue, one could also do these in bright red.
The painting stage was straight forward. The wheel wells were painted medium
grey. This area was more of guess work as I had no clear information about this
area and the instructions were of no help. The likelihood was that oil leaks and
fumes and dirt will darken this area. Areas around the cockpit and side windows
were first hand painted in white and the clear areas masked. As the civil
version I chose to build is overall gloss white this required some three coats
of with a smooth sanding in between. The kit was airbrushed in Revell gloss
white. Props had their pitch increased as they were too flat. This was made by
bending the ductile metal to the desired pitch. These were painted silver front
and matt black at the rear, while tips were red, white and blue.
As mentioned earlier the decals were of good quality.
The Lockheed logo both pointed to same direction which was not quite correct.
One of them was therefore slid upside down with the word Lockheed separated and
placed again. There required some touching up with red pant. The front cowling
red trim also needed to be hand painted to form a continuity of the beautiful
red decal trim alongside the fuselage.
Although
I painted the cabin seats in bright blue, one could also do these in bright red.
The painting stage was straight forward. The wheel wells were painted medium
grey. This area was more of guess work as I had no clear information about this
area and the instructions were of no help. The likelihood was that oil leaks and
fumes and dirt will darken this area. Areas around the cockpit and side windows
were first hand painted in white and the clear areas masked. As the civil
version I chose to build is overall gloss white this required some three coats
of with a smooth sanding in between. The kit was airbrushed in Revell gloss
white. Props had their pitch increased as they were too flat. This was made by
bending the ductile metal to the desired pitch. These were painted silver front
and matt black at the rear, while tips were red, white and blue.
As mentioned earlier the decals were of good quality.
The Lockheed logo both pointed to same direction which was not quite correct.
One of them was therefore slid upside down with the word Lockheed separated and
placed again. There required some touching up with red pant. The front cowling
red trim also needed to be hand painted to form a continuity of the beautiful
red decal trim alongside the fuselage.
| CONCLUSIONS |
May 2008