Zvezda 1/144 Tu-154M
| KIT #: | 7004 |
| PRICE: | 21.90 SRP |
| DECALS: | Three options |
| REVIEWER: | Andrew Abshier |
| NOTES: | New tool kit |
| HISTORY |
The Tu-154M, and the subject of this kit, is the deeply upgraded
version, which first flew in 1982 and entered mass production in 1984. It uses
more fuel-efficient Soloviev D-30KU-154 turbofans. Together with significant
aerodynamic refinement, this led to
 much lower
fuel consumption and therefore longer range, as well as lower operating costs.
The aircraft has new double-slotted (instead of triple-slotted) flaps, with an
extra 36-degree position (in addition to existing 15, 28 and 45-degree positions
on older versions), which allows reduction of noise on approach. It also has a
relocated auxiliary power unit and numerous other improvements. Manufacture
continued through 2006. Max. take-off weight increased first to 100,000 kg, then
to 102,000 kg. Some aircraft are certified to 104,000 kg. Tail numbers are 85616
(prototype), production aircraft from 85606 and on (except 85804, which is
re-imported Tu-154B-2). About 320 were manufactured. Production ended in 2006.
No new airframes have been built since the early 1990s, and production since
then has involved assembling airplanes from components on hand. This is the most
widely used version in the former Soviet states.
much lower
fuel consumption and therefore longer range, as well as lower operating costs.
The aircraft has new double-slotted (instead of triple-slotted) flaps, with an
extra 36-degree position (in addition to existing 15, 28 and 45-degree positions
on older versions), which allows reduction of noise on approach. It also has a
relocated auxiliary power unit and numerous other improvements. Manufacture
continued through 2006. Max. take-off weight increased first to 100,000 kg, then
to 102,000 kg. Some aircraft are certified to 104,000 kg. Tail numbers are 85616
(prototype), production aircraft from 85606 and on (except 85804, which is
re-imported Tu-154B-2). About 320 were manufactured. Production ended in 2006.
No new airframes have been built since the early 1990s, and production since
then has involved assembling airplanes from components on hand. This is the most
widely used version in the former Soviet states.
| THE KIT |
Scott previewed the kit . This is a very nice kit overall, and includes, for the first time on any model of a trijet, an actual S-duct for the center engine, complete with a compressor fan at the base!
| CONSTRUCTION |
Since I build my airliners, whenever possible, with clear windows, I made a circular bulkhead to put behind the cockpit area to prevent a see through effect to the cabin windows. The S-duct halves were cemented together and the interior seams finished. It was here that I discovered how soft the plastic was that Zvezda used for this model; it did make finishing the seams in the S-duct much easier, but it also had its disadvantages, as you will see.
I painted the fuselage interior black and the S-duct interior with
Floquil Old Silver. After adding nose weight,
 I
installed the S-duct, which fit perfectly.
I
installed the S-duct, which fit perfectly.
The wings have optional wingtips; the shorter as-built wingtips and the extended wingtips retrofitted recently to improve fuel efficiency. I was building a 1980s-vintage aircraft, so I used the short wingtips. They did not fit that well and some sanding was required, and despite my best efforts, I lost some of the engraved detail.
The intake ring for the center inlet needed to have its mounting flange sanded back slightly for a perfect fit. Once adjusted, the fit was so good that I left the ring off until final assembly to ease masking.
Zvezda commendably molded both the intakes and exhausts of the fuselage-mounted engines in one piece, so there was no seam to fill. I used Testors magnesium for the intake compressor fans, and Testor s exhaust for the exhaust fan and exhaust area. For the interior of the intake, I used Floquil Old Silver. I left the exhausts off until final assembly, but attached the intakes to be sure of a good blend between them and the main nacelle.
On the fuselage, I found that the locator pins actually created misalignments, so I cut these off before assembling the fuselage halves. Also, when sanding the seams, I discovered that it was VERY easy to get a flat top effect on the fuselage due to the soft plastic. Put aside the sanding sticks, use 600 grit paper, and a circular motion, and one can avoid this.
| COLORS & MARKINGS |
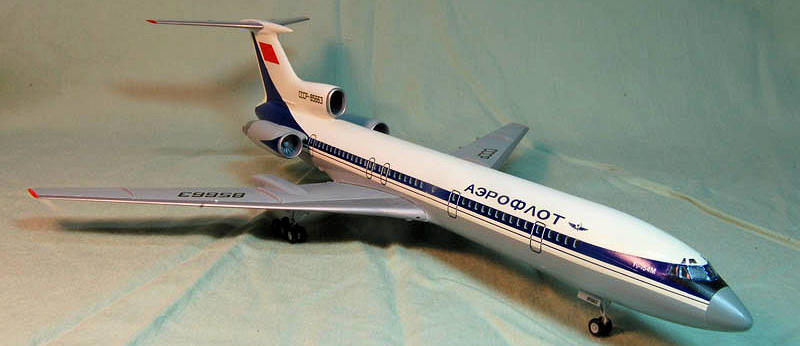
I chose the 1980 s Aeroflot scheme option from the kit decal. The
leading edges of the wings and horizontal stabilizers, as well as the center
intake ring, were painted with Floquil Old Silver. Wingtips on Soviet aircraft
were typically painted bright red; I masked off the wingtips and stabilizer tips
and airbrushed these areas using Testor s Italian Red. Finally, the radomes on
Tu-154s were  often
painted gray--and not in the exact shade used on the rest of the aircraft;
Testor s Flint Gray was used here. After paint was dry on all of these smaller
areas, I masked all of these areas off to receive the main colors.
often
painted gray--and not in the exact shade used on the rest of the aircraft;
Testor s Flint Gray was used here. After paint was dry on all of these smaller
areas, I masked all of these areas off to receive the main colors.
All of the major painted areas were primed using Floquil Reefer White. After fixing any minor faults and refinishing, I then followed with Testor s gloss white thinned about 40% using Aero Gloss dope thinner. I got a mild orange-peel finish, and addressed this using ultra fine finishing paper from Micro Mesh. I then masked off the white and painted on the gray, using Testor s Light Ghost Gray, which was a good eyeball match for the gray used on Aeroflot aircraft. Once the gray was dry, I overcoated these areas with Future. I wasn t satisfied with the quality of my finish, but elected to plow on.
The Zvezda decals performed well using the Micro Scale decal system. They did make an error on the 1980s Aeroflot scheme in that they totally forgot to include the exit outlines for the right side! Fortunately the other schemes on the sheet provided enough spare stock to address this problem. The windshield frame decal did not fit perfectly and I had to patch it in using bits from the other schemes.
| FINAL CONSTRUCTION |
 Landing
gear on this type was painted in the under fuselage color, so I painted the
struts with Light Ghost Gray, with the sliding oleo sections done in Floquil
Bright Silver. Wheel hubs were painted green, which seems to be a universal
wheel hub color on most Soviet aircraft. Using a punch, I made wheel hub masks
to stick in place to paint the tires. It wasn t entirely successful but it looks
good from 3 feet away!
Landing
gear on this type was painted in the under fuselage color, so I painted the
struts with Light Ghost Gray, with the sliding oleo sections done in Floquil
Bright Silver. Wheel hubs were painted green, which seems to be a universal
wheel hub color on most Soviet aircraft. Using a punch, I made wheel hub masks
to stick in place to paint the tires. It wasn t entirely successful but it looks
good from 3 feet away!
I attached all of the major components--wings, horizontal stabilizer, and engine nacelles--followed by the landing gear and landing gear doors.
| CONCLUSIONS |
This is one of the best airliner kits out there, and with the relatively uncomplicated paint schemes available this would make a fine introduction to the airliner side of our hobby. With the fall of the Soviet Union and Warsaw Pact, there are a great variety of color schemes to choose from for this model. Highly recommended!
February 2011
If you would like your product reviewed fairly and quickly, please contact me or see other details in the Note to Contributors.