
Revell 1/24 Routemaster (long)
| KIT #: | ? |
| PRICE: | £ |
| DECALS: | See review |
| REVIEWER: | Frank Spahr |
| NOTES: |
| HISTORY |
Building the Revell 1:24 Routemaster (Long) – or: Eating humble pie with the
doctor
 I need not add further words of mine to describe the classic Routemaster
(Long) bus. There are many websites devoted to this true London icon.
Moreover, there are more competent previews of Revell´s 1:24 scale kit than
I could do. This review is more on a personal level:
I need not add further words of mine to describe the classic Routemaster
(Long) bus. There are many websites devoted to this true London icon.
Moreover, there are more competent previews of Revell´s 1:24 scale kit than
I could do. This review is more on a personal level:
My partner Chrissie and I are card-carrying anglophiles; in the summer of
2011 we spent two lovely weeks in Britain, staying at London for several
days. Apart from doing the usual sightseeing we
 had secured tickets for a
production of „Much Ado about Nothing“ at Wyndham´s Theatre starring David
Tennant and Catherine Tate of Doctor Who fame. In fact we had planned the
trip around this show once we had got tickets. The show was great and much
enjoyed by an enthusiastic audience.
Chrissie´s attempt at getting autographs after the show failed due to
the heavy throng of fans firmly encamped around the stage door barrier. Even
getting any photos at all was hardly possible.
had secured tickets for a
production of „Much Ado about Nothing“ at Wyndham´s Theatre starring David
Tennant and Catherine Tate of Doctor Who fame. In fact we had planned the
trip around this show once we had got tickets. The show was great and much
enjoyed by an enthusiastic audience.
Chrissie´s attempt at getting autographs after the show failed due to
the heavy throng of fans firmly encamped around the stage door barrier. Even
getting any photos at all was hardly possible.
| THE KIT |
Earlier that year the Revell Routemaster kit had been presented, and still
during our stay at London I had the idea of building this kit and decorating
it in a personal way, reminding of this holiday and our f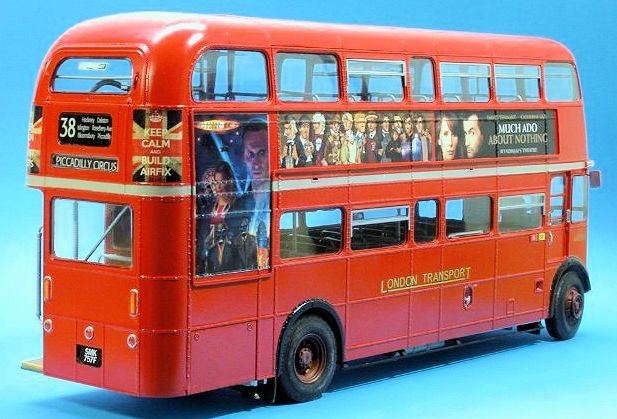 avourite British
things. Chrissie (a trained typesetter) would surely be able to produce
material for custom decals. So I purchased the kit a few months later and a
modeling friend even managed to get me the Revell photo etch for free.
avourite British
things. Chrissie (a trained typesetter) would surely be able to produce
material for custom decals. So I purchased the kit a few months later and a
modeling friend even managed to get me the Revell photo etch for free.
I need variation in modeling. My collection is eclectic, to say the least, and has a bit of it all in it. Even though my main interest is in Royal Navy vessels, that is by far not the limit. But I´m no vehicle builder and I was a bit concerned about tackling this project. Be that as it may, after completing two pretty complex ship projects I manhandled the big and well-filled box into my modeling den and got started. I scanned the decal sheet and measured it to get the right dimensions for our (yet to be made) custom decals. I then gave the files to Chrissie and asked her to be creative, if possible in the foreseeable future.
| CONSTRUCTION |
Then it was time to build the bus. I got to admit I was more than slightly
daunted by the complexity of this kit. Luckily expert modeler Guido Kehder
had built the bus and posted the whole process on his website, especially
where he had deviated from the Revell instructions. These want you to
assemble the body around the completed interior which looked like calling
for trouble in my book, and obviously in Guido´s, too. I´d rather complete
the body with sanding and filling and priming and painting and glosscoating
and decaling and then slip the interior into it than risk damaging said
interior in
 abovementioned process. Nonetheless it was really mind-boggling
to me to visualize the process and I spent a lot of time poring over Guido´s
magazine article and his website, let alone leafing through the instruction
booklet. I got the sneaking feeling that building ships did not involve this
particular challenge.
abovementioned process. Nonetheless it was really mind-boggling
to me to visualize the process and I spent a lot of time poring over Guido´s
magazine article and his website, let alone leafing through the instruction
booklet. I got the sneaking feeling that building ships did not involve this
particular challenge.
In English there is the term of „leaving one´s comfort zone“, to which there
is no perfect German translation I know of. I stepped outside mine for miles
during this project, and I can but say it very much increased the respect I
already had of vehicle builders. To me, this project was more demanding than
building my HMS Warspite with the full Pontos treatment. It sure did not
have so many fiddly parts, but much more was interconnected and depended
upon each other. Moreover, I never really loved clear parts, and here were
three large sprues of them sneering at me.
 Fair enough. At some point I was able to build the body, and the interior
parts weren´t hard to build in the end, but there were a lot of them and it
all took time and loads of space. The engine was fun to build, same as the
floor/suspension. I recently read the account of a British modeler who built
this kit within a week and auctioned it off smartly online. I can but say
hats off to that, I´d never be able to do that. The PE (made by Eduard) was
fairly easy to work with but in the end not really essential, maybe apart
from the radiator grill. A lot of what you do is not that visible after
completion anyway.
Fair enough. At some point I was able to build the body, and the interior
parts weren´t hard to build in the end, but there were a lot of them and it
all took time and loads of space. The engine was fun to build, same as the
floor/suspension. I recently read the account of a British modeler who built
this kit within a week and auctioned it off smartly online. I can but say
hats off to that, I´d never be able to do that. The PE (made by Eduard) was
fairly easy to work with but in the end not really essential, maybe apart
from the radiator grill. A lot of what you do is not that visible after
completion anyway.
As for the paint scheme and overall
accuracy, I relied on what Guido Kehder did and the instructions. I know
that true Routemaster enthusiasts were losing sleep and wringing their hands
on the numerous inaccuracies of the kit, but I was able to simply ignore
them. In this case, it was the personal touch that counted for me, and not
accuracy. Now and then I asked my dearest about the progress she was making
on the decals, but was met with less than raving enthusiasm and delight. I
got an inkling that this was where the project might be stalled.
 In two acts of utter ham-fistedness I managed to touch two of the upper deck
seats with a gluey finger while adding them to the model; despite a thorough
layer of clear acrylic over the seat decals, they melted and left unsightly
spots. I hid them with two „discarded“ newspapers, one of them with David
Tennant on the cover, sourced from the net and copied to size. The floors
and the hubs of the wheels were moderately weathered, the rest of the bus
left as a well-maintained vehicle should look.
In two acts of utter ham-fistedness I managed to touch two of the upper deck
seats with a gluey finger while adding them to the model; despite a thorough
layer of clear acrylic over the seat decals, they melted and left unsightly
spots. I hid them with two „discarded“ newspapers, one of them with David
Tennant on the cover, sourced from the net and copied to size. The floors
and the hubs of the wheels were moderately weathered, the rest of the bus
left as a well-maintained vehicle should look.
Things got really stressful when I started testing how to actually „marry“
interior and the (yet unpainted) bodywork. The latter cracked on the left
side and I was not happy at all. So I had to repair the damage and moreover
grind away material to ensure a damage-free result next time. A lot of the
 seats used the occasion for popping away from the decks, despite being
thoroughly glued – that did not improve my temper and I found myself casting
longing and pondering looks towards the dustbin. Oh, and there was still no
discernible progress with the decals.
seats used the occasion for popping away from the decks, despite being
thoroughly glued – that did not improve my temper and I found myself casting
longing and pondering looks towards the dustbin. Oh, and there was still no
discernible progress with the decals.
I persevered in the end. Modeling is SO about persevering and not following
your destructive urges – if you are interested in achieving a result. It
migth even be character-building on some level, methinks. The bus was
repaired and I devised a strategy re getting some really good decal artwork,
by making something up myself which would be
inacceptable to my dearest, presenting it to her, incite her contempt
and thus spurn her into action. It worked.
She presented some really nice images, based firstly on the theatrical
poster, but also on our favourite TV shows. There was a great image based on
„The empty child / The Doctor dances“ and a superb cartoon of all eleven
Doctors fitting snugly on the advertisement spots. My lifelong connection
with Airfix products and my distance to people taking modeling too seriously
was reflected in two Keep Calm posters, and last but not least there was
some space for a whisky and a cider ad.
| COLORS & MARKINGS |
 My friend Frank Ilse was so kind to print the decals on white decal sheet,
using his colour laser printer. While waiting for this, the model was
prepared for painting. The body was primed with grey
primer from a rattle can, and then sprayed with Vallejo ModelAir red.
That worked better than expected, despite the large area to be covered.
After curing, the body received a coat of clear gloss, also from a rattle
can, to achieve a good base for the decals. Wheel arches and metal stripes
on the body were masked and painted black and silver, respectively.
My friend Frank Ilse was so kind to print the decals on white decal sheet,
using his colour laser printer. While waiting for this, the model was
prepared for painting. The body was primed with grey
primer from a rattle can, and then sprayed with Vallejo ModelAir red.
That worked better than expected, despite the large area to be covered.
After curing, the body received a coat of clear gloss, also from a rattle
can, to achieve a good base for the decals. Wheel arches and metal stripes
on the body were masked and painted black and silver, respectively.
The decals arrived and looked just great. I then cut them out as neatly as possible and applied them. Some smaller glitches were touched over by brush painting. Now I was also able to apply the kit decals. The decals were sealed with more clear gloss, and a final coat of clear satin gloss.
| FINAL CONSTRUCTION |
 When that had cured, I dared add the interior. Luckily the body held, but
again some of the seats went AWOL and had to be laboriously reglued through
the windows. That done, the remaining parts of the interior were added. The
railings along the stairs were pretty tricky, but due to their good fit the
process went well.
When that had cured, I dared add the interior. Luckily the body held, but
again some of the seats went AWOL and had to be laboriously reglued through
the windows. That done, the remaining parts of the interior were added. The
railings along the stairs were pretty tricky, but due to their good fit the
process went well.
Now I had to tackle all the window panes. Some of them needed masking and
painting, and the edges of all were blackened using a felt tip pen,
indicating the rubber seal. I was unhappy with the decals for the directions
and bus numbers, as they were oversize and did not fit. In the end, I
applied them to the backside of the clear plastic covers. Adding direction
indicators and various handles completed the project and I was really happy
it was over.
| CONCLUSIONS |
Different subjects in modeling demand different skills and techniques; it was most instructive to leave my comfort zone and actually build such a large vehicle. The bus looks fine in the cabinet in Chrissie´s room and sure preserves some memories of a great summer trip to the UK. Modelingwise, I doff my hat to the modelers who regularly build these kits and look forward to my next model ship project!
| REFERENCES |
http://en.wikipedia.org/wiki/Routemaster
http://londonbuses.co.uk/index.html
http://www.die-leitplanke.de/1-herzlich-willkommen/4-modelle-im-bau-gebaut/london-bus-revell-m-1-24/
http://www.routemaster.org.uk/pages/home
January 2014
If you would like your product reviewed fairly and fairly quickly, please contact the editor or see other details in the Note to Contributors.