Heller 1/43 Series III Land Rover station wagon
| KIT: | Heller 1/43 Series III Land Rover stationwagon |
| KIT #: | 80151 |
| PRICE: | Approx $8.00 |
| DECALS: | One set of plates |
| REVIEWER: | George Oh |
| NOTES: | No engine, basic interior, one piece chassis |
| HISTORY |
No bloke ever forgets his love, or his first car. My first car was a red (& white) Series III Landrover. My Red Rover took me south from Hobart to the Daintree River in the North, and various places in between. And she never let me down once in six and a half years. She was fitted with wide Desert Dueler tyres, a twin-throated Webber carby on a Holden 202 motor, twin thermatic fans, spare battery, long-range fuel tank, 3 spotlights, 2 front bucket seats with sheepskin seat covers, an AM/FM radio/Cassette player (this was pre-CD’s), a CB radio, two cigarette lighter /power sockets, shelves in the back and a roof rack. She always carried a Turfor winch, a heap of tools, 2 x hydraulic jacks, a wallaby high-lift jack, snatch strap, tarps, fishing gear, camping gear, small generator, car fridge, cooking (BBQ) gear, 4 fuel jerrys (cans), water-carrying pipes (a black one for warming water), exhaust extension pipe, spare wheels, spare hoses, spare food, spare cloths, ropes and chains. Man, the Red Rover and I were equipped.
 I regretfully sold her when I
learnt that a real car isn’t the ideal vehicle for a big city, or luxurious
enough for a wife. But the Red Rover taught me that a real car
doesn’t have to be glossy. And she taught me about patience in
driving.
I regretfully sold her when I
learnt that a real car isn’t the ideal vehicle for a big city, or luxurious
enough for a wife. But the Red Rover taught me that a real car
doesn’t have to be glossy. And she taught me about patience in
driving.
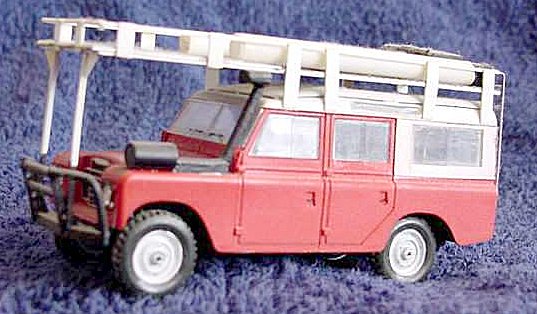
When my Townsville (in QLD) model club revealed that the Heller 1/43-scale Series III Landrover was to be the subject of our annual Identical Kit Competition, I knew right away that I’d be building it in the exact image of my old Red Rover.
| THE KIT |
The kit itself is pretty basic – 28 crisp, dark green parts. But there was no flash and no sink marks. There is no engine but that’s OK ‘cos the bonnet won’t open. All underside detail is moulded onto the chassis plate. The internal detail is accurate but basic – again OK as only the back door is a separate piece (= openable). Externally, there were only 4 main pieces – the chassis plate, the front plate (with the headlights), the rear door and the rest of the body. These joined on normal panel lines, so I didn’t need any putty for this one. The only decals provided was a set of number plates. I would have liked to see the company logo, and an instrument panel, as well.
| CONSTRUCTION |
I wanted to do something with the tyres, load the rear cargo well and do a roof rack (with load).
I couldn’t reproduce the tread of the Desert Dueler tyres, so I replicated standard Army Barlug tyres by tacking the two wheel halves together and cutting across the tyres (many times) with a razor saw. A jig with a single staple ensured the cuts were straight, even in depth and were evenly spaced. I’d do a cut, move the cut to the staple, then do the next cut and continued the process. To complete the tyres, I placed a piece of card between the halves (to widen the tyres), and advanced one tyre-half a tad so that the bars were offset from those of the other half. The kit gave me one spare tyre. Another club member gave me the other.
The inside got a lot of scratch-built details. The floor of the
chassis received the three pedals and the two 4WD transmission controls.
From plastic, I carved the two bucket seats (& added seat belts) for the
front. In the rear cargo well, I used card to build the two the
shelves just under the roof. The small stuff on the shelves, and the
big stuff that I carried on the back floor was all built
 from bits of scrap plastic.
Oh, I dumped the two bench seats along the sides of the cargo well, ‘cos
the Red Rover didn’t have them.
from bits of scrap plastic.
Oh, I dumped the two bench seats along the sides of the cargo well, ‘cos
the Red Rover didn’t have them.
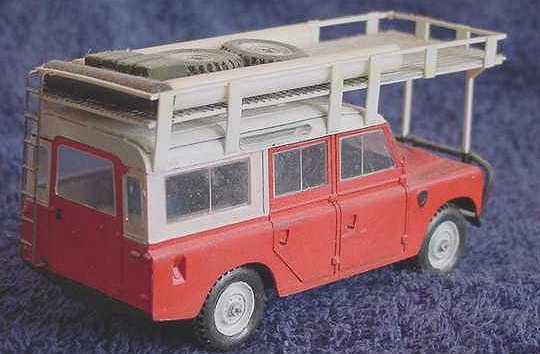
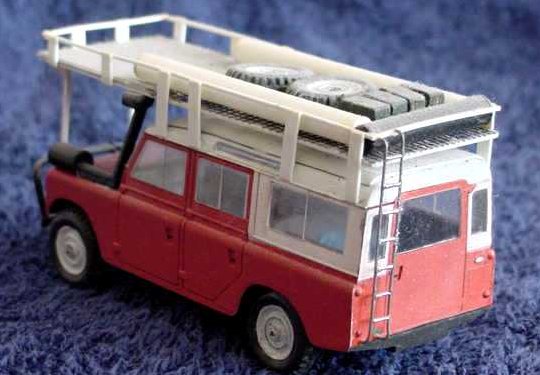
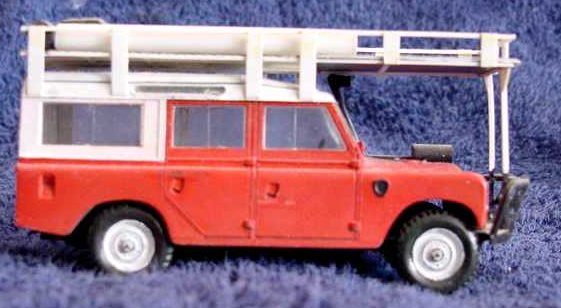
The roof rack was easy once I’d set my mind to it. I built two rectangular frames from 1/2mm square section rod, equal to the length and width of the body. The bottom one received the cross members (more square rod). Both frames were separated by short lengths of plastic strip. I’d hose-clamped a piece of arc-mesh to the Red Rovers roof rack (so I could walk or camp on it). On my model, I used a piece of fly-screen. The Red Rover’s roof rack had a corrugated iron awning that projected out over the bonnet because the North Queensland sun can get pretty intense. I had to buy a piece of 1/48-scale corrugated iron from a railway shop to replicate it on the model. The awning was supported by vertical bars on the bullbar – more square section rod (later). The ladder at the back certainly made it easier for me to get up onto the Red Rover’s roof rack. I fashioned the model one from pieces of wire, held together with superglue.
I couldn’t find any 1/48-scale jerry cans, so I had to scratch-build them. The water-carrying pipes were built from plastic tube. I built an exhaust extension pipe (I’d vent the exhaust near the roof when crossing a river) from a piece of rod, but my model seems to have lost it. The outside air filter and snorkel were hurriedly built from more tube and strips.
My friend Tim Elkington built me the Red Rover’s Bullbar in his workshop, and I helped him. It replaced a bodgie one made from water pipe. My helping Tim aided me in scratch-building the model’s bullbar. Two pieces of thin plastic card were tacked together and the two uprights were cut and drilled, simultaneously. After separation, they were joined by the two cross-members, and the resulting frame was attached to the front bumper. The rest was fashioned from plastic rod.
Did I leave anything out? Yes, because time beat me. The uprights on the Red Rover’s bullbar had a strip so that they were like I-beams (and were stronger). The Red Rover had a rear tailgate & hatch – not a rear door – fitted with a numberplate and light. The Red Rover had a tow-bar 7-pin plug socket. The Red Rover had a hole in the rear cross-member (on the right side?) for the PTO. The Red Rover had three large spotlights on the cross-member of the Bullbar. The Red Rover had an internal rear-view mirror and two large wing mirrors. The Red Rover had headlight covers. The Red Rover had a radio and a CB antenna. The Red Rover had me, and sometimes a lady, inside. I’m happy (now) that I didn’t buy that canoe.
| COLORS & MARKINGS |
 The outside of the body was sprayed white, masked, then the red. The
inside was fully brush-painted because it more-closely replicated the
carpet I’d laid on the floor and up the sides. The chassis was
spray-painted black before being dry-brushed and the details added. The
only part of the roof rack that needed painting was the corrugated iron
sheet. Lights, handles, vent and front grill were all brush painted and
drybrushed where necessary.
The outside of the body was sprayed white, masked, then the red. The
inside was fully brush-painted because it more-closely replicated the
carpet I’d laid on the floor and up the sides. The chassis was
spray-painted black before being dry-brushed and the details added. The
only part of the roof rack that needed painting was the corrugated iron
sheet. Lights, handles, vent and front grill were all brush painted and
drybrushed where necessary.
After painting, the wheels and inside bits were attached to the chassis plate, and the roof rack was attached to the top of the body. Then the two were fitted and glued together. My Red Rover was completed by adding the awning supports down to the front bumper.
| CONCLUSIONS |
Without my MOD’s and additions, the Heller 1/43-scale Series III Landrover is still quite an easy build. And at the end of the day, it looks like a Landrover, so I’m happy to recommend it. I daresay that it would probably pass on a 1/48th-scale diorama. I know a few people who were happy to see the Red Rover – those three old ladies whose tyre I changed, that bloke with his car stuck in the river, that hitch-hiker who Red Rover ferried home out past Teneterfield. I know that I’m certainly glad to see she again, even if she is only on my shelf in 1/43-scale.
September 2004
If you would like your product reviewed fairly and quickly, please contact me or see other details in the Note to Contributors.