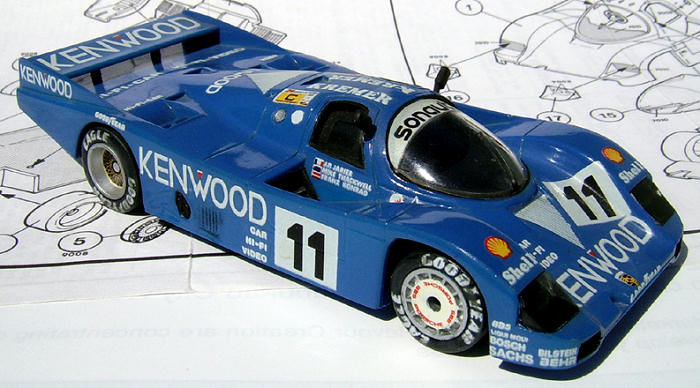
Heller 1/43 Porsche 962 (Kenwood)
|
KIT #: |
80187 |
|
PRICE: |
$5.95
AUD in the early 1990s |
|
DECALS: |
One option;
Kenwood #11 car |
|
REVIEWER: |
Graham Mison |
|
NOTES: |
Currently Out of Production |
The Porsche 962 was a
development of the 956 and is very similar in appearance. It first hit the
tracks in late 1984. It won
Le Mans
3 times and just about every other Sports Car race and series of the mid '80s
and early '90s. Around 150 were produced by Porsche and private companies.
Original specifications were a 2.6 ltr flat 6 putting out around 600 BHP with a
5 speed manual gearbox allowing the car to hit speeds of over 370 KPH. With a
length of 4.8m, a width of 2m and a height of 1.03m its sleek lines typified
Prototype sports car racing from the era.
 This
kit is one of two released by Heller in their
Rallye
series in 1988, the other being the Danone sponsored #33
car. The In The Box Preview of the Danone kit
applies to this boxing as well, with the exception of the decals. The 962 was
the first of a number of
Le Mans
racers that the French company released in this scale, the others being the
Mercedes C9, Jaguar XJR9 and the Peugeot 905 as well as a modified re-boxing of
this kit which was also a Kenwood sponsored car.
This
kit is one of two released by Heller in their
Rallye
series in 1988, the other being the Danone sponsored #33
car. The In The Box Preview of the Danone kit
applies to this boxing as well, with the exception of the decals. The 962 was
the first of a number of
Le Mans
racers that the French company released in this scale, the others being the
Mercedes C9, Jaguar XJR9 and the Peugeot 905 as well as a modified re-boxing of
this kit which was also a Kenwood sponsored car.
My intention for
this build was to do a quick Out Of The Box so no extra detail was added other
than in the decaling and the painting instructions were followed (almost) to the
letter. With only 21 parts it took just a week and that was only because I left
the main paint to dry for several days, this kit could be done in a weekend if
you wanted.
Construction
begins with the cockpit tub, which was painted overall Humbrol 33 Matt Black.
The side pod grill faces were given a dry brush of silver to bring out the
details, and then the passenger seat and the rest of the tub dry brushed with
mid Grey. The drivers seat was also given a coat of black and highlighted with
the same Grey and then attached to the tub. All these cockpit details will be
mostly hidden once the tub is encased by the body but I like to go to the
effort.
 As
the vehicle was to be overall blue I next prepared all the parts to be painted
in this colour. The chassis, body, rear wing and part numbers 10 and 11, the
side pod top rear exits, were prepared. Caution should be exercised when
removing the remnants of the sprue gate at the front of the body to ensure that
you do not cut into the body itself and the same caution applies to the wide
sprue gates on the chassis. In my kit the chassis and the bottom lip of the body
needed a small amount of flash and mold seems removed. Once cleaned up these
were all given a coat of Humbrol 14 Gloss French Blue and left to dry for
several days.
As
the vehicle was to be overall blue I next prepared all the parts to be painted
in this colour. The chassis, body, rear wing and part numbers 10 and 11, the
side pod top rear exits, were prepared. Caution should be exercised when
removing the remnants of the sprue gate at the front of the body to ensure that
you do not cut into the body itself and the same caution applies to the wide
sprue gates on the chassis. In my kit the chassis and the bottom lip of the body
needed a small amount of flash and mold seems removed. Once cleaned up these
were all given a coat of Humbrol 14 Gloss French Blue and left to dry for
several days.
My attention
then moved to the styrene slick tyres. These were given a sanding on their road
contact faces to roughen them up in an attempt to portray the look of tyres that
have done a few laps. The sidewalls were then painted Humbrol 21 Gloss Black as
were the inner and outer rims, with the contact surfaces done in Humbrol 33 Matt
Black. Humbrol 27 Grey was then dry brushed on to scuff the racing surface up.
I then applied
the Goodyear decals to the sidewalls and then very lightly dry brushed these
with Grey to tone down the gloss paint and the white of the decals. This, I
think, gives a reasonable representation of slicks in this scale. The separate
outer face of the front wheels were painted Gloss White and the decals applied,
the cooling fins on the outer circumference were painted Black and then the
details picked out in aluminium. For the larger rear wheels separate outer rims
are provided and these were painted
 Humbrol
11 Aluminium and attached. With that the wheels were pushed onto the stub axles
of the chassis. It was then that I discovered a slight warp to the chassis with
one tyre not making full contact with a flat surface. A gentle twist was given
to the chassis but this only improved the situation a little, I didn't want to
apply excessive force and break something, so left it be.
Humbrol
11 Aluminium and attached. With that the wheels were pushed onto the stub axles
of the chassis. It was then that I discovered a slight warp to the chassis with
one tyre not making full contact with a flat surface. A gentle twist was given
to the chassis but this only improved the situation a little, I didn't want to
apply excessive force and break something, so left it be.
To complete the
first stage of construction I fitted the cockpit tub to the chassis and after
painting the lower inner surface of the air ducts for the brakes Matt Black I
placed this aside to move onto the body.
Here I began by
painting the inner surface of the cockpit Flat Black as well as the dashboard
face and coaming. The steering wheel also gets a coat of this and is best
attached at this stage. There is no instrument detail provided, some thing I
would attempt on my next Heller 962 as well as opening the drivers' door. The
front faces of the headlight area also needs a coat of Black. Whilst that was
drying I cemented on the previously painted parts 10 and 11 as well as the rear
wing.
Construction was
almost complete now with only 5 parts to go. I tackled the one-piece
windshield/side windows next. This has the single wiper molded on it and I
thought this would be best painted before attaching it to the body. The Heller
clear parts are quite brittle and the windshield in my kit had a small molding
flaw on the bottom edge. I built the paint up on the wiper with several
applications, this is best done under a very bright light as it is difficult to
discern the wiper from the windshield. I used several drops of Super Glue in the
center section to attach this to the inside roof, with a little white glue
around the base to fill a few gaps, including that flaw. The appearance of the
side windows is not that good with an unrealistic step down from the doors to
the glass surface.
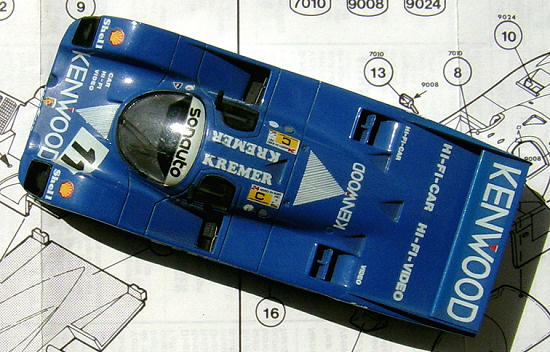
The
external mirrors are next attached with these painted Black with Silver faces.
On a 962 these can be adjusted for height on a sort of track attachment, the kit
location seems a little high but may be genuine. The glass headlight covers are
next and Heller suggests you paint the lights onto the inner surface of these
solid parts. I decided to make the lights out of silver decal. I used a hole
punch to make
 4
circles from solid silver Micro Scale decal sheet, I don't know if a product
like this is available now but I still have a number of these in different
colours. These were placed onto the body and I test fitted the glass parts and
found they needed a little trimming, I also didn't like the look of them as they
distorted the view. To reduce this I painted their inner surface Tamiya Smoked
Glass, on reflection (pardon the pun) this was too dark but I prefer that to how
they were.
4
circles from solid silver Micro Scale decal sheet, I don't know if a product
like this is available now but I still have a number of these in different
colours. These were placed onto the body and I test fitted the glass parts and
found they needed a little trimming, I also didn't like the look of them as they
distorted the view. To reduce this I painted their inner surface Tamiya Smoked
Glass, on reflection (pardon the pun) this was too dark but I prefer that to how
they were.
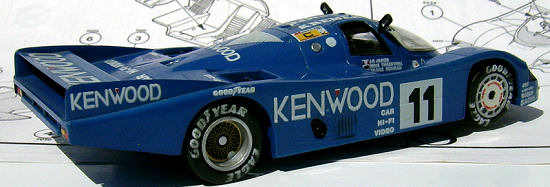
That only left the body to
be mated to the chassis and this was a reasonable fit. The sit of the model
seems a little high with too much ground clearance. That’s construction over so
onto the decaling. The guide for this is not on the instruction sheet but on the
box bottom where 5 photos of the finished model are shown. It was whilst
studying these images that something struck me, I think the model Heller used
for this is possibly not theirs or it was enhanced with extra detail. There is
more detail shown under the rear of the model and around the wing supports,
which look nothing like the kit parts. The front of the body is also lacking the
cutout for the tow hook and the windshield wiper looks like a separate part and
is at a different angle to the kits. A mystery for sure.
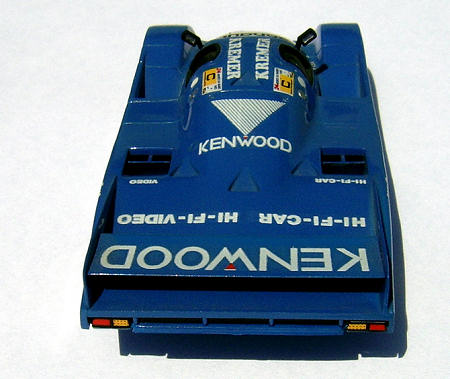
The
kit subject is the Kremer Racing car #11, sponsored by Kenwood sound systems and
driven by Jean-Pierre Jarier, Mike Thackwell and Franz Konrad. Stated by Heller
to have competed at
Le Mans
in 1986
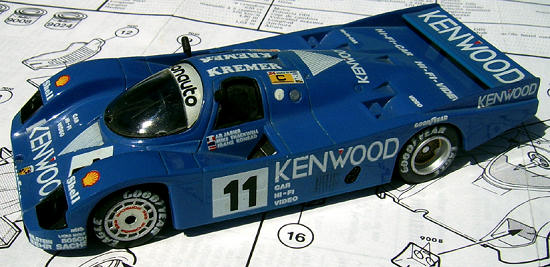
It
must be said that the supplied decals went on well to the gloss paint, I used
nothing but luke warm water and light pressure with a tissue. They appear
complete and mostly accurate in size and appearance compared to the one image I
could find of this car from
Le Mans
1985, and yes I said 1985 not the 1986 race as Heller state. This car didn't
compete in 1986. Who ever designed the decals got it right as the entrants'
sticker above the fuel caps states 1985. The one downer with the decals is the
national flags for the drivers, these are out of register and this is a common
problem with these kits. Instead of painting the circular fuel caps I again
turned to punching these out of decal sheet. The
finishing touches were the painting of the side exhausts, a little dirtying up
of the side grills and some dry brushing of the limited detail on the underside.
I was satisfied with the
finished models appearance as built OOTB and think this kit has the potential of
a real gem with some added detail. Recommended to modellers of all skill levels.
http://en.wikipedia.org/wiki/Porsche_962
- Information on the 962.
Graham Mison
April
2008
Copyright ModelingMadness.com
If you would like your product reviewed fairly and fairly quickly, please
contact
the editor or see other details in the
Note to
Contributors.
Back to the Main Page
Back to the Review
Index Page 2019