| KIT #: | 09192 |
| PRICE: | $30.00 |
| DECALS: | One option |
| REVIEWER: | Dan Lee |
| NOTES: |
| HISTORY |
The Lotus Esprit is one of the most famous luxury sports cars in large part because it was one of the vehicles driven by James Bond. The Esprit was designed by Giorgetto Giugiaro for Lotus in 1975 as a compact mid engined sports car. 10675 Esprits were produced from 1976 to 2004 in various series and versions.
 The
submarine car was developed around the early Series 1 Esprits. The actual car
was produced from an outer shell of a Lotus Esprit by Perry Oceanographic of
Florida. It is not an actual car and not much of a submarine either. The “sub”
car was used for filming and then sent on a promotional tour. It was recovered
by a collector from a storage unit and sold to potential real life Bond Villain,
Elon Musk, in 2013 with the intent to make it into a running electric submarine
car.
The
submarine car was developed around the early Series 1 Esprits. The actual car
was produced from an outer shell of a Lotus Esprit by Perry Oceanographic of
Florida. It is not an actual car and not much of a submarine either. The “sub”
car was used for filming and then sent on a promotional tour. It was recovered
by a collector from a storage unit and sold to potential real life Bond Villain,
Elon Musk, in 2013 with the intent to make it into a running electric submarine
car.
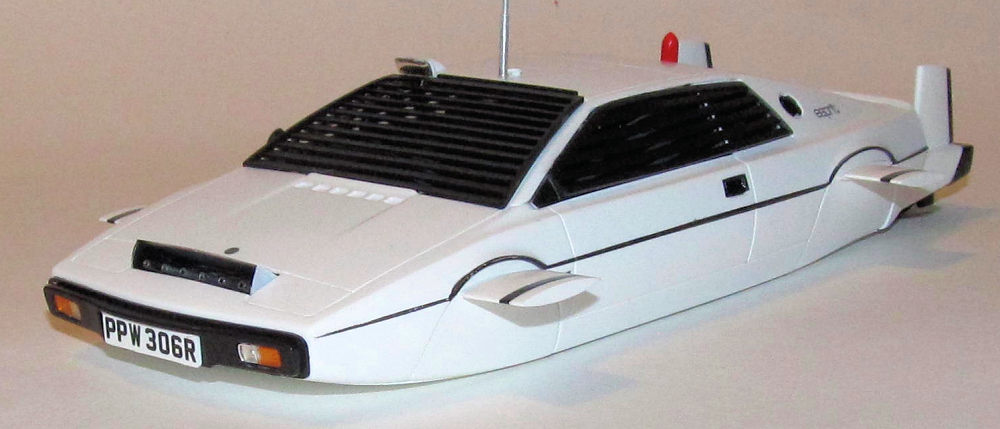
The Reel History is that Q-Branch led by the indomitable Major Boothroyd aka Q designed the submarine car (named “Wet Nellie” after the autogyro used in “You Only Live Twice”) to give Double O agents the ability to travel underwater if the mission so required it. The Esprit was equipped with a modified underwater SAM launcher (Blowpipe), explosive tipped harpoons, mines, ink jet dispensers, a periscope and an underwater capable closed circuit TV. The plans were allegedly stolen by Agent Triple X Anya Amasova.
| THE KIT |
Fujimi produced a Bond
Submarine Car kit based on their 1/24 Lotus Esprit. The kit contains separately
bagged sprues including the body, the headlights and accessories, the exterior
submarine parts and
 underside
in white while the propellers are molded in gold. The interior is made up of two
sprues of dark grey and the exterior black parts are molded in flat black.
Lastly, there is a chrome sprue containing the headlights and a large clear
sprue containing the optional headlights, windscreen, side windows and signal
light covers.
underside
in white while the propellers are molded in gold. The interior is made up of two
sprues of dark grey and the exterior black parts are molded in flat black.
Lastly, there is a chrome sprue containing the headlights and a large clear
sprue containing the optional headlights, windscreen, side windows and signal
light covers.
It comes with a small sheet of decals and a step by step instruction booklet.
The parts come with no flash or imperfections except sprue nubs and mold markings while the clear parts are very clear.
| CONSTRUCTION |
I first started by painting many of the interior parts RLM75 German Grey as per instructions while the interior small parts (like the steering wheel) were sprayed gloss black. I normally would have spent more time on the interior but most of it would have been hidden by the window baffles/shutters that I didn't really bother to add much detail (like seatbelts for example.) About the only detail I added was cutting out the decal for the submarine console and glued it onto the dashboard with white glue.
The various interior parts were glued together using Tamiya Extra Thin glue. The clear piece that divides the passenger compartment from the trunk was secured using white glue.
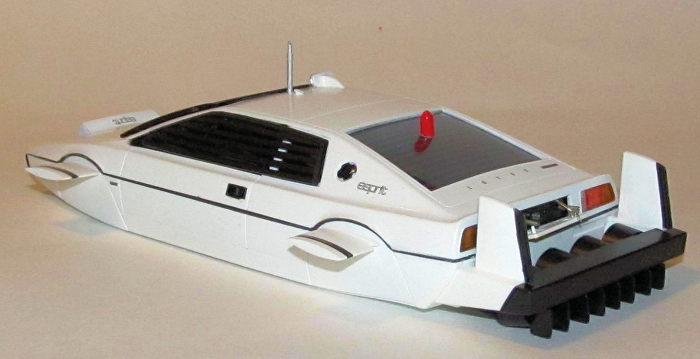
The instructions give you
the option of opening up the rear and front sections and exposing the various
hidden weapons. I opted to open things up. The rear area didn't require any real
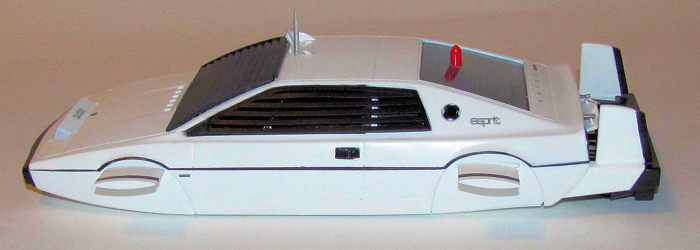
work while the front did. I had to remove part of the nose section where the
explosive tipped harpoons are fired out. I ran a knife with a new blade gently
over the seam line and continued till it opened up. Next I sanded that area
smooth and  straight.
Fujimi provides the harpoon bay portion. I painted it first with gloss black
interior, then masked off when dry and sprayed the top part gloss white. Finally
I hand painted the harpoon gun nozzles with Vallejo Metal Color Silver.
straight.
Fujimi provides the harpoon bay portion. I painted it first with gloss black
interior, then masked off when dry and sprayed the top part gloss white. Finally
I hand painted the harpoon gun nozzles with Vallejo Metal Color Silver.
I then worked on the exterior pieces. The various white, brass and black parts were removed from the sprue gates, sanded and painted flat white, copper and gloss black. When the white parts were dry, I sprayed them gloss white.
The body has black trim all around it. It would be a nightmare for me to brush paint so I spent a good hour and half masking the white areas of the body and then spraying on gloss black for the trim areas. When the masking was removed, I found a couple of places that required some touchups. The black parts were sprayed gloss black while the missile warhead was painted gloss red. The signal light clear parts were painted clear red and/or orange based on the instructions. I added the black painted rear louvers to the trunk to finish up the interior portion of the car.
The body was sprayed with Tamiya Gloss coat and it was left for a few hours to cure. Once it was dry, the decals were added with a little bit of help from MicroSol. After the decals were dry, the decal solution residue was wiped off and the final Tamiya Gloss coat. The other parts were gloss coated at the same time.
The license plate decals were added to the license plate parts. Once dry, the excess decals were carefully trimmed with a knife.
| FINAL ASSEMBLY |
 The car
now had to be assembled. The windscreen was inserted into the shell of the car
and glued in with Tamiya extra thin cement. The side windows were secured in
place using Micro Krystal Klear glue.
The car
now had to be assembled. The windscreen was inserted into the shell of the car
and glued in with Tamiya extra thin cement. The side windows were secured in
place using Micro Krystal Klear glue.
Once dry, the interior was added and glued in place with Tamiya extra thin. The lights and chrome backing were glued into the bumpers using Krystal Klear. Once dry, the bumpers were secured to the body with Tamiya extra thin cement.
The props and tail fins/rudders were glued in place as well as the wheel covers and fins. Lastly, the various extra parts from license plates, jet nozzles, light covers, periscope and missile were glued on.
| CONCLUSIONS |
There it is. The Fujimi Sub car was a fun build. Straight forward for the most part, but it involved a lot of masking and sometimes complex painting due to the color scheme (white and black is not easy.)
Copyright ModelingMadness.com
If you would like your product reviewed fairly and fairly quickly, please contact the editor or see other details in the Note to Contributors.
Back to the Main Page Back to the Review Index Page Back to the Previews Index Page