Classic Racing Resins 1/24 1962 Mickey Thompson Special
| KIT #: | |
| PRICE: | $ |
| DECALS: | One Livery |
| REVIEWER: | Mark Hiott |
| NOTES: | Transkit |
| HISTORY |
 In
1962, Mickey Thompson entered three John Crosthwaite -designed cars in the
Indianapolis 500. They used a stock V8 Buick engine, and it was in the rear
unlike the front-engined, race-tuned, Offenhauser- powered cars used by most
competitors. It was the first stock engine to be raced at Indy since 1946.
Thompson's crew, led by Fritz Voigt, was young, smart, and hard working. Working
12- to 14-hour days, the car was designed and built in 120 days. For the race,
the engine (enlarged to 4.2-L capacity, the maximum allowed by the regulations
for "stock block" engines) had to be detuned because they were concerned it
would not last the distance. Despite being more than 70bhp down on the other
cars, Dan Gurney qualified eighth and was in ninth place until a leaking oil
seal seized the gearbox and ended his race on lap 94. He was placed 20th out of
33.
In
1962, Mickey Thompson entered three John Crosthwaite -designed cars in the
Indianapolis 500. They used a stock V8 Buick engine, and it was in the rear
unlike the front-engined, race-tuned, Offenhauser- powered cars used by most
competitors. It was the first stock engine to be raced at Indy since 1946.
Thompson's crew, led by Fritz Voigt, was young, smart, and hard working. Working
12- to 14-hour days, the car was designed and built in 120 days. For the race,
the engine (enlarged to 4.2-L capacity, the maximum allowed by the regulations
for "stock block" engines) had to be detuned because they were concerned it
would not last the distance. Despite being more than 70bhp down on the other
cars, Dan Gurney qualified eighth and was in ninth place until a leaking oil
seal seized the gearbox and ended his race on lap 94. He was placed 20th out of
33.
| THE KIT |
First up I want to say that most of my builds are not
mainstream・kits. Most are OOP and difficult to obtain. I do the articles so if
you do want to search the kit out, you will know what to expect. This kit comes
and goes at CRR and if you email Calvin, he will let you know when it will be in
stock again.
The kit is what's referred to as a trans kit・in that it normally transforms a
donor kit into something different. However, there is no donor kit that will
work with it, so you will need to scratch build most of the drivetrain. In this
case you get the body, wheels/tires, engine/chassis, intakes, exhaust and
windscreen.
| CONSTRUCTION |
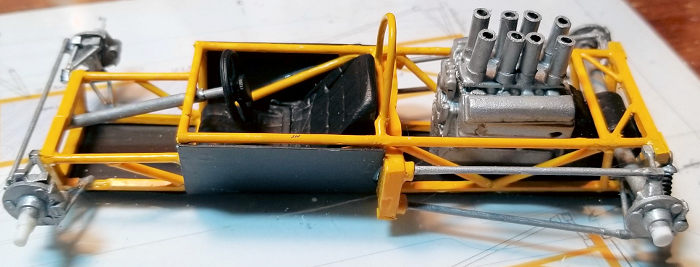 The
first thing to do is decide if you want to do a full chassis or just add
suspension to the kit parts. I chose to scratchbuild a complete chassis.
The
first thing to do is decide if you want to do a full chassis or just add
suspension to the kit parts. I chose to scratchbuild a complete chassis.
A friend of mine sent me a diagram of the chassis and it was built using 1/16
round and square strip. I had to grind out the inside of the body to make the
chassis fit. Even then, I had to modify the chassis to clear the inside of the
nose. I used 1/8 square for the front and rear bulkheads as they carry the
suspension mounting points.
I cut apart the kit chassis and separated the seat, center mount and engine. I
used 1/8 brass tube for the intakes.
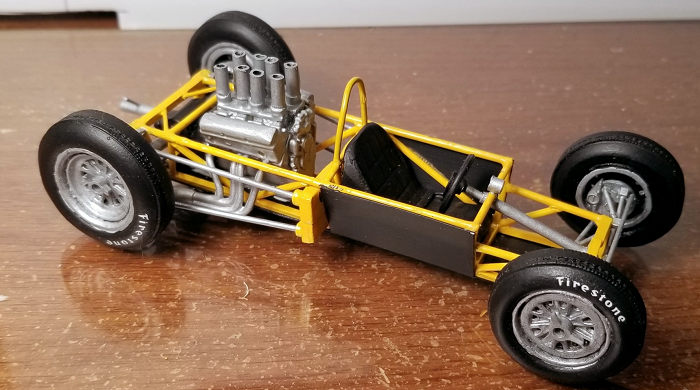 The
suspension was made using the diagram as a layout for the front and rear arms.
They were built with various round and square strip. I used the uprights from
the AMC Lotus kit. They were then drilled so I could use rod to pin them to the
frame. When complete, the frame was boxed in and seat, center mount and engine
were fitted in the frame.
The
suspension was made using the diagram as a layout for the front and rear arms.
They were built with various round and square strip. I used the uprights from
the AMC Lotus kit. They were then drilled so I could use rod to pin them to the
frame. When complete, the frame was boxed in and seat, center mount and engine
were fitted in the frame.
Wire was used for the track bars, tie rod and exhaust braces.
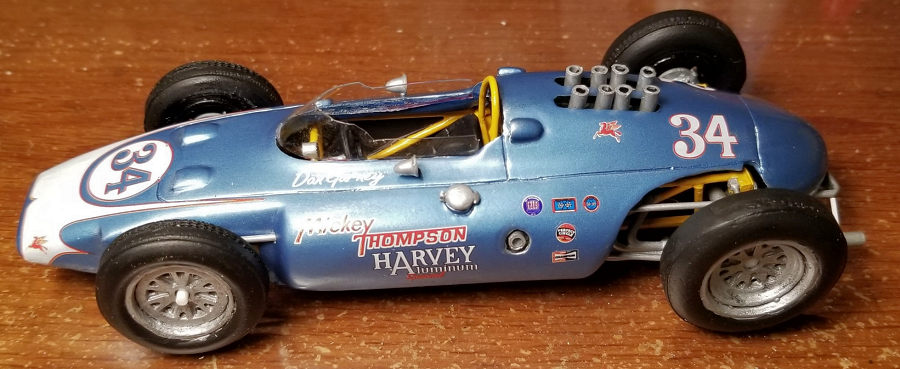
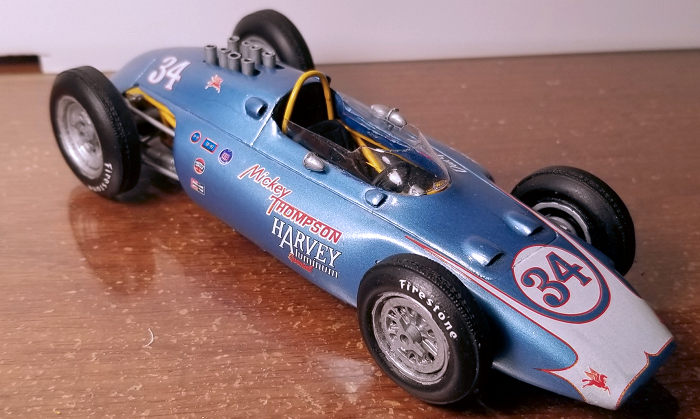
The body was used basically out of the box. I did, however, need to grind away
some areas as I went along. As I test fit the frame and such, I found that it
hit, rubbed or just didn稚 clear certain areas. I needed to open the intake holes
and removed resin from the rear of the body. I again used parts from the Lotus
kit for the mirrors and center nuts for the wheels.
| COLORS & MARKINGS |
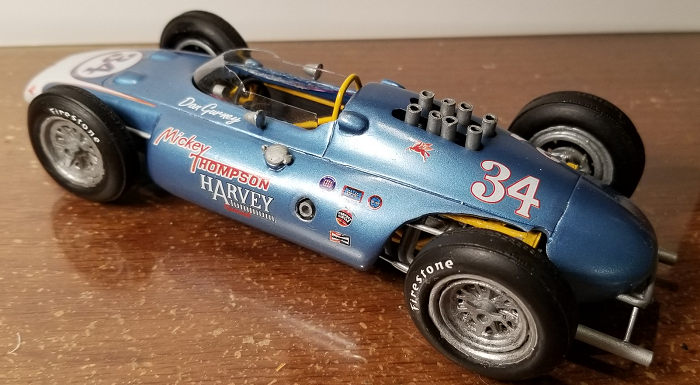 Painting
was fairly straight forward. Testors Nassau Blue for the body and Chrome
Painting
was fairly straight forward. Testors Nassau Blue for the body and Chrome
Yellow for the frame. I'm not sure if these colors are still available from
Testors but I know other companies make them.
Decals are from Indycals and include the white area on the nose. They are thin
but I had no trouble with them.
| CONCLUSIONS |
This is not a kit for everyone. It requires a lot of careful scratchbuilding. I think anyone who is use to scratchbuilding should have no trouble with it.
| REFERENCES |
The internet and various friends.
Mark Hiott
15 September 2025 Copyright ModelingMadness.com. All rights reserved. No
reproduction in part or in whole without express permssion from the editor.
If you would like your product reviewed fairly and fairly quickly, please
contact
the editor or see other details in the
Note to
Contributors.