AMT 1/25 1959 Chevrolet El Camino
| KIT #: | |
| PRICE: | |
| DECALS: | |
| REVIEWER: | Joe Essid |
| NOTES: | 'Tip Top Shop' kit used. 'Rat Fink' decals |
| HISTORY |
The History-Talkers and Makers of Books in Rothville say that in our great-grandparents' time, the tribes of the Earth destroyed each other, melting their cities and burning their people from the sky using the flying machines we are only now, in this era of The Rebuilding, learning to make again.
 I saw many
things with my own eyes when young, as Warped Head of the Rat Fink Squadron. I
rode among the Highway Patrollers who rebelled against The Lord of the
Wasteland, that tyrant of tyrants who smashed the Old Murakin Warlords after The
Dust stopped blowing and people began to think of making a new world. His vision
was empire; ours was a dream of peace without tyrants.
I saw many
things with my own eyes when young, as Warped Head of the Rat Fink Squadron. I
rode among the Highway Patrollers who rebelled against The Lord of the
Wasteland, that tyrant of tyrants who smashed the Old Murakin Warlords after The
Dust stopped blowing and people began to think of making a new world. His vision
was empire; ours was a dream of peace without tyrants.
Many of us stole vehicles from the Steel War-Dog Packs and raised our own flags in the Wasteland, even in Devastated Zones full of The Twisted, places that glowed by night, in order to get the Three S-sentials: Supplies, Software, Survivors. We found Twisted Ones who knew the Plenty-Times Science of Bots: metal arms or legs, targeting computers, Bionic Eyes and Ears. We became more than human in order to fight The War-Dogs and their Lord.
One by one, in machines patched together from wrecks or taken in battle, we began finding Clean Zones for our little villages. Cutting hard deals with the Bulletfolk and Petrolfolk, we traded skills and muscle for what we needed, until the Day of Reckoning: The Battle of Broken Arch, near the Big Muddy River, when The Lord and his Packs met their Maker.
| THE KIT |
I think this to be AMT's 1964 issue of the iconic batwing-finned Chevy. The real deal was a one-year design, its perceived excesses toned down for the 1960 model year before vanishing until 1964, when it resurfaced on a midsize Chevelle chassis. I've long had a fondness for these hybrid car/trucks; we owned a very potent 1970 for several years.
 Looking at
an actual '59 made me want to do something with its 1/25 cousin in my parts box.
AMT's kit was state-of-the-art stuff in its day: detailed chassis with working
front suspension, decent engine and interior. Down to emblems and trim, it
matches its real counterpart well and the kit has been reissued many times. My
built example came in rough shape, missing a few parts, from my father-in-law's
estate. There it sat for a decade until I saw Mad Max: Fury Road.
Looking at
an actual '59 made me want to do something with its 1/25 cousin in my parts box.
AMT's kit was state-of-the-art stuff in its day: detailed chassis with working
front suspension, decent engine and interior. Down to emblems and trim, it
matches its real counterpart well and the kit has been reissued many times. My
built example came in rough shape, missing a few parts, from my father-in-law's
estate. There it sat for a decade until I saw Mad Max: Fury Road.
The 1/1 scale working vehicles of that film are beyond compare; I admit to trying a Mad Max II: The Road Warrior build in the early 90s, while I was in Grad School. It became a disaster given my lack of tools and rusty modeling skills. Now I'm better at scratch-building and working with multi-media materials, so I figured "why not?" In the years since I labored in the graduate stacks at Indiana University, we modelers got better adhesives, good acrylic paints, and vast shopping & research opportunities online.
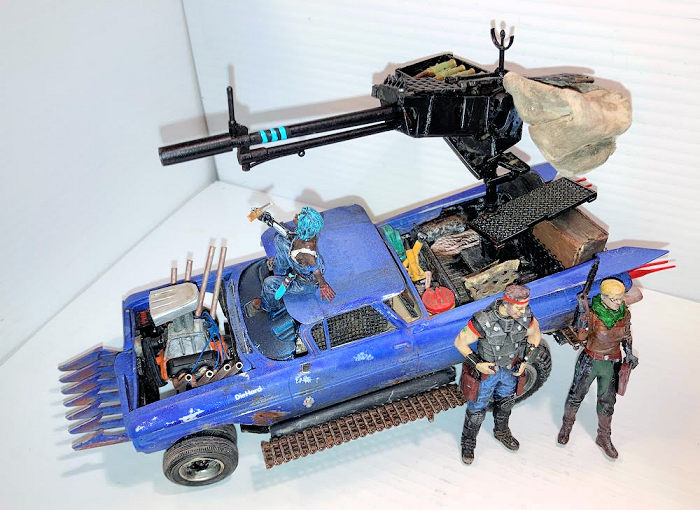
I reviewed online photos of big-gun Technicals from modern conflicts, peeked at the vehicular aesthetics of George Miller's films again, then got the kit apart and cleaned up. I said "something will emerge from the parts box." And so it did. I had no idea that packing materials, a section of furnace grating, a guard from a hair trimmer, brass tubing, a car-wash chamois, and the cap from a tube of Gorilla Glue Gel would end up on the model, making it, as Forum member Rob Hart said, "The Technical to end all Technicals."
| CONSTRUCTION |
The build emerged around three elements. I had a 1/35 Tamiya STG III kit with a detailed interior I never used, and its 75mm gun and flooring beckoned to me. Add to that a Williams Brothers 1/6 machine gun; it gave me a barrel and iron sights for this weapon. Finally I possessed a bunch of shaving guards for an electric hair-trimmer. I saw them and said "people-catchers for the Wasteland!"
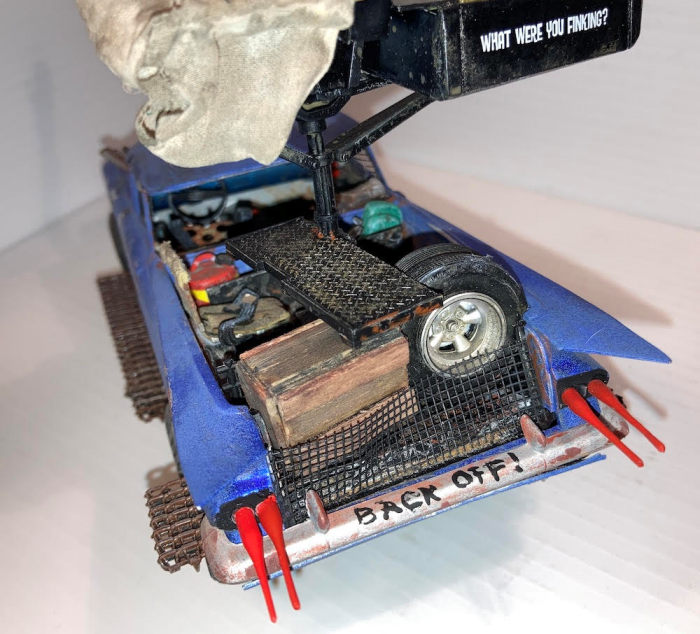
I built my Scout with that ridiculously oversized set of blades and equally outsized main armament. The big gun got built up with an ammo box of Evergreen sheet, using 1/6 .50 caliber bullets from an old 21st Century Ultimate Soldier set to fill the tray. More sheet styrene became a deflector to eject spent brass into the bed, for later reloading. I attached the 75mm gun-mount to the El Camino's bed and monkeyed around until I had a rod long enough for the gun to clear the cab when it swiveled. The rod sits in a Gel Glue cap that had been the supercharger scoop for a while, until I built a flat scoop.
The Wasteland Scout would carry materials and tools for its crew to scavenge and make repairs, so I put a couple of dividers in the bed to store a coil of rope, gas can, bed roll, spare tires, jack stands, fire extinguisher, and whatever else I could cram in from the AMT Tip-Top Shop kit.
The Chevy looked ridiculous sitting on standard rear
wheels, even cool mags on dual rear tires (I already had duals up front). I
bored out 1/16 tractor tires until they fit a road-wheel from a 1/35 T-35, for a
modicum of believability. For the stance I also went large; again, at the
suggestion of Rob I added heavy-duty leaf-springs cut from strip Evergreen
styrene, warping them in hot water, then gluing them together. At each end, I
drilled a small hole for a sewing pin than goes into the car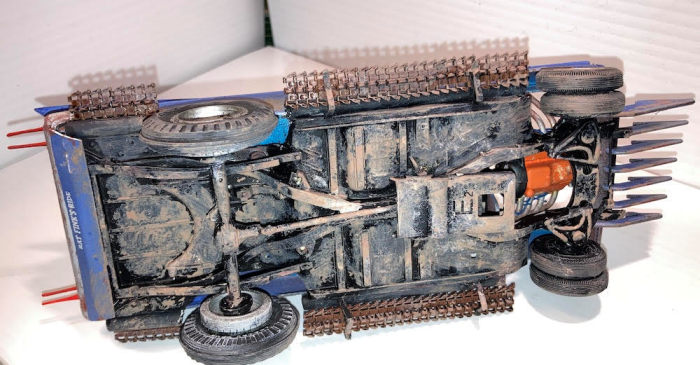 's
frame. This was one of the most enjoyable parts of the build, as the results
remind me of a job I did a few years ago on my life-sized '74 Buick, to remove,
clean, and repaint its lifted rear suspension. The result on the model is, to my
jaded eye, perfect: it looks jacked up, all the better to give the gunner a
clear field of fire. To protect the drive-shaft I added a skid-plate near the
tail of the transmission, using a cut-down windshield-wiper adapter that had
been rattling around in my parts box.
's
frame. This was one of the most enjoyable parts of the build, as the results
remind me of a job I did a few years ago on my life-sized '74 Buick, to remove,
clean, and repaint its lifted rear suspension. The result on the model is, to my
jaded eye, perfect: it looks jacked up, all the better to give the gunner a
clear field of fire. To protect the drive-shaft I added a skid-plate near the
tail of the transmission, using a cut-down windshield-wiper adapter that had
been rattling around in my parts box.
Later in the build I had two issues, not unusual when torturing a kit until it hollers "uncle." The rear wheels would not allow me to mate body to chassis, even were I to "radius" the fenders. So I cheated, with bits of sprue glued between the two halves. Some soft-plastic tubes that ship in shoes got cut to fill the gaps at the edges, as well as being staging areas for running boards I made with 1/35 tank tracks and props used for and STG III's side-armor. I'm saving the armor itself for an AFV or some future Wasteland vehicle.
Glass windows would not last long in The Wasteland, so I removed them. This made the front of the cab look odd indeed, given how a 59 El Camino windshield curves around to meet the car's A-pillars. Then it occurred to me that a riveted-on sun-shade, out of 40s cars, might restore some balance to this part of the build. More Evergreen got cut, warped, and glued down.
AMT's V-8 motor, either a Chevrolet 283 or 348 "Turbo-Thrust," was a joy to modify; I wanted a supercharger with a scoop, which I fabricated out of styrene sheet. Since The Wasteland is dusty, I lined the scoop's air intake with ultra-fine stainless-steel screen I've used in some fuel systems as a strainer. Some odd bits from the parts bin gave me pulleys, and I used sewing elastic for the belt as well as seat belts for the interior and gunner's travel-seat in the bed. When the motor was together, some dry-brushing brought out the belt's details. Instead of the dual exhausts or even side-pipes I'd considered, I went wild: Zoomie pipes straight up from the exhaust manifolds for an already over-the-top project, using bent brass tubing. Jeweler's wire dipped in acrylic paint made the plug and battery wires. I recently replaced all the wires and plugs on two GM V8s; I didn't bother checking the plug-order on the AMT distributor...
The interior lost its bench seat and got more Evergreen to box in the walls. Grab handles came from a tank kit and a shifter from stretched sprue topped with a blob of CA gel. The seats began as a piece of furnace grille I love for its round holes. I cut this with a Dremel, bending the seats and smoothing edges on my shop's grinding wheel before adding chamois pads and elastic seatbelts with bits of PE metal for the buckles.
I had started on my crew before the car was even painted, using two figures from Master Box. I have a crossbow-toting commando from their set The Last Bridge. She's a tough-looking pro, good for sneaking into enemy territory for a quiet strike. The driver comes from Master Box's Edge of the Universe series; he has some Science-Fictional gadgets on his wrist that I emphasized but I left out a set of cyber-goggles, instead using some putty to make his hair wilder, leaving the impression for the goggle-strap to serve as a headband. The final figure is a female gunner. I really liked this one when I spotted it online, from a Chinese firm and listed on Alibaba. She's seated, ready to take a drink from a can or bottle. Sadly for me, she shipped without either of her arms! I looked through the Masterbox parts for something to use, finding a human left and robot right arm, bent just right to hold a bottle I made out of clear sprue.
| COLORS & MARKINGS |
Since I adore weathering vehicles, I knew I'd get my jollies on this project. After the model was more or less together, albeit temporarily, I sprayed it in Rustoleum Rusty-Metal Primer from a rattle can. I use that to prep farm implements for painting, and it goes on flat and smooth. Over that paint I shot some Tamiya Silver from a can, and when it cured, I sprayed cheap hairspray.
I employ that technique for weathering armor; it's
easy if you use acrylic over enamel with the hairspray to protect the bottom
coats. So I airbrushed a thinned Cobalt Blue Acrylic, making the car look new.
Then I backed up abou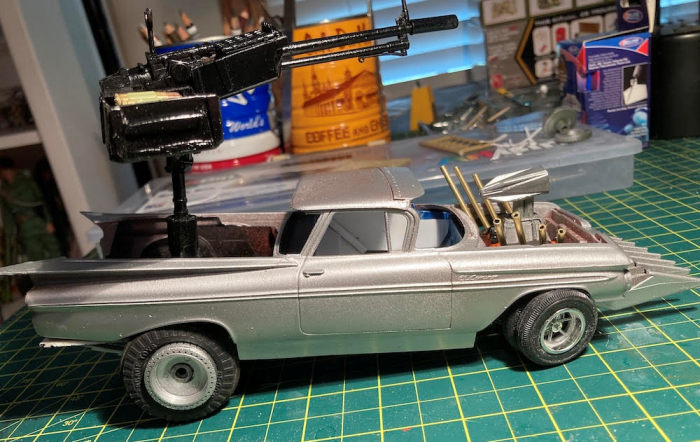 t
a foot from the kit and misted the entire body with a lighter blue. When dry, I
sponged and scrubbed at the blue with damp (not wet) cotton swabs and bits of
foam packing material to reveal the silver, which in turn I nicked a bit to get
to the rust beneath. Speaking of rust, I tried a technique from a modeling
magazine decades back. I ground the "sheet metal" thin from the inside, using my
Dremel. Then I poked rust-holes through the thin remaining plastic and roughed
up the outside surface, to give realistic looking rust-through in likely spots:
lower edges of doors and behind wheel openings. The rear bumper got a similar
treatment.
t
a foot from the kit and misted the entire body with a lighter blue. When dry, I
sponged and scrubbed at the blue with damp (not wet) cotton swabs and bits of
foam packing material to reveal the silver, which in turn I nicked a bit to get
to the rust beneath. Speaking of rust, I tried a technique from a modeling
magazine decades back. I ground the "sheet metal" thin from the inside, using my
Dremel. Then I poked rust-holes through the thin remaining plastic and roughed
up the outside surface, to give realistic looking rust-through in likely spots:
lower edges of doors and behind wheel openings. The rear bumper got a similar
treatment.
On went some of the Ed Roth decals; our Highway Patrol had found a book about Roth in a Devastated Zone and made a cult hero of him, with mascots and a Rat-Fink attitude to terrify their enemies. The tops of fenders and the blacked-out grille got highlighted with rust-colored or silver Prismacolor pencils.
All the while I worked on the figures. I love painting them; having done tiny wargaming figs for decades, these giants were a pleasure to detail. My method starts by painting them a flat color, usually black, "dressing" them with skin, then each layer of clothes or gear until I get to the outermost layer. Each step gets oil washes, dry-brushing, and touch-ups for areas like eyes, eyebrows, lips, facial hair, buckles, and other details. I kept fiddling with colors for gear and hair until I had what suited my concept for these hardened road-warriors. They all look bug-eyed in the photos, but in the case they show well. These tasks let me keep the fire burning while the kit was drying or I had reached an impasse on one part or another.
The Scout's exterior got many washes of Flory Grime and Dark Dirt, as well as specks of many browns for mud or dust and streaks of gray. With a sponge I dry-sponged some light browns on the quarter panels, tires, and all over the chassis.
| FINAL CONSTRUCTION |
 One of the
greatest parts of a fantasy subject is that it can be anything you wish. Early
on I'd redone the Chevy's fins to make them really pointy in back; late in the
build I kept adding things. Why not a bunch of tank treads for running boards?
The ammo deflector looked a bit futile for its intended purpose, so why not cut
up some thin white cotton fabric and drape it over toothpicks for a
brass-catcher bag, brush it with thinned white glue, then weather the heck out
of the cloth?
One of the
greatest parts of a fantasy subject is that it can be anything you wish. Early
on I'd redone the Chevy's fins to make them really pointy in back; late in the
build I kept adding things. Why not a bunch of tank treads for running boards?
The ammo deflector looked a bit futile for its intended purpose, so why not cut
up some thin white cotton fabric and drape it over toothpicks for a
brass-catcher bag, brush it with thinned white glue, then weather the heck out
of the cloth?
I also figured the tail lights would be disabled in such a vehicle, and in any case my originals were missing. So I made some spikes out of stretched sprue and painted them red! Just in case you miss the enemy with the front people-catcher, just back up...
| CONCLUSIONS |
Even though I clocked about 50 hours on this build over 3 months, I want to do more science-fiction scratch-builds. There's no expert to say "that's not how they looked at the Battle of Broken Arch in the year 2088. Those sorts of spikes did not appear until 2092." Thus I start to see the appeal of this sort of project. I plan to do more.
Look in your parts box. Are you ready to cry havoc and let slip The Dogs of War?
11 August 2023 Copyright ModelingMadness.com. All rights reserved. No
reproduction in part or in whole without express permission. If you would like your product reviewed fairly and
fairly quickly, please
contact
the editor
or see other details in the
Note to
Contributors.