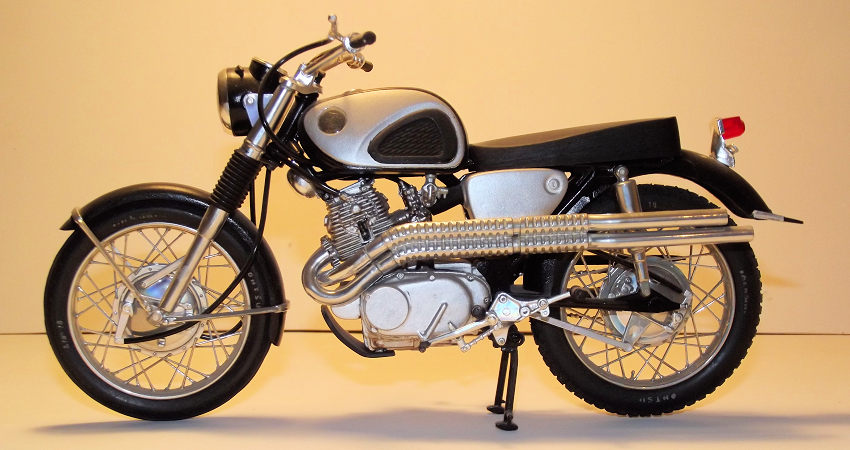
Revell 1/8 Honda CL-77 Scrambler
| KIT #: | 7193 |
| PRICE: | $ |
| DECALS: | One option |
| REVIEWER: | Frank Reynolds |
| NOTES: | Vintage 1967 issue. Long since OOP. |
| HISTORY |
In the early 1960s the British led the World in the production of sports motorcycles - Triumph produced the 350cc Tiger 90, 500cc Tiger 100, 650cc T110 Thunderbird and the legendary T120 Bonneville. BSA, Norton, Royal Enfield, Matchless and Velocette all manufactured the sort of fire breathing beasts that were sought after by any man with a sense of adventure. All were based on mechanical architecture that dated from the 1940s, refined and updated certainly, but old school. Sure they dripped oil from the crankcase or timing chain boxes, they could be a pig to kick start but their manufacturers were happy in the knowledge that they were the best available anywhere.
A few years earlier an up and coming
Japanese manufacturer called Honda started production of small engined bikes of
50cc an d 125cc; clever buzzy little things that appealed to teenagers and
people who wanted an economical ride to work. Nice, they said, but not serious
motorcycles. Honda studied the marketplace and released bikes with engines of
160cc, then 200cc. In 1962 Honda dropped a bombshell on the World of biking with
the release of their 250cc CB 72 and 305cc Super Hawk, visually identical and
differing only in their engine capacity. Unusually for the time, the engine was
an integral part of the frame, making the bikes lighter and easier to maintain.
They weighed around 320lbs and p ushed out 27 to 30hp. They were sleek and
refined with overhead cam engines, electric start, twin leading shoe brakes on
front and rear wheels, glossy, shiny and fast. Oh Yes! They were fast. Quicker
than a Brit 350, quicker than many 500s, better handling, better braking, they
would come to be identified as one of the types that finished the British
motorcycle industry as a World power.
ushed out 27 to 30hp. They were sleek and
refined with overhead cam engines, electric start, twin leading shoe brakes on
front and rear wheels, glossy, shiny and fast. Oh Yes! They were fast. Quicker
than a Brit 350, quicker than many 500s, better handling, better braking, they
would come to be identified as one of the types that finished the British
motorcycle industry as a World power.
The USA loved them too; Steve McQueen was photographed riding one, Elvis too. Honda wanted the American market and introduced trail bike versions with high handlebars and high level exhausts, called the CL72 and CL77 Scrambler and they sold by the bucket load.
The CB/CLs had a couple of neat features. The rider’s footrests were integral with the gear change and rear brake pedals. To the rear of the foot rests was a prominent triangular casting with a number of alternative bolt holes enabling the footrests to be repositioned lower and further back if required. The instrument dials were combined into a single pod on top of the headlamp split into left and right halves for the speedo and rev counter. At rest the two needles pointed towards the rider then swung outwards and upwards as the pace increased. Brave Honda pilots would try to get the needles horizontally opposed at the 9.15 position on the clock face, the bravest would claim 10.10 or better. According to road tests of the period the engine would redline at 9,000rpm, speed topping out at 95.
Sill the old guard would not listen. An engine that revved that high would blow itself up; if the bike was an import the paint would probably flake off. The rest of us ignored the buzzkill and carried on having a blast. I got mine in 1968, it was a ’63 model CB72 that had been tricked out with drop handlebars and trumpet mufflers. Resplendent in Black and Chrome it lasted two years before it was wiped out from under me by an oncoming car. Happy days.
Today many of the Brit manufacturers are long gone. BSA, Velocette, Francis Barnett, AJS/ Matchless are history. Honda? Whatever happened to them?
| THE KIT |
After nearly 60 years as a family business my LHS has an old and deep cellar and the occasional surprise emerges from the Cretaceous layers. The shop has a bargain shelf that features shop worn stock or something that was brought back as defective years ago. I spied a mint white Revell box from the 1960s, flagged up as having no instructions and with defective chromed parts. A Honda bike from the glory days. Priced at £5-00, it was in my bag before I had time to think it over.
 The box contained four main parts frames
in plastic. There were two tyres moulded in a dense rubber, a coil of black
vinyl hollow tubing, a short length of thicker rubber tubing and a tiny decal
sheet. Two of the parts frames were moulded in a vivid red plastic, a small one
in clear to provide the headlamp and tank badges, one small part in clear red
for the tail light. The fourth main parts frame had left the Revell factory
vacuum plated in a bright and shiny metallic finish. The red moulded parts
formed the base colour of just about all of the bike that was not chromed or
polished alloy on the original – red being one of the factory options from
Honda, along with Medium Blue or Black.
The box contained four main parts frames
in plastic. There were two tyres moulded in a dense rubber, a coil of black
vinyl hollow tubing, a short length of thicker rubber tubing and a tiny decal
sheet. Two of the parts frames were moulded in a vivid red plastic, a small one
in clear to provide the headlamp and tank badges, one small part in clear red
for the tail light. The fourth main parts frame had left the Revell factory
vacuum plated in a bright and shiny metallic finish. The red moulded parts
formed the base colour of just about all of the bike that was not chromed or
polished alloy on the original – red being one of the factory options from
Honda, along with Medium Blue or Black.
Time had not been kind to the metallic finished parts, large areas had flaked off to reveal white plastic underneath, the most badly affected being the fuel tank side panels, the side cases of the engine and the air filter covers to the sides of the saddle. Fortunately the spoked wheels, engine cylinders and exhaust pipes were little affected.
| CONSTRUCTION |
A large scale bike benefits from being built up like the real thing so the basic parts were undercoated while still on the frames using grey auto primer from a rattle can, then airbrushed in Tamiya gloss acrylic. I chose X-1 Black in homage to my trusty steed of bygone days.
The metallised parts required some work,
those that retained a sound finish still needed to be cut from the frames, which
inevitably left a small dot of white plastic showing where the mould feeds had
been cut away. Then each required the metallic finish to be sanded away on the
joining faces so that they
 could be glued together. I used Squadron sanding
sticks to clean up the surfaces and a good tight face mask is essential for this
work since ingestion of powdery metallic dust is to be avoided. A tiny dab of Tamiya Chrome silver was used to cover up the white pin marks. The parts with
the damaged “chrome” required a lot more work. The remains of the plating had to
be sanded away completely and this took a lot of effort, especially around the
engine casings. When cleaned up they were primed and finished in airbrushed X-11
Chrome Silver. The saddle was painted in X-18 semi-gloss Black to give some
suggestion of the plastic seat cover.
could be glued together. I used Squadron sanding
sticks to clean up the surfaces and a good tight face mask is essential for this
work since ingestion of powdery metallic dust is to be avoided. A tiny dab of Tamiya Chrome silver was used to cover up the white pin marks. The parts with
the damaged “chrome” required a lot more work. The remains of the plating had to
be sanded away completely and this took a lot of effort, especially around the
engine casings. When cleaned up they were primed and finished in airbrushed X-11
Chrome Silver. The saddle was painted in X-18 semi-gloss Black to give some
suggestion of the plastic seat cover.
I started the build with the wheels, each consisting of two halves forming the hubs and spokes and they were squeezed together from each side of their respective tyres. The brake operating arms were glued in place and then using the smallest brush that I could find I picked out some of the detail of the manufacturer’s name on the tyre walls.
The engine was next since the frame of the bike needed to be built around it. The crankcase halves were joined followed by the prominent angled twin cylinders. The gear box casing was added to the left side. Twin carbs were added to the rear of the cylinders and the starter motor to the front of the crankcase.
The key to the build was the bike’s frame, split lengthways by Revell and a tribute to the toolmaker’s art of the period since it formed the rear suspension pivot, curving up and under the fuel tank to meet the steering tube behind the forks. The rear section of the same moulding provided a frame tube rising rearwards to support the saddle frame and rear suspension dampers. The whole structure clipped down on top of the engine to form the core of the bike. The clutch housing was fitted , trapping the drive chain and rear sprocket, the rear suspension arm and chain guard. This was the sort of assembly where three hands might have been useful. The rear mudguard was fitted together with the two suspension damper units and with some trepidation the structure was sprung open to enable the back wheel to click into place.
The front forks were built up and assembled using the wheel and headlamp assembly glued in place to stabilise the unit while the steering pivot was threaded through the front frame tube , which enabled the fork yoke to be secured.
 The naked frame needed some pipework to be
installed. Revell provided hollow vinyl tubing of one diameter to serve as
cables. Referring to the box art, some internet pictures and vague memories from
the past, the brake cables, speedo and rev counter drive cables were fixed in
place. The kit provided some small and potentially fragile plastic pins moulded
in place for the ends of the cables to be slipped on. Routing the vinyl cables
was always going to be a challenge so I employed an old trick by sliding lengths
of soft copper wire inside to to enable them to be bent gently to follow the
required path through and around the bike. Where I ended up breaking off some of
the plastic pins, they were replaced with tiny pieces of fine wire glued into
drilled holes. The ends of the vinyl pipes were secured with a drop of superglue
– an adhesive that will not stick well to vinyl and metallised plastic but it is
better than nothing.
The naked frame needed some pipework to be
installed. Revell provided hollow vinyl tubing of one diameter to serve as
cables. Referring to the box art, some internet pictures and vague memories from
the past, the brake cables, speedo and rev counter drive cables were fixed in
place. The kit provided some small and potentially fragile plastic pins moulded
in place for the ends of the cables to be slipped on. Routing the vinyl cables
was always going to be a challenge so I employed an old trick by sliding lengths
of soft copper wire inside to to enable them to be bent gently to follow the
required path through and around the bike. Where I ended up breaking off some of
the plastic pins, they were replaced with tiny pieces of fine wire glued into
drilled holes. The ends of the vinyl pipes were secured with a drop of superglue
– an adhesive that will not stick well to vinyl and metallised plastic but it is
better than nothing.
The minimalist decal sheet provided the instrument panel and the Honda badges that sit on the side of the fuel tank behind a clear plastic bubble. I was relieved to find that the ancient decals parted company with the backing sheet after a soak in very warm water.
The side panels over the air filter housings were installed , trapping the rubber pipes leading to the carburettors. I added the seat and fuel tank, headlight assembly and handlebars. The fuel tap was fitted under the left side of the fuel tank and the warning horn under the front . The exhaust pipes were added to the left side. Installation of the foot pegs and control levers and the rear light completed a fun build.
| CONCLUSIONS |
I find it best to approach an ancient kit without any aspiration to modernise it. The Revell Honda is of its time and that’s the way kits were produced 50 years ago. It is big enough to look good on the shelf - at 260mm long and 130mm tall. The chance to wallow in a little nostalgia was too good to pass up and for this build I did just enough to patch up the old kit to get it presentable, and I really enjoyed it.
Maybe these kits can be found on internet auction sites, but they seem to be pretty rare. The full size seems to be more readily available and is a treasured collector’s item in its own right.
11 December 2017
Copyright ModelingMadness.com
Thanks to www.dragonmodelsusa.com for the preview kit. You can find this kit at your favorite hobby shop or on-line retailer.
If you would like your product reviewed fairly and fairly quickly, please contact the editor or see other details in the Note to Contributors.
Back to the Main Page Back to the Previews Index Page Back to the Review Index Page