
Heller 1/8 Honda CB 750
| KIT #: | 80983 |
| PRICE: | €15 when new |
| DECALS: | One option |
| REVIEWER: | Spiros Pendedekas |
| NOTES: | 1971 tooling |
| HISTORY |
Whereas by 1967 American racing's governing body, the AMA, still had rules that allowed racing by production machines only and restricting overhead-valve engines to 500 cc whilst allowing the side-valve Harley Davidsons to compete with 750 cc engines, Bob Hansen, American Honda's service manager, possibly foreseeing the upcoming allowance of overhead valve engines to 750cc, decided to fly to Japan, in order to discuss with Soichiro Honda the possibility of using Grand Prix technology in bikes prepared for American motorcycle events.
Hansen told Soichiro Honda that he should build a “King of Motorcycles”. Soichiro knew that what won on the race track today, sold in the showrooms tomorrow, so a large engine capacity road machine would have to be built to compete with the Harley Davidson and Triumph twin-cylinder machines. With the superlatively talented Soichiro having no problem at all in creating such a machine and with AMA’s standardization of a full 750 cc displacement for all engines regardless of valve location or number of cylinders, the rest was history.
 Developed
for a year, the CB750 appeared at the Tokyo Show in November 1968 and was
publicly launched in the UK during April 1969. The pre-production versions
appeared with a high and very wide handlebar intended for the US market, where
the CB750 was directly targeted.
Developed
for a year, the CB750 appeared at the Tokyo Show in November 1968 and was
publicly launched in the UK during April 1969. The pre-production versions
appeared with a high and very wide handlebar intended for the US market, where
the CB750 was directly targeted.
The charismatic CB750 had a transverse, straight-four engine with a single overhead camshaft (SOHC) and a front disc brake, neither of which was previously available on a mainstream, affordable production motorcycle, giving the CB750 a considerable sporting performance advantage over its competition, particularly its British rivals.
Adding to the bike's value were its electric starter, kill switch, dual mirrors, flashing turn signals, easily maintained valves and overall smoothness and low vibration both under way and at a standstill. Being the first modern four-cylinder machine from a mainstream manufacturer, the term “superbike” was coined to describe it.
With its reception being nothing shorter than
glorious, Cycle magazine called the CB750 "the most sophisticated production
bike ever" and Cycle World called it a “masterpiece”, highlighting its
painstaking durability testing, its 120 mph top speed, the fade-free braking,
the comfortable ride and excellent instrumentation.
The iconic CB750 was named in the Discovery Channel's "Greatest Motorbikes Ever"
and was in The Art of the Motorcycle exhibition. It is in the UK National Motor
Museum and is included in the AMA Motorcycle Hall of Fame Classic Bikes, with
The Society of Automotive Engineers of Japan, Inc. rating the initial 1969 model
as one of the 240 Landmarks of Japanese Automotive Technology. It remained in
the Honda line up for ten years, with a production total of over 400,000.
| THE KIT |
This is a 1971 mold, reissued a few times ever
since and it must not be confused with the MPC 1/8 CB750 that was first issued
around the same time. My copy was a seemingly mid 80’s/early 90s release, bought
wrapped in 2005 from a toy/hobby shop at a very low price.
Apart from “normal” styrene, the kit includes chrome plated and vinyl sprues.
The level of detail is quite high, but the kit is somehow overengineered
(possibly due to mold limitations back then), hence the high number of parts (to
the neighborhood of “300”). Whereas molding is quite crisp without too much
flash, significant warping was
 noticed,
especially at the light gray styrene sprues. The fact that the plastic was extra
brittle (possibly due to aging) was rather discouraging, as the warped parts
would refuse to get force straightened, breaking upon the slightest force
applied.
noticed,
especially at the light gray styrene sprues. The fact that the plastic was extra
brittle (possibly due to aging) was rather discouraging, as the warped parts
would refuse to get force straightened, breaking upon the slightest force
applied.
The French instructions, accompanied by a “translation leaflet”, are also not
among the most user friendly approaches, especially when a complex build is
ahead, but you can easily download the new, revised and English-written ones
that Heller decided to treat us with the latest (2014) kit reissue.
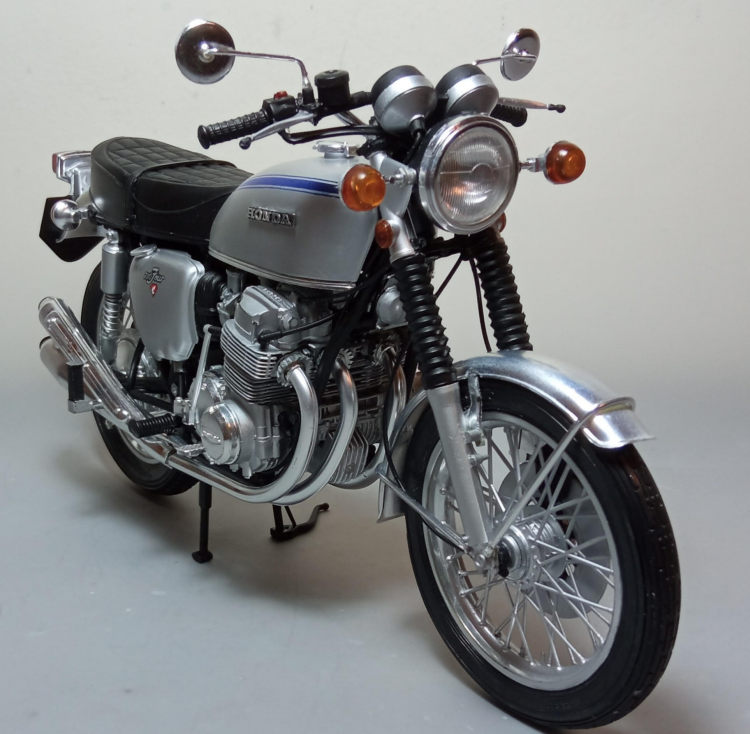
All in all, the kit looks very detailed but also quite challenging. For a more
in-depth look of my specific copy, you may refer to the preview in
the MM archives.
Admittedly, though I have always wanted to build the big Heller Honda and kept
on opening the lovely Heller box, peeking into its contents, my inexperience in
motorcycle kits, combined with the overwhelming number of parts, kept me back.
There is a time for everything, though, with the specific kit’s coming after a
beloved fellow modeler and friend infected me with the “motorcycle modeling”
virus. Off the Heller Honda went to the bench then!
| CONSTRUCTION |
Being mostly an “airplane” modeler, my approach to
tackle this complex kit would be to do as many sub-assemblies as possible, in
order to transform the initial chaotic multi-sprue sight into something more
manageable.
I thus started by joining the wheel halves and the 4 exhaust mufflers, all done
in chrome. The front wheel halves that had to be clamped together, since fit was
less than perfect, with two of the spokes breaking by applying just mild
pressure, a sign of the forthcoming issues. The tailpipes were drilled out for
extra realism, painted black and attached to the mufflers.
 The
crankcase was assembled, followed by the cylinder block. The latter comprises 18
separate filets that have to be correctly orientated. The engine top cover was
then attached, followed by the oil filter housing. The quadruple carburettors
(3-piece each), the equally 3-piece air cleaner, the 2-piece external oil tank
and the 4-piece battery were also assembled at this time.
The
crankcase was assembled, followed by the cylinder block. The latter comprises 18
separate filets that have to be correctly orientated. The engine top cover was
then attached, followed by the oil filter housing. The quadruple carburettors
(3-piece each), the equally 3-piece air cleaner, the 2-piece external oil tank
and the 4-piece battery were also assembled at this time.
The frame was next assembled, with the two piece swing arm and the central stand
trapped between the frame halves. Here is where the warped plastic caused
serious issues, as many angles of the thin frame parts were “off”. Since the
slightest stress applied to them (trying to bend them into shape) resulted in
breakage, there was not much else to do, other than trim-fit the parts as best
as I could, only hoping that the frame would not look too “off”
Other sub assemblies done included the front forks, front fender and front disc
caliper (3-piece each) and the 2-piece rear fender and chain guard. The rear
shock absorber springs were fabricated by wrapping the supplied wire around an
equally kit supplied cylindrical styrene piece, observing the number of coils
and overall length. The springs were then trapped between the shocks upper
(chromed) and lower sections (painted black).
After some filing and sanding (mainly seams and sink marks), I figured out it
was a good time to take the already done sub assemblies to the paint shop!
| COLORS & MARKINGS |
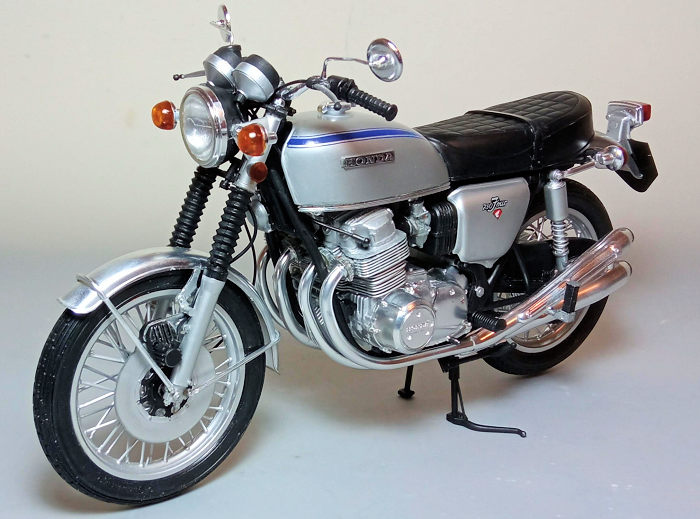 The frame,
battery, oil tank, chain guard and the fore section of the rear fender were hand
painted black, whereas the fuel tank, the side covers and the complete engine,
including the carburettors, were painted Hu11 Silver.
The frame,
battery, oil tank, chain guard and the fore section of the rear fender were hand
painted black, whereas the fuel tank, the side covers and the complete engine,
including the carburettors, were painted Hu11 Silver.
Whereas chromed parts, apart from touching up their seams, are not "normally"
supposed to be painted, inspired from a fellow modeler who does so, I decided to
apply a coat of Hu11 Silver at the wheels and the front fork bottoms. With the
drawback of paint adhering less strongly but, still, adhering), the overall tad
toy-ish chrome shade of these parts was somehow toned down to more realistic
looks.
I went on and applied the minimal decals onto the fuel tank and side covers.
Despite their past date, they behaved well, with only the blue tank stripe
presenting some tearing-offs, which were touched up with a custom made blue mix
using a fine brush. A coat of Future sealed the decals.
| FINAL CONSTRUCTION |
The engine had the chain driving sprocket, its
side covers and various other small chromed bits installed, then it was attached
to the frame. As expected, fit was very challenging, as not all attachment
points would line up due to frame warping, with the engine finally settling to a
position that misalignment would not be too obvious.
The carburettors were attached to their chromed mounting plate, then had their
engine intake tubes attached to their front, the air cleaner at the rear and
their throttle levers on top. The two vinyl throttle wires ends were secured on
the aforementioned top levers with a heated blade. The complete sub assembly was
then carefully attached to the engine.
The rear shock absorbers were attached in position, followed by the rear fender.
The vinyl chain was joined by the styrene link halves provided and carefully
affixed to the engine driving sprocket in such a manner these links would be
blanked by the front sprocket cover (as the links were notably thicker, making
the difference noticeable). Regarding chain color, I elected to simply dry brush
the black vinyl with silver, with the looks deemed acceptable. The chain guard
was finally attached.
 The rear
wheel had its good looking tire pressed in position. After attaching its drum
housing and rear sprocket, I carefully mounted the chain onto the sprocket and
secured the complete assembly to the swing arm by gluing the chromed supplied
bolts to the axle ends (the wheel had beforehand been pulled back a far as it
went, so the chain would look nice and tight). The rear drum operating lever and
connecting rod were next attached, concluding the rear end assembly.
The rear
wheel had its good looking tire pressed in position. After attaching its drum
housing and rear sprocket, I carefully mounted the chain onto the sprocket and
secured the complete assembly to the swing arm by gluing the chromed supplied
bolts to the axle ends (the wheel had beforehand been pulled back a far as it
went, so the chain would look nice and tight). The rear drum operating lever and
connecting rod were next attached, concluding the rear end assembly.
Moving to the front, I first press-fitted the tire to the front wheel, then
attached the brake disc at one side and the speedometer spindle to the other
side. After gluing the brake caliper to the left fork, I put together the
complete front section, meaning trapping the wheel, front fender and lower
triple tree between the forks. This was an operation easier said than done, as
nothing wanted to stay in position, having to resort to some means of “jig” made
from two clothes pegs that held the front wheel upright, while all the rest was
aligned and drying.
Once dry, I carefully attached the pair of fender supporting rods. Moving to the
top, I attached the pair of 2-piece fork extensions that double as headlamp
support, followed by the upper triple tree. The good looking headlamp was then
assembled and attached and the now completed (and very flimsy) front section was
set aside to dry. Both triple trees and headlamp casing were painted black.
It was then exhausts’ mounting time: I first attached the manifolds to the
mufflers, then, without the glue fully cured, I flipped the bike upside down and
mounted in place the complete exhaust, essentially using the model as a jig.
After being satisfied with the alignment, I secured all the attaching points
with glue. Finally the front section was attached, with the Honda proudly
resting on her shoes!
The speedometer and tachometer were assembled and attached in position, with the
corresponding vinyl cables carefully attached at their rears. The instrument
faces themselves were represented by decals that looked good once attached, as
did the transparent protective glasses that were secured with Clearfix. A good
looking decal also represented the four instrument lights (green, blue, red and
orange), located on top of the handlebars securing plate.
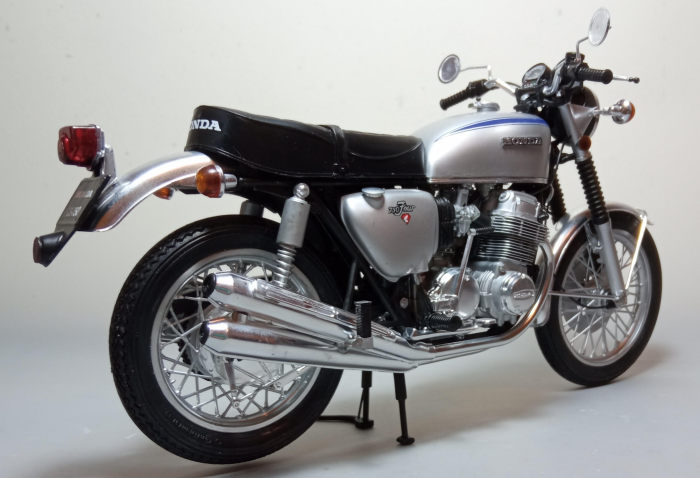
 The
indicator lights were assembled and attached in position, as were the fork
mounted side reflectors, with all transparent parts painted clear orange. The
tail light was assembled and, together with the real reflector, were attached to
the number plate, with the complete sub assembly attached to the rear fender.
Transparent parts were painted clear red. The number plate was painted black and
had the “HONDA” and “CB750” white decals affixed.
The
indicator lights were assembled and attached in position, as were the fork
mounted side reflectors, with all transparent parts painted clear orange. The
tail light was assembled and, together with the real reflector, were attached to
the number plate, with the complete sub assembly attached to the rear fender.
Transparent parts were painted clear red. The number plate was painted black and
had the “HONDA” and “CB750” white decals affixed.
The battery had its
filler caps painted yellow and attached in position, followed by the already
painted black oil tank. The latter had its inlet and outlet vinyl oil hoses
attached and routed to the crankcase. The hoses' couplings were highlighted with
my silver pen.
The chromed handlebars tube had the 2-piece front brake and clutch levers, the
one piece flash switch and the vinyl grips attached. The whole assembly was
then secured in position with the top plate that contained the indicator lights.
The kill switch located at the right grip was painted red.
The front brake and clutch vinyl cables/hoses were accordingly routed, it being
not among the easiest of tasks due to the vinyl’s stiffness. The fuel tank had
its filler cap, its fuel valve, its HONDA logos and its decorative chrome filets
attached and installed in position, followed by the saddle which had its
passenger grip attached and the white “HONDA” decal affixed at the rear. The
rear view mirrors, kick starter, side covers, side stand, all foot pegs and
rear brake and gear levers were attached in position.
The complete model (sans the transparencies) was then given a light satin coat,
in order not only to tone down the (at areas) too pronounced toy-ish chrome, but
also to give the bike a more realistic, homogenous look, before calling it done!
| CONCLUSIONS |
This is a classic kit of
the iconic CB750. Overall shape looks correct, detail is plenty allover and each
individual part looks to be accurately replicated. Parts count is high,
something possibly having to do with mold limitations back then, in order to
achieve this level of detail. Instructions were not too user friendly, but you
can easily (and are strongly advised to) download the vastly improved 2014
release ones. The build itself is complex and, in a number of areas,
complicated, meaning the kit is not for the novice who wishes to build his first
motorcycle kit.
In my specific 30 year old kit, the plastic was severely warped and extremely
brittle, meaning I had very little margin in trying to straighten warped parts.
Since I noticed the same brittle plastic in the same era Heller Laverda 750 kit
that I also had in my stash, it is possible that this mishap might have occurred
due to plastic aging.
With some patience, an imposing model can emerge out of the box, the main
discord being the thickness of the wheel spokes that are off-scale (not too
much, though). The kit has been reissued in 2014 with fresh decals, the
aforementioned improved instructions and (hopefully) non-brittle plastic, but
looks not too easy to find today (2022), let alone at a sensible price.
If you have one in your stash, or find one at a good price and are thinking of
putting it together, by all means do so! With some perseverance you will end up
with an eye-catching scale replica of a landmark in automotive engineering.
Happy modeling!
Spiros Pendedekas
12 September 2019
Copyright ModelingMadness.com. All rights reserved. No reproduction in part or in whole without express permission.
If you would like your product reviewed fairly and fairly quickly, please contact the editor or see other details in the Note to Contributors.
Back to the Main Page Back to the Review Index Page Back to the Previews Index Page