
AMT 1/25 General Lee (Dodge Charger)
| KIT #: | ? |
| PRICE: | $12 |
| DECALS: | One option and they are really good |
| REVIEWER: | Wyll Jones |
| NOTES: | Get Ready to Sand |
| HISTORY |
My wife and I went to see the movie ’The Village’. Of course this was going to be the last movie I was going to pay good money to see before ‘Star Wars Revenge of the Sith’. That was until while watching the previews I saw the worlds most beautiful orange car fly through the air, ON THE BIG SCREEN. Star Wars could wait, I would never get another chance to see the General Lee on the big screen again. I must see this, I must build this.
AMT had put this model out before so in my thinking they would again. But this time would they have fixed the problems that I remember their kit had? I just knew they would. Wouldn’t they?
| THE KIT |
I went to Wal-Mart and found it, oh my lucky day. Right there on the side of the box was a picture of the model with the proper rear window. Yes it was my lucky day. This one would not disappoint me.
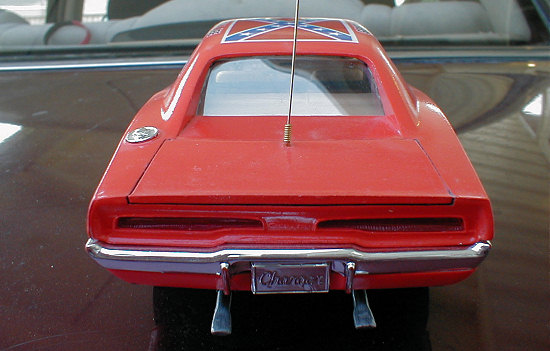
Until I got home and opened it. There sat the same old wrong rear window chunk of orange plastic. I was devastated, I was sad, I was mad. I called AMT and just had to ask them if anyone there even built models. Or if they had seen the car. Or if they cared. If nothing else the girl at AMT I talked to was very nice. She assured me that they do listen and care and that she would take my complaint straight to the folks who could make a difference.
It still had to be built.
| CONSTRUCTION |
 Now first things had to be first.
Cut out the rear window area. Some of you may think that pre-planning this sort
of thing would be a good idea, especially if one has never done this sort of
thing. But that is just crazy thinking.
Now first things had to be first.
Cut out the rear window area. Some of you may think that pre-planning this sort
of thing would be a good idea, especially if one has never done this sort of
thing. But that is just crazy thinking.
Not to say that there wasn’t some little piece of pre-work thought. I figured that I did all of the interior and all of the engine and the whole chassis and then tried to do the window conversion, well bad words could be spoken. So being the genius that I have convinced my kids that I am I did foresee this possible disaster. So if I do the window thing first and screw it up, who cares, I would have a bunch of parts for my extras bin.
I first typed in the words General Lee into the search engine of my choice and wait for the results. I got lots of good pictures of the General Lee. I also realized that there are, shall we say inconsistencies from one car to another. Different is good. It makes it so that I don’t get in trouble with the car rivet counters, I hope.
At no fault of my own I ended up with many many photos of Jessica Simpson as Daisy Duke. Oh the things we are willing to go through to support our art.
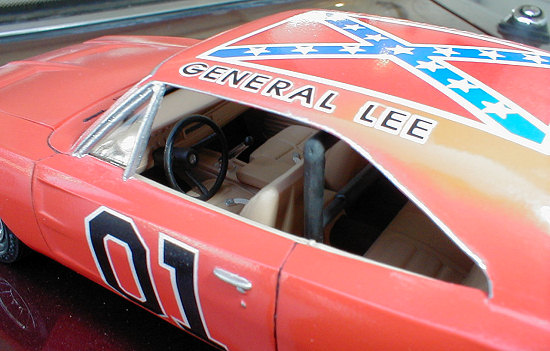
Using Squadron Sheet Styrene for the first time came next along with cutting out the rear window. Then I started the measure eight times and cut wrong once method of doing things. That soon turned into eyeball it once, cut it, glue it and place it.
Getting the new flat area and the new triangle side wall thingies to go together nice was somewhat of a chore but they finally did look ok. But the more I worked on this project the worse the window frame looked at the top edge. I fixed it by cutting a thin piece of styrene and gluing it around the inside edge of the window. A little bit of sanding and filler fixed the unsightly joints and imperfections in no time at all. Heck if I could do it then those professionals over at AMT could have to.
For the clear part I cut a piece of plastic from one of my kids toy packages. I finally got it to where it looked pretty good too. But in the end I did realize I forgot to dip it Future. Dang-num-it anyways.
 In a moment of time wasting I
decided to test fit the bumpers and the grill. The fit was awful. What was
supposed to be nothing more than a time filler but it turned into so much more.
Like hours and hours of sanding and fitting. When I finally got done they
looked fine but I’m still expecting the rear bumper to fall off at anytime for
no reason.
In a moment of time wasting I
decided to test fit the bumpers and the grill. The fit was awful. What was
supposed to be nothing more than a time filler but it turned into so much more.
Like hours and hours of sanding and fitting. When I finally got done they
looked fine but I’m still expecting the rear bumper to fall off at anytime for
no reason.
Not wanting to be outdone by the rear window or the bumpers it was the engine’s turn to hate me. The two engine halves went together about as well as me and ties, or my daughters and clean bedrooms. It was so bad I almost glued the hood on. It would have been my first non-planned curbside. But I carried on and sanded like, insert your own analogy because I can’t think of good one. After I got the two halves together the rest of the engine parts went on pretty good. A little thinning here and there but it turned out looking like an engine. So I was more than happy.
Of course the next thing to do was the chassis. Mostly because with the engine done it would make a good place to store it. The chassis went together well enough to make up for some of the other headaches this model brings. And bonus, all four wheels touch the ground.
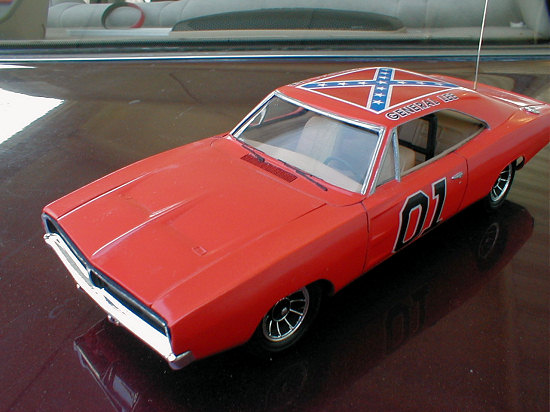
The interior was one of the few not so low points of this kit. And I had options. Well actually inconsistencies. About half of the pictures I found showed a black interior and the other half had a tan interior. I ended up going tan because I thought it would look better in scale. Now if I were to ever get the chance to have the real thing I would have a black interior cause I think it would look right.
The steering wheel sat down too low, unless a person has no legs. Not being smart enough to test fit this part first I didn’t notice this issue until it was already in place. I was able to adjust it a little but not nearly enough to make it look quite right.
 The roll bar was nearly a complete
waste of time and plastic, won’t fit. Maybe someone else could fit it in there
but not me, wasn’t going to happen. This turned out to be another case of
inconsistency being my friend. Cause some of the General Lee’s had full roll
cages. Some had back half only. One had just a single roll bar right behind
the front seat. It was all needed to see, now I would be justified in going the
easy way. So I did.
The roll bar was nearly a complete
waste of time and plastic, won’t fit. Maybe someone else could fit it in there
but not me, wasn’t going to happen. This turned out to be another case of
inconsistency being my friend. Cause some of the General Lee’s had full roll
cages. Some had back half only. One had just a single roll bar right behind
the front seat. It was all needed to see, now I would be justified in going the
easy way. So I did.
Next was to put the subassemblies together. This is where I got really lucky. In all of the work I did on the back window I never though about the fact that I would at some point use the interior. It didn’t fit perfectly but with only a little sanding, and at this point any sanding that took less than three hours was just a little sanding, it fit almost perfectly. Oh happy day.
The push bar on the front brought me back to reality. It was as well designed as a Yugo and as fragile as a butterfly wing. But it never did look right anyways. Because of that I wasn’t overly upset when one of the cats wiped out the push bar, I won’t put it back on.
| COLORS & MARKINGS |
PAINT
I already told you about the interior being tan so I’ll tell you about the engine and chassis. The engine got painted orange, I think it just looks right. The chassis got to be flat black because I paint all of my chassis’ flat black. I’m not a historically based modeler so I paint whatever looks fine or even just ok and that stayed the standard with this one as well.
Inconsistency reared it’s ugly head once again, this time regarding the body paint. Through all of the things I saw there were at least three people out there who claim to be the final authority on the subject. The one that sticks out in my head was Tangerine Orange. It sounded kind of exotic to me and I just couldn’t see the Duke boys agreeing to use Tangerine Orange. If they did it would be pretty disturbing.
 “Gee Luke, what color should we
paint the General?” asks Bo.
“Gee Luke, what color should we
paint the General?” asks Bo.
“I was thinking maybe Bright Happy Green with little strawberries all over it.” replied Luke.
“I don’t think that would be such a good idea being that Uncle Jessie already has those colors on his pick-up truck.” warned Bo.
“You know Bo, the fellows down at the paint shop did mention a new color they just got in, I think it was named Tangerine Orange.”
“By golly Luke that sounds downright perfect.”
“Yes Bo, it really does, I think I’ll call my girlfriend Marsha Brady, and tell her all about it.” exclaimed Luke.
NO NO NO. Nope I would rather think that the boys ran out of money down at the Boars Nest and orange was all that Cooter was willing to give them.
So I went with Model Master International Orange and a coat of future.
DECALS
Now for the high point of the kit, the decals. Although the Lettering looks a bit on the large size they still look good and went down great. But once again inconsistency was present. Some of the photos online had the bottom edge of the flag on the driver side and some had it on the passenger side. Being a moon shiners car, that would make it a cousin to NASCAR, and this show is all about cousins, I had to go with the NASCAR thing. So I put the bottom edge on the driver’s side. Double bonus, the white part of the decals are very opaque. My only question about the decals is why are all of the stars facing one way and the one in the middle facing the other way? Why didn’t I notice until it was already on the car? Would I have done anything about it anyways?
I painted the wheels flat black but I didn’t take off the chrome first. This way when the flat black dried I could use toothpicks and fingernails to scrape the paint off of the chrome on the high spots.
The antenna is of course a piece of guitar wire. I don’t know what string it is but it looks good to me.
| CONCLUSIONS |
Would I build it again? Well that depends. If I can keep my cats from destroying this one I won’t have too. If the cats do take it out then it may be easier on my ego to build a full size one and then invent the first shrink ray in history.
Any one or two issue and this would be ok but this kit has just too many problems to make it worth doing again. Can only recommend it to modelers with a lot of experience and patients with sanding and reconstruction. Not a good first model for anyone.
It’s a shame really. Kits like this are often the first kit a young modeler will get. But it’s such a mess it’s got to be frustrating for newer builders. I wonder how many young people were completely turned off of the hobby by kits like this.
May 2007
Copyright ModelingMadness.com.
If you would like your product reviewed fairly and fairly quickly, please contact the editor or see other details in the Note to Contributors.