| KIT #: | 2786 |
| PRICE: | $7.95 a long while back. |
| DECALS: | One Option |
| REVIEWER: | Ian Jackson |
| NOTES: |
Second
time around !! |
| HISTORY |
Normally
articles for MM don’t carry any sort of explanation, but hopefully Scott will
indulge me a little here ;-)
We have
recently re-located to
 I built a
fair number of these kits back in the early and mid-nineties, none of them
particularly well, so the subject of this, the first of an irregular series of
articles, I am revisiting the first NASCAR kit I ever bought and built back in
1991. With each build I am trying to reinvigorate those atrophied car building
skills and, put simply, try to get better with each project.
I built a
fair number of these kits back in the early and mid-nineties, none of them
particularly well, so the subject of this, the first of an irregular series of
articles, I am revisiting the first NASCAR kit I ever bought and built back in
1991. With each build I am trying to reinvigorate those atrophied car building
skills and, put simply, try to get better with each project.
The Car
This
generation of Buick Regal replaced the Grand National for the 1987 NASCAR season
and was used until the end of the 1991 season when Buick left NASCAR, followed
by Oldsmobile the following year.
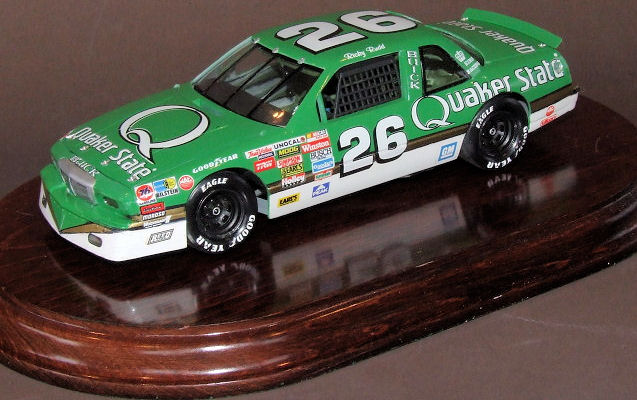
For 1988
Ricky Rudd replaced Morgan Shepherd in the #26
Quaker State
Buick Regal owned by drag
racing legend Kenny Bernstein.
He struggled with engine failures all season long and finished 11th in the
standings, his worst points finish in eight years. After his only win of
1989 came at the inaugural
Sears Point event, Rudd departed the operation, and signed with
Hendrick Motorsports to drive
the #5 Levi Garrett
Chevrolet Lumina.
| THE KIT |
As Scott
has alluded to in a number of his NASCAR kit articles, once you have built one
of Monograms’ kits, essentially you have built them all – the Buick I’ve built
here shares all of its ‘innards’ with the Monte Carlo, Grand Prix and T’bird
kits of the same era. The differences in these kits limited only to the
bodyshell, transparencies and decals – not too dissimilar to the real thing !!
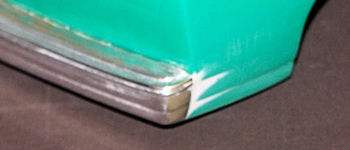
The
biggest surprise upon opening the box is the colour of the plastic – It’s green,
but so bright it’s bordering on fluorescent. If you buy this issue of the kit,
then be prepared for some very hard work if you plan on painting it anything but
‘
| CONSTRUCTION |
 Considering the age of the moulds I was presently surprised with how well the
front & rear bumpers matched the bodyshell – virtually no warping at all. Only a
little filling & blending needed.
Considering the age of the moulds I was presently surprised with how well the
front & rear bumpers matched the bodyshell – virtually no warping at all. Only a
little filling & blending needed.
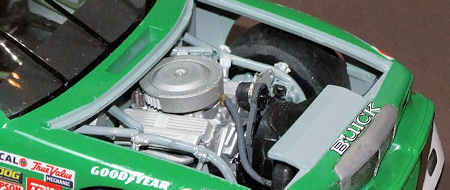
I moved
straight onto the engine block which built-up quickly and easily. Looking at
other folks builds on-line (especially on Randy Ayers site), I decided it was
best to ignore the painting instructions called-out by Monogram, and painted the
block a light aluminium tone. What I did next, I did wrong !! – I painted the
separate ‘A’ frame and trailing arms and rear axle a combination of
 dull aluminium and steel tones instead of the satin black they should be. The prop
shaft was similarly painted incorrectly… it should be white !!
I made no attempt to add the ignition harness, my atrophied car-building
skills when I was building this simply weren’t up to the job !!
dull aluminium and steel tones instead of the satin black they should be. The prop
shaft was similarly painted incorrectly… it should be white !!
I made no attempt to add the ignition harness, my atrophied car-building
skills when I was building this simply weren’t up to the job !!
Block to
one side, I started on the interior. I couldn’t find any photos whatsoever of
the insides, of this car, but from the external shots that are available, and by
pausing footage of various 1988 Winston Cup races available on You Tube I
determined the inside was definitely green. I sprayed the whole Tamiya XF? Dark
Green but it simply didn’t look right. So I left the cage and floor pan green
and re-sprayed the underside, inside of the shell and the frame forward of the
firewall glossy Light Ghost Grey (16375).
I sprayed
the wheels matt black (I brush painted a coat of Kleer/Future later), then put
all of this to one side to focus on the bodyshell.
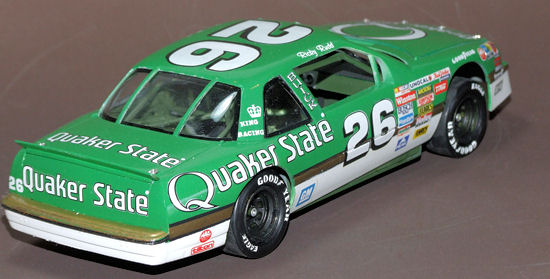
| COLORS AND MARKINGS |
The
aforementioned bright green was always going to be hard to tame, so after
masking-off the insides the white lower body was first primed straight from the
rattle-can using an acrylic white car-body primer, I brought with me from the UK
(any British readers will know Halfords is just wonderful for these).
 Once dry
I rubbed it back using ultra fine wet’n dry with lots of water and shot two
coats of good old Humbrol glossy white enamel cut with 40% cellulose at fairly
high pressure (17-20psi). I gave this a week to dry/cure. Next I carefully
measured the width of the gold stripe on the Fred Cady sheet added two
milimetres for the upper and lower black pinstripes and then masked the body
again and sprayed two coats of Humbrol glossy black. Hardest part of this
exercise was on the front air dam, where it narrows to a point on the lower
centerline (have a look at the photo of the real thing).
Once dry
I rubbed it back using ultra fine wet’n dry with lots of water and shot two
coats of good old Humbrol glossy white enamel cut with 40% cellulose at fairly
high pressure (17-20psi). I gave this a week to dry/cure. Next I carefully
measured the width of the gold stripe on the Fred Cady sheet added two
milimetres for the upper and lower black pinstripes and then masked the body
again and sprayed two coats of Humbrol glossy black. Hardest part of this
exercise was on the front air dam, where it narrows to a point on the lower
centerline (have a look at the photo of the real thing).
I was
lucky and everything went to plan with only the very slightest of touching-up to
do later. Again the paint was left to dry for a few days and the whole thing
re-masked ready for the green. I mixed my own tone from Humbrol #3 gloss green
with 20% #69 yellow. It may not be 100% accurate, but ‘it looks right’ to me.
Like the white, I sprayed two coats at (no more than) 20psi and walked away for
a week to allow it to fully dry/cure and focus on finishing the insides.
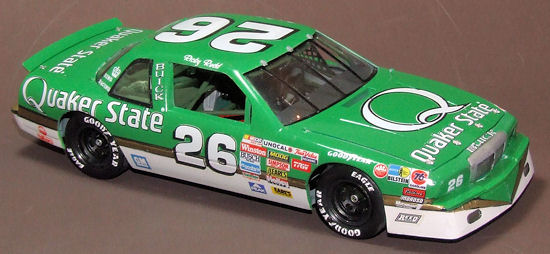
With the
masking removed, it looked exactly like I hoped it would !!
| FINAL BITS |
Surprisingly the components of the roll cage all came together with very little
effort. To piece them together I scraped any paint from the contact points used
a spot of cyano to hold them in place, then a touch of Humbrol liquid cement to
‘weld’ joints. I used the same technique for all the suspension parts. A BIG
lesson I have learned since building these models back in the 1990’s is
 PATIENCE. The build is so much easier if one allows sub-assemblies to set before
putting any stress on them – why it took me so long to realise this is a mystery
!!
PATIENCE. The build is so much easier if one allows sub-assemblies to set before
putting any stress on them – why it took me so long to realise this is a mystery
!!
After a lot of test fitting, I brought the engine, exhausts and chassis together and gently slipped it all into the bodyshell whilst simultaneously holding my breath. Everything went well, so I took it all back out again, got my breath back and reached for the decal sheet.
My decals
were (damp) damaged whilst the kit was in storage, and totally unusable.
Initially I was going to replace them with another set of kit decals from Mike
Herman (www.mikesdecals.com),
but on Mikes’ suggestion I chose the Fred Cady sheet instead, and what a great
choice it was !!
The Fred
Cady sheet is designed as an (almost) direct replacement for the kit sheet
(minus the contingency stickers and the aforementioned black pinstripes each
side of the gold cheat-line). The white elements are virtually opaque and so
much better than the kit supplied sheet. Most of the white elements have a black
border which are all supplied separately and
 applied straight on top of the
white.
applied straight on top of the
white.
Again, I
took my time: I applied all the major white decals first (numbers, main sponsor
logos), and the gold cheat-line. Then coated the whole in a coat of Kleer/Future
and set about the rest. I stole the contingencies from an unsuspecting Monte
Carlo kit of the same era and after three ‘sittings’ I was done.
The last
job before finishing was to mask and paint the black sections of the ‘glass’,
then once dry dip them all in a bath of Kleer/Future. Unfortunately this era of
Monogram NASCAR kits require you to attach the front & rear ‘glass’ from the
inside. Not ideal but with care and white glue it will look neat.
| CONCLUSIONS |
 So, did I
enjoy the build… Absolutely !! A wonderful trip back in time and so much more
enjoyable because my ‘skills’ such as they are, now match more closely my
expectations. Following-on from this project I finished a 1994 BGN Lumina and
closely behind that will be a Monte Carlo ‘Aerocoupe’. Would I recommend this
kit, well I’d say a ‘qualified’ yes. If you’ve never built a NASCAR before, it
may be a good idea to build a couple of ‘ordinary’ car kits first, just to get
the feel for it. If you have built
NASCAR’s before, then you know exactly what to expect…. Just remember to put-on
your shades before you open the box, the green plastic really is
that bright !!
So, did I
enjoy the build… Absolutely !! A wonderful trip back in time and so much more
enjoyable because my ‘skills’ such as they are, now match more closely my
expectations. Following-on from this project I finished a 1994 BGN Lumina and
closely behind that will be a Monte Carlo ‘Aerocoupe’. Would I recommend this
kit, well I’d say a ‘qualified’ yes. If you’ve never built a NASCAR before, it
may be a good idea to build a couple of ‘ordinary’ car kits first, just to get
the feel for it. If you have built
NASCAR’s before, then you know exactly what to expect…. Just remember to put-on
your shades before you open the box, the green plastic really is
that bright !!
| REFERENCES |
November 2012
If you would like your product reviewed fairly and fairly quickly, please contact the editor or see other details in the Note to Contributors.