| KIT #: | ? |
| PRICE: | $15.00 when it was new |
| DECALS: | One option |
| REVIEWER: | Mark Hiott |
| NOTES: | Modified with AMT Viper hood |
The
Dodge division of Chrysler has always been known for wild outrageous
automobiles. In 1992 Dodge started production of the wildest yet: the Dodge
Viper RT/10. Some time around 1995 someone at Dodge decided to stuff a Viper
engine into a Ram
 pick-up
and the Ram
pick-up
and the Ram
Being a Dodge technician and a Viper tech as well, I was immediately in love
with the Ram
| THE KIT |
Upon
opening the box you notice a typical Monogram kit. Molded in white plastic with
vinyl tires and a small fret of chrome parts. One thing I want to point out:
Ignore the painting call outs for the Viper engine. The only black Viper engines
were the cast iron prototypes,
| CONSTRUCTION |
Truck Cab
 Begin
by cutting the body apart at the front door edge. Remove everything forward of
the door lines, except a small portion of the fender opening just below the body
side molding. Be very careful when
doing this, as the body will be very susceptible to damage as the front portion
is removed. Do NOT throw the parts away yet! Test fit the body to the chassis.
When you are satisfied that everything looks ok, fill the bodyline just below
the rearview mirrors. Follow the curve of the body to get a nice smooth surface.
Set the cab aside.
Begin
by cutting the body apart at the front door edge. Remove everything forward of
the door lines, except a small portion of the fender opening just below the body
side molding. Be very careful when
doing this, as the body will be very susceptible to damage as the front portion
is removed. Do NOT throw the parts away yet! Test fit the body to the chassis.
When you are satisfied that everything looks ok, fill the bodyline just below
the rearview mirrors. Follow the curve of the body to get a nice smooth surface.
Set the cab aside.
Viper Hood
The
conversion of the Viper hood is much more complicated then the truck cab. You
will have to cut and section the hood in order to get it to fit. I like the look
of the Viper nose and chose to leave the front fascia the normal size and rework
the hood to fit between the fascia and truck cab. Cut the Viper hood down the
center.  Use
some tape to hold the hood on the front fascia. Place the hood up to the truck
cab and spread the hood until it meets the corners of the cab at the "A"
pillars. Tape the hood in this spread open position. Carefully remove the hood
and lay it bottom side up on your workbench. Glue the 3 parts of the hood
together and allow them to dry THROUGHLY! Use whatever method works best for you
and fill in the resulting gaps in the hood. I backed it with plastic sheet and
filled the inside, but do whatever works for you. Take notice of the hood
contours as you sand.
Use
some tape to hold the hood on the front fascia. Place the hood up to the truck
cab and spread the hood until it meets the corners of the cab at the "A"
pillars. Tape the hood in this spread open position. Carefully remove the hood
and lay it bottom side up on your workbench. Glue the 3 parts of the hood
together and allow them to dry THROUGHLY! Use whatever method works best for you
and fill in the resulting gaps in the hood. I backed it with plastic sheet and
filled the inside, but do whatever works for you. Take notice of the hood
contours as you sand.
Get
the frame, interior bucket and the modified truck body, assemble and tape them
together. At this point you will have to shave the sides of the wheel wells on
the truck frame and the lower splash pan to match the Viper hood. By the process
of test fitting and shaving/sanding, remove portions of the wheel wells and
splash pan until the hood fits properly. Next, fill in the wheel openings in the
Vipe r
hood with plastic sheet. This next step may be troublesome but it was the best
way I could think to do it. Place the modified Viper hood onto the chassis. Once
you have it where it goes, tape it in place. CAREFULLY turn the chassis over and
mark the new wheel openings. At the same time mark off the small portion left on
the front edge of the cab doors. Cut the new wheel openings per your marks. At
this point, fill all the seams on the wheel openings and sand smooth. Again,
take notice of the contour of the Viper hood when sanding. You may want to
experiment with this process as you may find one that works better for you.
Next, add a small strip of plastic to the bottom of the Viper nose to close the
space between the nose and the ground. I added a ¼ inch piece and sanded until
it looked right.
r
hood with plastic sheet. This next step may be troublesome but it was the best
way I could think to do it. Place the modified Viper hood onto the chassis. Once
you have it where it goes, tape it in place. CAREFULLY turn the chassis over and
mark the new wheel openings. At the same time mark off the small portion left on
the front edge of the cab doors. Cut the new wheel openings per your marks. At
this point, fill all the seams on the wheel openings and sand smooth. Again,
take notice of the contour of the Viper hood when sanding. You may want to
experiment with this process as you may find one that works better for you.
Next, add a small strip of plastic to the bottom of the Viper nose to close the
space between the nose and the ground. I added a ¼ inch piece and sanded until
it looked right.
Assemble
the kit as per the instructions. I made
NO changes to the chassis with the exception of brass tube exhaust tips.
Build the interior as per the instructions. After the interior is complete; box
in the area in front of the dashboard. This area was covered
 by the
wiper cowl that you removed in the first step. Choice of color is up to the
individual, I chose to paint mine a bluish Gray, as this is a popular color for
the Ram trucks. Paint the shifter knob white. You will NOT be able to use the
headlights that come with the Viper kit. I used clear acetate to fill the
openings and just painted them black.
by the
wiper cowl that you removed in the first step. Choice of color is up to the
individual, I chose to paint mine a bluish Gray, as this is a popular color for
the Ram trucks. Paint the shifter knob white. You will NOT be able to use the
headlights that come with the Viper kit. I used clear acetate to fill the
openings and just painted them black.
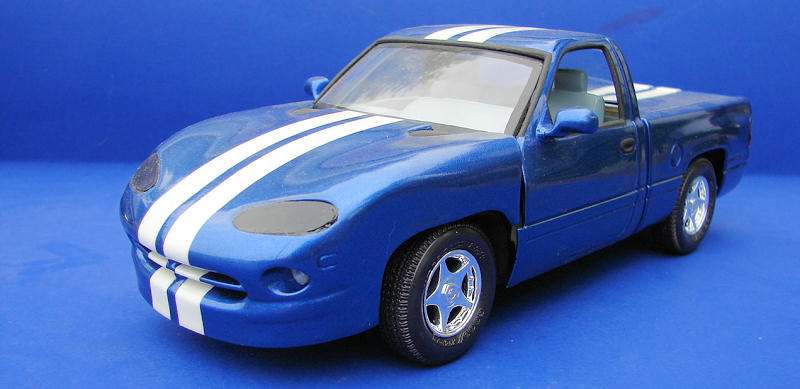
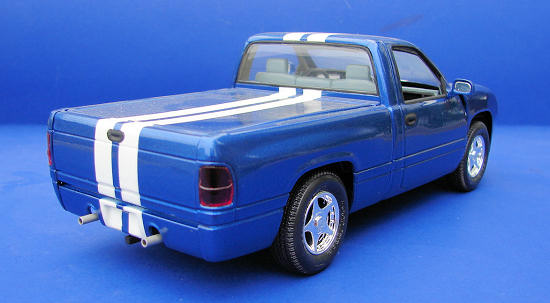
Once you have the chassis assembled, get the part of the truck body you cut off. You will need to remove all the parts molded onto the inside of the fenders. The electrical components can just be glued onto the inner fenders. The battery will need to be shaved to make it look like it sits in a recess in the fender. Fit the Viper hood onto the truck and you are DONE! As you may have noticed in some of the pictures, I have not mounted the Viper hood to the truck yet. All I have there now are a couple of braces to hold it in place. I have not figured out how to make the hood hinges for it yet! The underside of the Viper hood is not complete yet either, I plan to install some insulation on the hood as soon as I figure out how to mount it. I also have to build headlight buckets for it.
| COLORS & MARKINGS |

Working in a Dodge dealer has its advantages; I had my truck painted in our body shop! The truck is painted Viper Blue (paint code PBE) and the stripes are Bright White (paint code PW7). I started by painting the truck and Viper hood with gray primer so that the colors would have equal tint and depth. I then painted the both parts Bright White. After it had dried a couple days, I taped off the stripes and painted the parts Viper Blue. I then removed my tape and clear coated the body. Getting the stripes to conform to the front fascia of the Viper nose is a pain, but well worth the trouble.
| CONCLUSIONS |
Building the basic truck is a piece of cake. I'm sure it would be a fine
addition to any model collection.
The conversion of this model has its ups and downs, but it builds into a very
unique model. Given patience and a steady hand I’m sure that anyone can do it.
This was my first kitbash and I was really happy with the results.
| REFERENCES |
My
imagination
September 2010
If you would like your product reviewed fairly and quickly, please contact me or see other details in the Note to Contributors.