
| KIT #: | 7205 |
| PRICE: | $45.00 MSRP |
| DECALS: | One option |
| REVIEWER: | Mark Hiott |
| NOTES: | Lots of chrome, rubber tires |
| HISTORY |
 It’s a Harley…what more needs to be
said?
It’s a Harley…what more needs to be
said?
| THE KIT |
For a look at the contents, please see Scott’s in-box review.
| CONSTRUCTION |
When I was asked to do this build, I thought “Huh, 6 weeks? Piece of cake”. When the box arrived and I saw all that chrome, I wasn’t so sure. There are 2 very large sprues of chrome parts and each part had at least 2 attachments points. On the up side, there are no ejector pins marks and the chrome is beautifully molded.
There were 2 broken parts in my kit: the right handgrip/mirror mount and one brace for the license plate holder.
The kit includes a stand that I found helpful in holding the bike upright during the build.
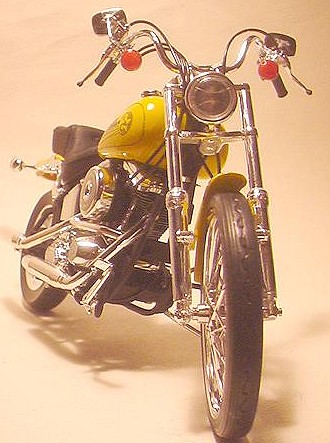
Construction started with the wheels. Take care here, as the rim offsets are different left and right. I was careful and still managed to assemble the front wheel wrong. (More on that later) The tires went on the rims with no trouble and look really nice.
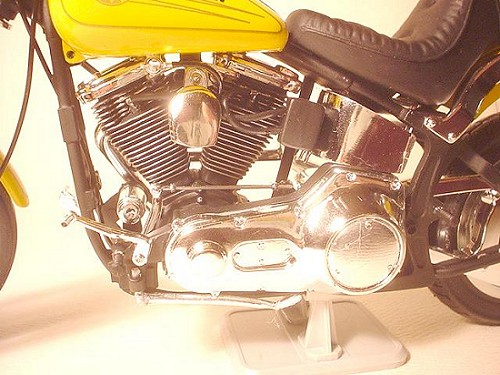
Next up was the
engine. The instructions have the cylinder misidentified, parts 12 and 13
are the rear cylinder and parts 16 and 17 are the front one. The giveaway
is the location of the exhaust ports and of the spark plugs. I installed
the spark plug wires in a later step. Leave th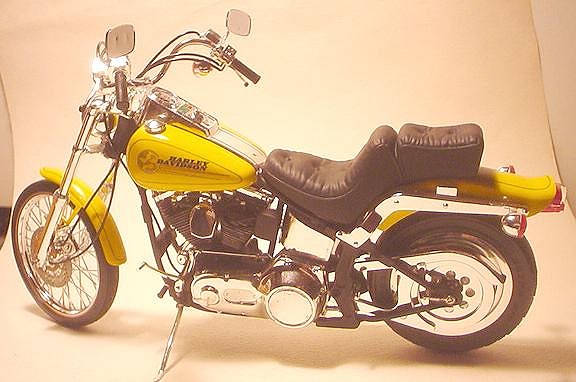 e carb, air cleaner and fuel
lines off until the engine is mounted in the frame. This keeps the hoses
out of your way during the build and would be impossible to add if you
mounted the carb in step 3.
e carb, air cleaner and fuel
lines off until the engine is mounted in the frame. This keeps the hoses
out of your way during the build and would be impossible to add if you
mounted the carb in step 3.
I skipped steps 4 and 5 altogether, I chose to assemble the forks and swing-arm on the frame. Again, it keeps those small fragile parts from being broken during building. It also allows you to keep building while the front fender paint is drying.
The first step in the building of the frame is to assemble the shocks from step 5. Let this dry overnight, as you don’t want it coming apart during the process. As the frame halves go together, trap the front fork in the frame neck and the front mount for the rear shock. (Take note of the ‘UP’ stamped on part #100)
Assemble the swing-arm as per step 5 making sure to trap the rear shock assembly as you do. Swing the arm up and install the required screw. I know this sounds difficult but proper alignment of the arm is critical. Allow this to dry before moving to the next step. After adding the rear tire, I discovered that the bike sits too high. As I think back, I would have left out the springs and just glued the swing-arm in place.
 After the engine is
installed in the frame, the fun starts. Oh, all that chrome! I decided to
cover the sprue attachment points with chrome Bare Metal Foil. It is not
quite as chrome as the molded stuff, but it’s close. With a good buff job,
you can only tell in a couple of places.
After the engine is
installed in the frame, the fun starts. Oh, all that chrome! I decided to
cover the sprue attachment points with chrome Bare Metal Foil. It is not
quite as chrome as the molded stuff, but it’s close. With a good buff job,
you can only tell in a couple of places.
I also decided to rearrange step 8 as well. The drive belt is so tight that it tries to pull the final drive case off the engine. I ended up mounting the final drive to the engine without the transmission. After it was dry, I inserted the transmission from the other side, trapping the drive belt on the sprocket.
When assembling the halves of the left fuel tank (parts 7 and 10) make sure to drill a hole in #10 for the fuel petcock. There is a slightly embossed mark on the bottom. The only other problem I encountered was that the lower mounting screw for the fuel tank would not stay in the hole. Not sure if it was my fault or not, but I chose to leave it out.
The last thing I assembled was the front fork. This is when I discovered I had mounted the front tire backwards. I had to shave a bit of the axle to center the wheel so the fork would fit straight. The grips are miss numbered, part 51 is the right and part 49 is the left.
I also left the springs out of the front fork as it sat too high. At this point I also fixed the broken mirror mount and added the lines.
| COLORS & MARKINGS |
 I chose to paint my
Harley yellow. First because I like bright colors, second I had some left
over from a previous project.
I chose to paint my
Harley yellow. First because I like bright colors, second I had some left
over from a previous project.
The decals look very un-nerving, large decals with lots of open space. I used lots of water to help them slide around and they snuggled down with no trouble.
| CONCLUSIONS |
This is a nice kit. The number of chrome parts is daunting, but the extra work is well worth it. The Bare Metal Foil is not the best way to fix the attachment points and I have heard good things about Alclad Chrome. Perhaps I will give that a try in the future.
With the exception of the working suspension making the bike sit too high, it builds into a very nice model. (But that is easily fixed)
This kit is not for beginners, but someone with a couple of motorcycles under their belt should have no trouble.
January 2006
| REFERENCES |
Just some photos off the net.
Copyright ModelingMadness.com. All rights reserved.
If you would like your product reviewed fairly and fairly quickly, please contact the editor or see other details in the Note to Contributors.
Back to the Review Index Page 2019