| KIT #: | RS-44 |
| PRICE: | ~$30.00 |
| DECALS: | Two options |
| REVIEWER: | Ben Brown |
| NOTES: | Hobby Design Gemballa Racing decals used |
| HISTORY |
The McLaren MP4-12C, later shortened to 12C, was a high performance sports car built in England from 2011 to 2014. It was the first production car designed and built by McLaren. It was also their first road car to be produced since the F1 of the late 1980s. The MP4-12C has a carbon fiber chassis and is powered by a 3.8 L McLaren V-8 that produces 592 hp. The car can go from 0-60 mph in 2.8 seconds and will pass through 100 mph in 6 seconds. Top speed is 218 mph, and the advanced braking system will stop the car from 60 mph in 30 meters.
The MP4-12C GT3 is a pure racing version of the road
car. The race car’s engine produces less horsepower than the street car, due to
racing regulations. New bodywork, to improve downforce and to allow for wider
wheels was added. It had a special, lighter 6-speed transmission and a steering
wheel from the MP4-24 F1 car. The car’s first race was the
 2011 Spa
Francorchamps, followed by entries in the Spa 24 Hours and the Macau Grand Prix.
In 2012, McLaren prepared 25 cars for a full season of racing. The car’s first
victories were won by Hexis Racing at the two races of the 2012 Circuito de
Navarra round of the FIA GT1 World Championship.
2011 Spa
Francorchamps, followed by entries in the Spa 24 Hours and the Macau Grand Prix.
In 2012, McLaren prepared 25 cars for a full season of racing. The car’s first
victories were won by Hexis Racing at the two races of the 2012 Circuito de
Navarra round of the FIA GT1 World Championship.
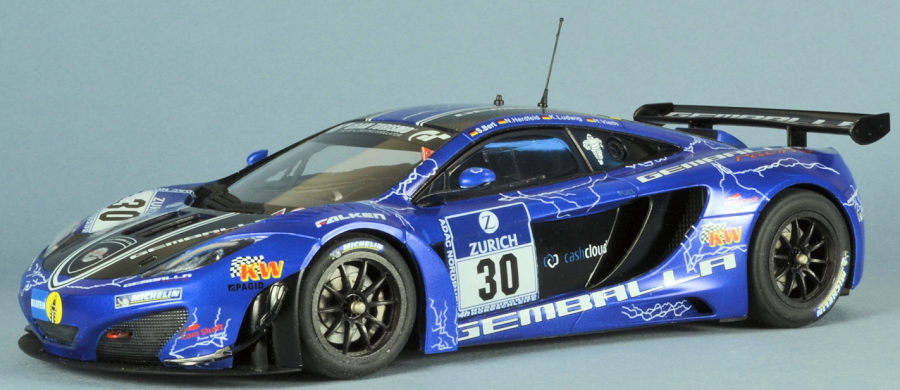
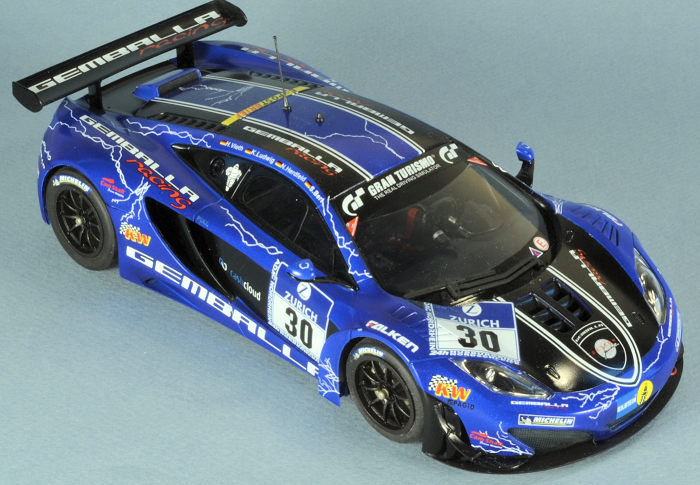
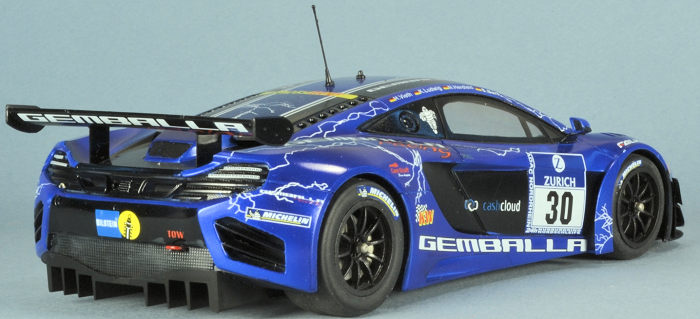
Gemballa is a specialty tuning company, founded in 1981, and based in Leonberg, Germany. The company specializes in turning out highly modified and very fast Porsches and McLarens. In 2010, the company was seized and shut down by German authorities as part of an investigation into the disappearance of founder Uwe Gemballa. Gemballa turned up dead several months later in South Africa, reportedly killed during a failed money laundering scheme. Gemballa’s CEO and an investor purchased the company and restarted it as GEMBALLA GmbH.
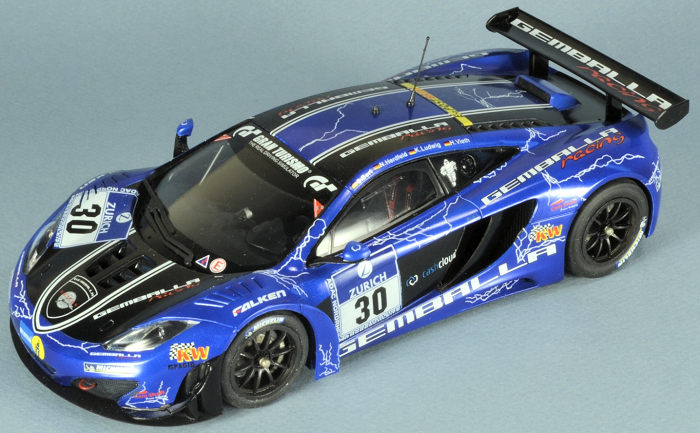
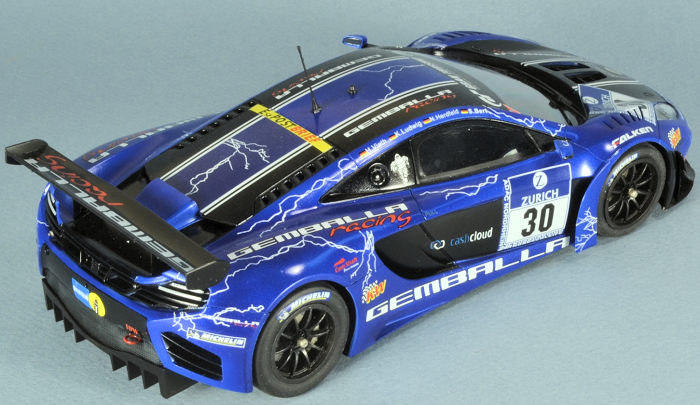
Gemballa Racing was established in 2011, using two McLaren MP4-C12 GT3s instead of Porsches. The team’s drivers included Sascha Bert, Hendrik Vieth, Klaus Ludwig, and Nick Heidfeld. They had a quiet season, failing to make podium in any races. Based on internet photos, they had at least two wrecks during the season. Gemballa’s final race was at the 24 Hours Nürburgring. Unfortunately, 3 hours 41 minutes into the race, driver Klaus Ludwig came into contact with a much slower car at a sweeping left hand curve (the Schwedenkreuz, usually taken at ~240 km/h) and spun into the guard rail, totaling the McLaren. Fortunately, only Ludwig’s pride, and later his wallet, were hurt. One source has stated he was fined €11,000 for his after-crash “discussion” with the other driver. Gemballa sat out the 2013 season and eventually sold both cars.
| THE KIT |
There isn’t much I can add to Scott’s preview of the kit, found here.
Hobby Design made two different sets of O.Z. Racing wheels and an updated resin cockpit for the kit, and Studio 27 makes a photo etched set and carbon fiber decals. A company called KA makes a detailed engine and roll cage. If you don’t like the kit’s decals, there are quite a few decal sets available from various manufacturers for cars from several GT3 series.
| CONSTRUCTION |
The interior is simple, with just a few parts
and a roll cage. The small windows make the black cockpit pretty dark, so the
Hobby Design cockpit might not be worth the money, unless the modeler wants to
someh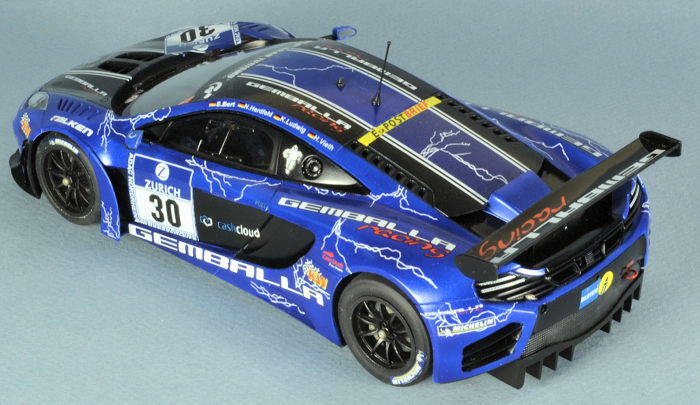 ow
open the doors. I painted the interior parts with Tamiya semi-gloss black and
flat black. The only color is from the seat belts and a few switches. I made my
own belts with painted medical tape, styrene, and bits of cut-up staples. The
belt logos were leftovers from an Indycals seat belt decal set. The roll cage
parts are a little fiddly, and are made more so by my trying to thread the seat
belts back to the mounting bar.
ow
open the doors. I painted the interior parts with Tamiya semi-gloss black and
flat black. The only color is from the seat belts and a few switches. I made my
own belts with painted medical tape, styrene, and bits of cut-up staples. The
belt logos were leftovers from an Indycals seat belt decal set. The roll cage
parts are a little fiddly, and are made more so by my trying to thread the seat
belts back to the mounting bar.
The suspension is very basic, with little detail, but the real car’s flat bottom hides most of the chassis detail. Brake calipers and rotors are provided, since these can be seen through the excellent O.Z. wheels.
For those who like to wire and display an engine bay, the stock kit engine doesn’t have much to detail. Most of the detail is molded into the cockpit tub part, with turbo ducting as a separate part. I didn’t bother painting the engine details, since these wouldn’t be visible on the finished model. The engine cover was the only part on the kit that didn’t literally click into place. I had to thin the edges so it would fit flush with the body.
| COLORS & MARKINGS |
Rather than use the orange factory colors provided in
the kit, I decided on some Hobby Design’s decals for a Gemballa Racing car from
the 2012 24 Hours Nürburgring. Even though every photo of the car looks like a
different shade of blue,
 Gemballa
appears to have used McLaren’s Azure Blue. With model cars, one can often just
order a small bottle of touchup paint from one of several manufacturers, for
about the same price per mL as hobby paint, and airbrush it on their model.
McLaren doesn’t release their paint codes or sell touchup paint, and if they
did, it would probably be priced proportionally to their cars. After a little
sleuthing on a McLaren owners forum, I learned that Mazda’s 34J Aurora Blue is a
spot-on match for Azure Blue, so off I went to my local Mazda dealer. The Mazda
touch-up paint sprayed beautifully when thinned about 50:50 with Mr Leveling
Thinner. The black areas were painted Tamiya TS-14 Gloss Black.
Gemballa
appears to have used McLaren’s Azure Blue. With model cars, one can often just
order a small bottle of touchup paint from one of several manufacturers, for
about the same price per mL as hobby paint, and airbrush it on their model.
McLaren doesn’t release their paint codes or sell touchup paint, and if they
did, it would probably be priced proportionally to their cars. After a little
sleuthing on a McLaren owners forum, I learned that Mazda’s 34J Aurora Blue is a
spot-on match for Azure Blue, so off I went to my local Mazda dealer. The Mazda
touch-up paint sprayed beautifully when thinned about 50:50 with Mr Leveling
Thinner. The black areas were painted Tamiya TS-14 Gloss Black.
For the Nurburgring race, the #30 car had a painted engine cover, instead of the standard clear part. I don’t know why, but Lamborghini has done this for several of their past GT race cars, and so has Lotus, with their Exige. Perhaps they were following the “First Rule of Italian Driving” (from the movie Gumball Rally): “What is behind me is not important.” I primed the clear part with Tamiya gray primer, because white primer would require more coats to make the clear part opaque. Unfortunately, I ignored my inner voice that was yelling at me to give it a coat of white over the gray primer before applying the color coat, so the blue turned out a little darker on the engine cover than on the rest of the model.
 Fujimi
provides some masks for the clear parts. Some of the black areas are on the
inside of the clear windshield part, while others are both inside and outside,
so I made a copy of the mask sheet and cut extras from Tamiya tape. I sprayed
these parts Tamiya X-18 Semi-gloss Black. I also sprayed the inside of the body,
in case there were any gaps in the cockpit tub.
Fujimi
provides some masks for the clear parts. Some of the black areas are on the
inside of the clear windshield part, while others are both inside and outside,
so I made a copy of the mask sheet and cut extras from Tamiya tape. I sprayed
these parts Tamiya X-18 Semi-gloss Black. I also sprayed the inside of the body,
in case there were any gaps in the cockpit tub.
Hobby Design provides decals for two Gemballa cars: Ludwig’s ill-fated #30 and a car with Prestige Cars logos. These decals performed flawlessly, but the instructions don’t mention many of the smaller decals, so I had to resort to photos of the real car for placement. There were a lot of lightning bolt decals to add to the model, and I had to refer to photos of the real car to see if these went below or over the top of some of the other decals. I used the kit decals for the LED brake lights, but I wasn’t completely happy with the results. It would have been nice if Fujimi had provided the brake light bars as clear parts. This is really my only complaint about the kit.
Once the decals were dry, I sprayed a couple of coats of Tamiya TS-13 Clear Gloss. The grills on the front and rear of the car were drybrushed dark metallic gray.
| CONSTRUCTION CONTINUES |
The cockpit mounts to the chassis, and then four pins on the chassis plug into sockets in the body. The body and chassis both required a little flexing to get them in place.
Not for the first time, I couldn’t get the Fujimi’s
tire decals to work. Using them as dry transfers or Clearfix-style (place them,
wet the paper, hope for the best) didn’t do a thing. Fortunately, the Hobby
Design sheet provided the correct
 Michelin
decals. The wheels are held in place by poly caps, so they just press on. The
kit wheels are not correct for the car I was building, because they have too
many spokes. I had planned to live with them, and actually finished the model,
but then I learned they were the perfect match for the wheels I needed for
another car I wanted to build. I ordered what was apparently the last set of
Hobby Design resin wheels left in the world from BNA Model World and swapped
them with the kit wheels. They are labeled “F” and “R,” but the fronts are the
same width as the rears and need to be sanded down by about 1 mm. The rear tires
were a little loose on the wheels, so I shimmed them by wrapping a strip of tape
around the wheels. Hobby Design also provides four very nice metal filler
valves, and I promptly launched one into space when I picked it up with
tweezers, so my wheels have no filler valves.
Michelin
decals. The wheels are held in place by poly caps, so they just press on. The
kit wheels are not correct for the car I was building, because they have too
many spokes. I had planned to live with them, and actually finished the model,
but then I learned they were the perfect match for the wheels I needed for
another car I wanted to build. I ordered what was apparently the last set of
Hobby Design resin wheels left in the world from BNA Model World and swapped
them with the kit wheels. They are labeled “F” and “R,” but the fronts are the
same width as the rears and need to be sanded down by about 1 mm. The rear tires
were a little loose on the wheels, so I shimmed them by wrapping a strip of tape
around the wheels. Hobby Design also provides four very nice metal filler
valves, and I promptly launched one into space when I picked it up with
tweezers, so my wheels have no filler valves.
The final step was to add the antennae on the top. For once, I had remembered to pre-drill the mounting holes early in the construction process.
| CONCLUSIONS |
This is a great kit for people who might be new to car modeling and are learning the techniques specific to the genre, or for someone who just wants a break from building detailed suspensions and engines. Fujimi has captured the beautiful lines of the McLaren, and overall, this was a fun, relaxing build. The only problems I had with the kit were self-induced.
Lesson learned by a car newbie with this kit: Mr. Base White is not a substitute for Tamiya white primer. It is excellent when used as a flat white paint, but it doesn’t have the better adhesion properties of a true primer, so the paint you apply over it tends to scratch easily or rub off.
| REFERENCES |
Wikipedia
11 June 2019 If you would like your product reviewed fairly and fairly quickly, please
contact the editor or see other details in the
Note to
Contributors. Back to the Main Page
Back to the Review Index Page
Back to the Previews Index Page