| KIT #: | PN 24001 |
| PRICE: | ~$35.00 |
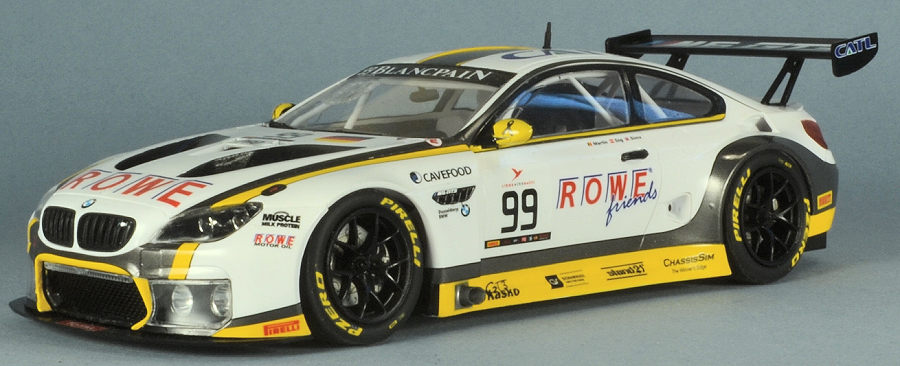
| DECALS: | Two Rowe Racing liveries (2016 Spa 24 hour) |
| REVIEWER: | Ben Brown |
| NOTES: | Model Technologies seat belt buckles |
| HISTORY |
The BMW M6 GT3 was introduced in 2016 as a replacement for BMW’s Z4 GT3 car. Powered by a twin turbo 4.4 liter V8 that produces 577 hp. It weighs more than 1200 lbs less than the street M6 Coupe.
The first race for the M6 was the 2016 24 Hours of Daytona and its first win was with the Rowe Motorsports team at the 24 Hours of Spa-Francorchamps 2016. Rowe Racing supported teams running in the VLN Endurance Championship for many years before entering their own team in 2008. They started competing in the Blancpain GT series in 2015, entering two Mercedes-Benz SLS AMG GT3 cars. For the 2016 season, they switched to the BMW M6 GT3. In addition to the win at Spa, they placed second in the 2017 24 hour race at Nürburgring.
| THE KIT |
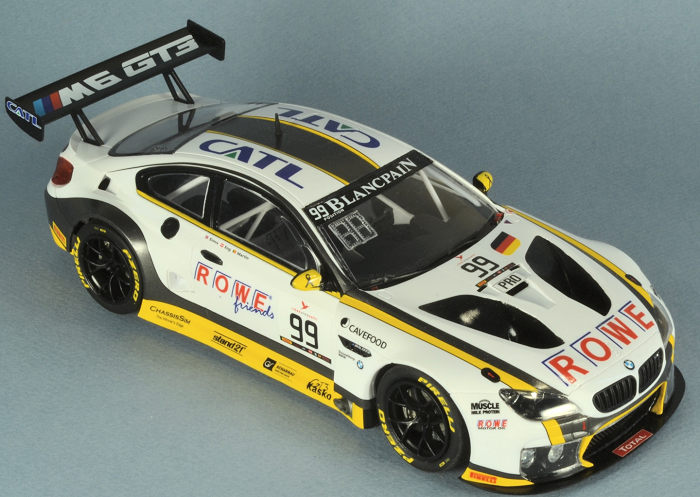
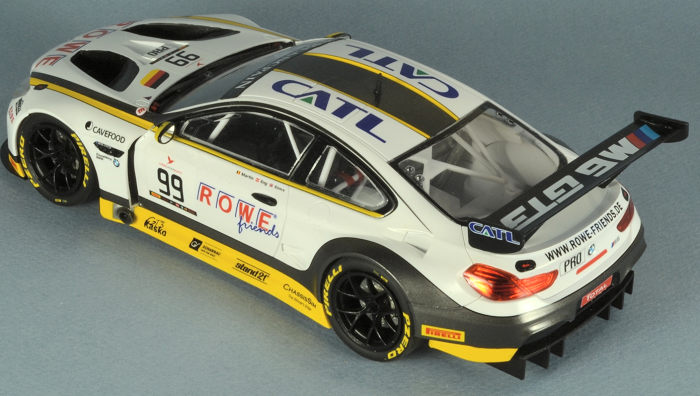
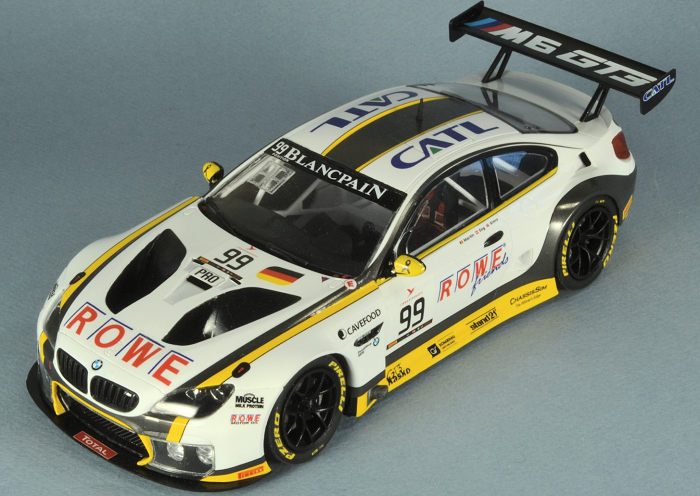
The kit includes white, silver, black, clear, and chrome sprues, a set of rubber tires, and some poly caps to attach the wheels. Decals are provided for the Rowe Racing number 99 car that won the 2016 Spa 24 Hours race. Alternate decals are also included for the number 98 Rowe Racing car that finished 41st in the race. The decal sheet also includes seat belts and tire logos. It is a curbside kit, meaning there is no engine detail. No chassis detail is provided, other than the basics of the drivetrain and suspension, but anything more is unnecessary, because these cars have flat bottoms. A good interior, including a roll cage rounds things out. The Rowe Racing car depicted in the kit had the lighted leaderboard mounted to the windshield, and the kit windshield has a square mount molded into it.
 Several other versions of
this kit are available, including blue and aqua Falken Tires colors and a car
from the 2016 Monza 3 Hours race. They include additional parts for louvres over
the front fenders. Some photos of the Falken kit show it with a different
windshield, without the leaderboard mount, while other photos still show it.
Several other versions of
this kit are available, including blue and aqua Falken Tires colors and a car
from the 2016 Monza 3 Hours race. They include additional parts for louvres over
the front fenders. Some photos of the Falken kit show it with a different
windshield, without the leaderboard mount, while other photos still show it.
As of April 2019, there is a fair amount of aftermarket available for this kit. Platz sells a separate photo etched detail set and a set of decals for the carbon fiber sections of the car. I’ve found a set of decals from a slot car company called Slotfabrik for a blue Walkenhorst Motorsports car with Playstation logos from the 2016 Nuerburgring 24 hour race, Racing Decals 43 has a set for a Turner Motorsports Liqui-Moly car from the 2016 24 Hours of Daytona, and KMP has decals for a Schubert Motorsports car from the 2016 Nurburgring race. The Walkenhorst decals require the Falken kit, with its fender-mounted louvres, and, if it doesn’t have the molded-in leaderboard mount, the Falken kit would probably also be best for the Liqui-Moly car. The Schubert car had the windshield mounted leaderboard, like on the Rowe cars. Right after I got the windows installed, I learned that Decalcas (available from SpotModel) and Zero Designs (available from Hiroboy) make masks for the clear parts. Based on my experience detailed below, don’t bother with the window decals, just order some masks and paint the black areas.
| CONSTRUCTION |
This was supposed to be a fun build and I wanted to keep my costs down, so I skipped purchasing the photo etch set and carbon fiber decals and just followed the assembly and painting instructions. All of the parts suffered from mold joint lines and a little flash where the molds separated. The parts from silver sprue also required an extra soaking in engine degreaser and, eventually, denatured alcohol before paint would stick to them. The chassis/belly pan had some ejector pin marks and “towers” in unfortunate places. They must be removed so the cockpit tub will fit and so they don’t show on top of the splitter plate on the front and the diffuser in the rear. The roll cage parts also had a lot of ejector pin marks and flash that required cleanup. Oddly, Platz includes the clutch and front and rear brake master cylinder reservoirs on the driver’s side of the roll cage, even though these can’t be seen unless the door is opened. The part that can be seen from inside the cockpit had a big sink hole in it. There are a lot of wires molded into the cockpit tub, and I made a semi-successful attempt at painting them.
 The front and rear bumper
covers fit the body very well. I removed part of the mounting structure above
the grill opening, so I could add the grill after the body had been painted.
There are two NACA ducts on each side of the body near the rear wheel well that
don’t fit very well. The upper ones were supposed to be attached to some ducts
in the cockpit, but I glued them directly to the body to make sure they fit.
There was still a slight gap between the ends of the ducts and the intakes.
The front and rear bumper
covers fit the body very well. I removed part of the mounting structure above
the grill opening, so I could add the grill after the body had been painted.
There are two NACA ducts on each side of the body near the rear wheel well that
don’t fit very well. The upper ones were supposed to be attached to some ducts
in the cockpit, but I glued them directly to the body to make sure they fit.
There was still a slight gap between the ends of the ducts and the intakes.
The decal sheet provides seat harnesses, but I made my own from painted medical tape and some old Model Technologies photo etched buckles. A clear part for some sort of box is provided for the spot where a passenger seat would mount. I initially couldn’t find any photos of it installed in a car, so I assumed it was a reservoir for a Coolshirt system and painted it light gray. Of course, right after I did that, I found a photo of a car with the box installed, and sure enough, it was clear! I couldn’t identify its function, other than it possibly protects some electronic equipment.
The radiator and oil cooler assembly is supposed to attach to the front of the chassis. The attachment points are not very solid, and the assembly popped off while I was test fitting the body to the chassis. I decided to leave it off of the chassis and attach it to the body, first, once the decals had been applied. The outer sides of the ducts (Parts C17 & C18) interfered with the driving light buckets, so I filed them down until they fit without spreading the front of the body.
| COLORS & MARKINGS |
I primed the body, followed by several coats of Tamiya Pure White, decanted from the rattle can and applied with an airbrush. I wet sanded the body with 5000 grit sandpaper and then airbrushed a couple of coats of Tamiya Clear Gloss. I painted the driving light buckets, the opening for the radiator intake, and the screens above the diffuser flat black and the areas around the two exhaust pipes Alclad Dark Aluminum. The four yellow decals around the radiator opening were the only ones that didn’t fit very well and required some touching up with yellow paint and strips of black decal film. I found Testors yellow in the little square bottle to be an almost perfect match for the decals. All of the rest of the color on the body was provided by the decals. The large yellow and metallic gray decals fit surprisingly well, and conformed to the rear fenders and bumper with liberal applications of Solvaset and heat. I touched up the inside edges of the fenders with Metalizer Gunmetal, which was a good match for the metallic gray decals.
 After the decals were dry,
I sprayed a couple more coats of clear gloss, in the process managing to get a
couple of dog hairs on the hood (I love my Yellow Lab, but does she ever shed!).
My efforts to remove the hairs resulted in a couple of flaws in the paint, but I
left them alone, because I was afraid trying to fix them would damage the nearby
decals. I then polished the body with various auto polishes from my garage.
Platz provides some plastic screen to cut to shape for the front opening and the
front fender vents. Photo etched versions of these screens are provided in the
“detail up” set.
After the decals were dry,
I sprayed a couple more coats of clear gloss, in the process managing to get a
couple of dog hairs on the hood (I love my Yellow Lab, but does she ever shed!).
My efforts to remove the hairs resulted in a couple of flaws in the paint, but I
left them alone, because I was afraid trying to fix them would damage the nearby
decals. I then polished the body with various auto polishes from my garage.
Platz provides some plastic screen to cut to shape for the front opening and the
front fender vents. Photo etched versions of these screens are provided in the
“detail up” set.
The clear parts have black trim decals that are applied to the insides before they are added to the body. They didn’t quite fit, so I filled the gaps with black decal film. The lower front section of the windshield must be painted black on the outside, but the black decal for that area doesn’t go all the way down to the painted area, so you have a see-through gap to paint. The instructions don’t mention some outside areas of the side window clear parts that also need to be painted. I had trouble getting the windshield to fit properly. I had test-fitted it without the wiper arms, and they interfered with the hood and caused a gap at the top of the windshield that had to be filled and painted. The window decals caused weak attachment points between the clear parts and the body, so I had some trouble with the clear parts falling out, leaving the decal attached to the body. I suggest ditching the decals and using masks to paint the black areas on the clear parts.
I had to strip and repaint the wing twice, because paint wouldn’t adhere to it, even after multiple washes in engine degreaser and denatured alcohol. I eventually sanded the wing enough to remove whatever was on the surface. The plastic reminded me of what I’ve seen in Trumpeter kits, where even lacquer-based primers and paints bead up like water on a waxed car.
| FINAL CONSTRUCTION |
There were no positive locators for the chrome parts for the headlights and brake lights, so I resorted to holding them in place and using blobs of superglue and accelerator to secure them to the body. The headlight parts interfered with the radiator ducting, requiring some tweaking to get everything in place, and the painting instructions were vague about what needed to be painted black. The clear parts for the headlights didn’t fit very well; I never did get them to correctly fit the openings.
 The body is supposed to
drop onto to the combined chassis and cockpit assemblies. There is a tab at the
rear end of the cockpit and two pins at the front of the chassis, so one is
required to bend the chassis slightly to allow the pins to slot into place. I
must have flexed the body a little too much, because soon after the glue had had
time to set, the LED class light bar inside the right side of the windshield
fell off, taking some of the black interior decal with it. I just let it go,
since prying the side window off to fix it would risk more problems.
The body is supposed to
drop onto to the combined chassis and cockpit assemblies. There is a tab at the
rear end of the cockpit and two pins at the front of the chassis, so one is
required to bend the chassis slightly to allow the pins to slot into place. I
must have flexed the body a little too much, because soon after the glue had had
time to set, the LED class light bar inside the right side of the windshield
fell off, taking some of the black interior decal with it. I just let it go,
since prying the side window off to fix it would risk more problems.
The upper parts of the mirrors on the #99 2016 Spa car should be yellow, but the instructions call for them to be black. There were several decals that were supposed to go on and around the mirrors, but the instructions were too vague to give any clues about exactly where they should go. I ended up using yellow paint and black decal film to make them look like the car in photos. The tires are tapered (outside diameter of one side is larger than the other) and this doesn’t go away when they’re mounted on the wheels. I had hoped to hide the mold parting lines on the edges of the tires by putting them on the inside, but the taper seemed to be less severe when they were mounted the other way around. I finally just sanded the tires to shape. The walls of the exhausts are very thick, so I thinned them before installing them.
| CONCLUSIONS |
In spite of the fit issues (both self-induced and otherwise) and mold parting lines on most of the parts, I enjoyed this kit. In the box, it looks relatively simple, but one has to spend a lot of extra time on parts cleanup, adjusting for fit, and applying decals. It’s really more like a limited-run kit, instead of something you’d see from Tamiya, Fujimi, or Aoshima, so I wouldn’t recommend it to a beginning modeler.
Platz has recently announced more kits of 2016-2018 GT cars: a BMW M8, a Porsche 911 GT3R and RSR, and an Audi R8 GT3. Hopefully, they’ll continue the series of modern Grand Touring cars with GT3 versions of the Lamborghini Huracan and Honda/Acura NSX.
| REFERENCES |
BMW Motorsports: https://www.bmw-motorsport.com/en/topics/season-2018/fahrzeuge/bmw-m6-gt3.html
Top Gear: https://www.topgear.com/car-news/frankfurt-motor-show/bmw-m6-gt3-big-winged-beast-race-car
3 June 2019
Copyright ModelingMadness.com
If you would like your product reviewed fairly and fairly quickly, please contact the editor or see other details in the Note to Contributors.
Back to the Main Page Back to the Review Index Page Back to the Previews Index Page