| KIT #: | SLK 017 |
| PRICE: | 77.86 Euros |
| DECALS: | Two options |
| REVIEWER: | Rob Hart |
| NOTES: | White metal with photo etch and turned aluminum parts |
| HISTORY |
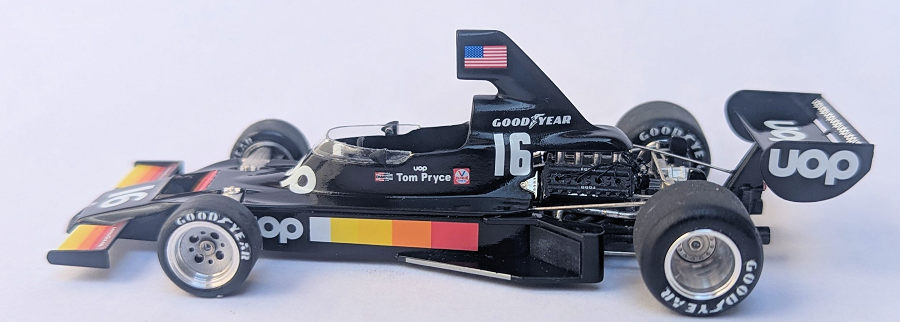
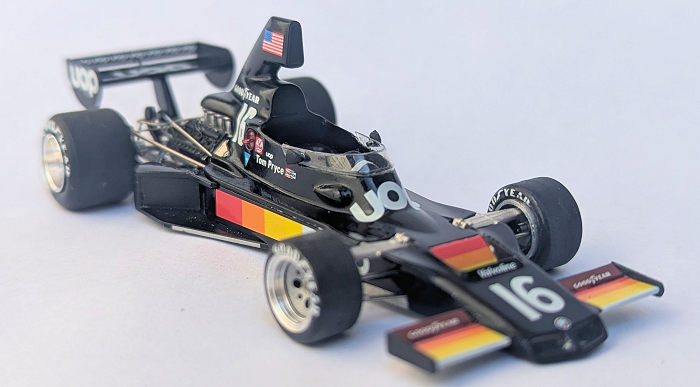
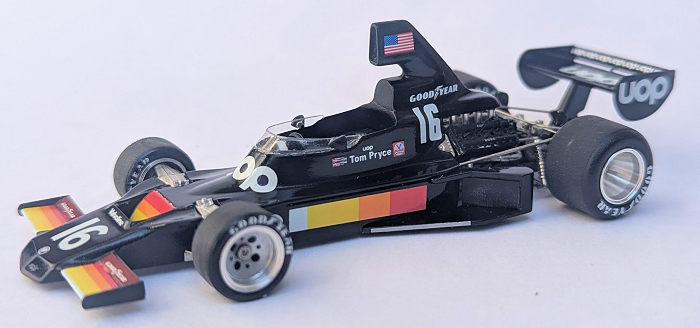
The Shadow DN5 was an American Formula One car used by the Shadow team in the 1975 Formula One season. It was a mid-engined design powered by a Cosworth DFV V-8. Its most distinctive physical features were the twin nostril intakes for the oil cooler. The cars were driven by Tom Pryce and Jean-Pierre Jarier. The cars were fast, but unreliable and the best finishing positions achieved were two third places, both by Pryce.
| THE KIT |
 The kit has
40 white metal parts, 86 photo etched parts, 22 turned aluminum parts, 4 steel
pins, 4 rubber tires, 2 metal screws, 2 metal springs, 2 vacu-formed butyrate
windshields, and a sheet of water slide decals. The five page full color
instructions illustrate 11 assembly steps and provide complete painting and
decal placement guides. Although the instructions do an admirable job of clearly
showing the locations of most of the parts, the engine/transaxle and rear
suspension sub-assemblies are very complex with many tiny parts needing to be
carefully aligned while being fitted into a very small area Consulting
references for additional clarity is recommended. Fortunately, internet
references abound to ease the difficulty of completing these sub-assemblies.
The kit has
40 white metal parts, 86 photo etched parts, 22 turned aluminum parts, 4 steel
pins, 4 rubber tires, 2 metal screws, 2 metal springs, 2 vacu-formed butyrate
windshields, and a sheet of water slide decals. The five page full color
instructions illustrate 11 assembly steps and provide complete painting and
decal placement guides. Although the instructions do an admirable job of clearly
showing the locations of most of the parts, the engine/transaxle and rear
suspension sub-assemblies are very complex with many tiny parts needing to be
carefully aligned while being fitted into a very small area Consulting
references for additional clarity is recommended. Fortunately, internet
references abound to ease the difficulty of completing these sub-assemblies.
| CONSTRUCTION |
I started the construction
of the model by drilling out the holes for the pin and socket attachment points.
I like to drill these holes slightly larger than than the pins that will go into
them so I have some wiggle room in the event alignment issues pop up. Then I
went over all of the white metal parts with files and sanding sticks to clean up
mold parting lines, burrs, and sink marks. I used medium cure superglue to fill
any low places and surface scars. After the filler had cured and been sanded
smooth, I glued the front and back parts of the body to each other, glued the
front wings on, filled all the seams with additional super glue, and sanded the
joints smooth. I then washed the parts with a used toothbrush and dish washing
detergent. Once the parts had air dried, they were air brushed with a coat of
Rustoleum self etching metal primer that had been decanted from a spray can. I
find that the self etching primer greatly improves the adhesion of hobby paints
to metal surfaces. After the self etching primer dried, I sanded it smooth with
a piece of 3200 grit micro mesh and airbrushed a coat of Tamiya gray lacquer
primer 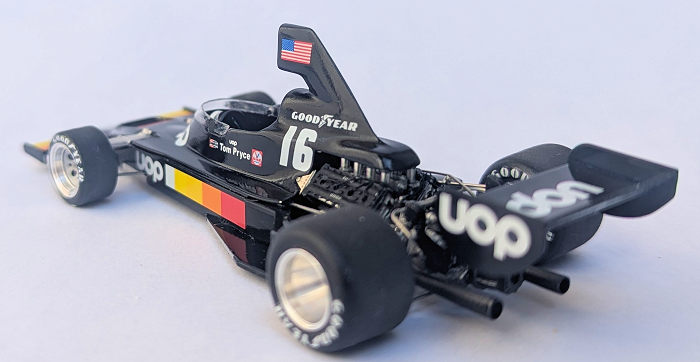 over
it. The Tamiya primer coat helps fill small pits and scratches and the gray
color makes it easier to see any other flaws that might need additional filler.
After smoothing the 2nd coat of
primer with 3200 grit micro mesh, I painted the parts except for the body,
wings, and side pods with Tamiya acrylic paints per the color call outs in the
instructions. The body, wings, and side pods were painted with Tamiya X-1 Gloss
black acrylic.
over
it. The Tamiya primer coat helps fill small pits and scratches and the gray
color makes it easier to see any other flaws that might need additional filler.
After smoothing the 2nd coat of
primer with 3200 grit micro mesh, I painted the parts except for the body,
wings, and side pods with Tamiya acrylic paints per the color call outs in the
instructions. The body, wings, and side pods were painted with Tamiya X-1 Gloss
black acrylic.
With the painting mostly finished, I began to assemble the the kit. I built the engine pretty much per the instructions with only two additions. I used Pro Tec .0075” detailing wire to simulate ignition wires and I replaced the kit's too tall intake trumpets with some shorter aftermarket trumpets. The kit provides photo-etched seat belts and shoulder harnesses. I have never been able to bend photo-etched belts into shape and then paint them to a standard that I was satisfied with so I substituted belts that were made from thin strips of blue masking tape and aftermarket photo-etched buckles. The gauges on the dash are represented by decals. I glued some photo-etched bezels to the decals and filled the centers of the bezels with drops of Vallejo Polyurethane gloss to simulate the gauge's glass faces. The only other additions that I made to the cockpit were photo-etched gas, brake, and clutch pedals. In retrospect, this was a waste of time and good aftermarket parts as the pedals are completely invisible on the finished model. Leaving off the the steering wheel until later, I attached the cockpit parts and the engine to the base plate and began assembling the rear suspension. The coil over shocks in the kit are way too big and I replaced them with aftermarket parts that were shorter and smaller in diameter. The assembly sequence for the rear suspension must be carefully followed or you'll end up trying to attach and align tiny photo-etched parts in a very small area that will become inaccessible if the parts are assembled out of order.The kit's instructions provide a good guide to the start of the process, but I needed additional photo references to determine the exact spatial orientation of the parts.
| COLORS & MARKINGS |
 The kit
provides decals for either one of Pryce's cars or one of Jarier's cars as they
were raced at the 1975 Italian Grand Prix. Both liveries are identical with the
exceptions of the race numerals and the driver's names. The decals were printed
by Cartograph and performed flawlessly. After the decals dried for about 48
hours, I wiped off any residue and applied a few heavy coats of Tamiya Acrylic
X-22 Clear. Because the humidity level on the day that I applied the clear coat
was in the single digits, I had added some Tamiya Acylic Retarder. When I
returned to the painted and decaled parts some 2 weeks later, the clear coat was
still tacky enough to leave finger prints. I was at a loss as to how to fix this
and ultimately decided to strip the paint and decals and start over. I dumped
all of the clear coated parts in a jar of lacquer thinner and let them soak for
24 hours. Surprisingly, the lacquer thinner stripped off all of the paint and
decals down to the self etching primer coat and also dissolved all of the
superglue filler and glued attachments. I repeated the gluing, filling, sanding,
and primering process. When it came to re-applying the gloss black base color I
used Tamiya LP1 lacquer paint. I found and bought a replacement set of decals
from a Spanish internet retailer. After applying the decals for the 2nd
time, I airbrushed a couple of wet coats of Tamiya TS-13 Clear gloss lacquer
that I had decanted from a spray can (note: always test TS-13 on any decals that
you plan to use as it has a reputation for eating some decals). This time the
clear coat dried to the touch in a few hours and I rewarded my success with some
Girl Scout peanut butter patties.
The kit
provides decals for either one of Pryce's cars or one of Jarier's cars as they
were raced at the 1975 Italian Grand Prix. Both liveries are identical with the
exceptions of the race numerals and the driver's names. The decals were printed
by Cartograph and performed flawlessly. After the decals dried for about 48
hours, I wiped off any residue and applied a few heavy coats of Tamiya Acrylic
X-22 Clear. Because the humidity level on the day that I applied the clear coat
was in the single digits, I had added some Tamiya Acylic Retarder. When I
returned to the painted and decaled parts some 2 weeks later, the clear coat was
still tacky enough to leave finger prints. I was at a loss as to how to fix this
and ultimately decided to strip the paint and decals and start over. I dumped
all of the clear coated parts in a jar of lacquer thinner and let them soak for
24 hours. Surprisingly, the lacquer thinner stripped off all of the paint and
decals down to the self etching primer coat and also dissolved all of the
superglue filler and glued attachments. I repeated the gluing, filling, sanding,
and primering process. When it came to re-applying the gloss black base color I
used Tamiya LP1 lacquer paint. I found and bought a replacement set of decals
from a Spanish internet retailer. After applying the decals for the 2nd
time, I airbrushed a couple of wet coats of Tamiya TS-13 Clear gloss lacquer
that I had decanted from a spray can (note: always test TS-13 on any decals that
you plan to use as it has a reputation for eating some decals). This time the
clear coat dried to the touch in a few hours and I rewarded my success with some
Girl Scout peanut butter patties.
| CONSTRUCTION CONTINUES |
 With the
painting and decaling finished, I attached the body to the base plate. I was
then able to attach the side pods to the body and check the body's alignment
with the rear suspension and engine. After some fettling and I was satisfied
that everything was square and all four tires would touch the ground at the same
time, I attached the electrical shutoff switch handle, the radiator grills, the
radiator pipes, the push/pull rods. the rear wing pylon, the tail light lens,
the steering wheel, and the transaxle linkage rod. I glued the tiny windshield
to the body and then drilled holes in each side of the windshield for the rear
view mirror posts. I next added the front wing end plates and the wheels/tires.
With the wheels in place, I added the center-lock nuts and attached the
previously assembled rear wing.
With the
painting and decaling finished, I attached the body to the base plate. I was
then able to attach the side pods to the body and check the body's alignment
with the rear suspension and engine. After some fettling and I was satisfied
that everything was square and all four tires would touch the ground at the same
time, I attached the electrical shutoff switch handle, the radiator grills, the
radiator pipes, the push/pull rods. the rear wing pylon, the tail light lens,
the steering wheel, and the transaxle linkage rod. I glued the tiny windshield
to the body and then drilled holes in each side of the windshield for the rear
view mirror posts. I next added the front wing end plates and the wheels/tires.
With the wheels in place, I added the center-lock nuts and attached the
previously assembled rear wing.
| CONCLUSIONS |
I rate this one a fairly typical Tameo 1/43 build. The rear suspension was more complicated than most, but the front suspension was less complicated than most. The provision of grossly over sized rear shocks was hard to understand given that Tameo sells pre-built examples of the kit. I can only blame myself for the problems with the acrylic clear cote. I recommend this kit to anyone with an interest in the subject and has experience building mixed media models.
Rob Hart
20 May 2025
Copyright ModelingMadness.com. All rights reserved. No reproduction in part or in whole without express permission from the editor.
If you would like your product reviewed fairly and fairly quickly, please contact the editor or see other details in the Note to Contributors.