| KIT #: | K747 |
| PRICE: | $140.00 |
| DECALS: | Two options |
| REVIEWER: | Rob Hart |
| NOTES: | out of production |
| HISTORY |
The car;
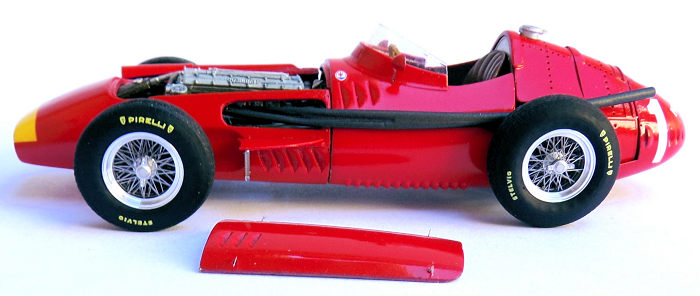
The Maserati 250F was a single seat Formula One racing car manufactured in Italy from 1954 through 1957. It used a tubular chassis with coil springs on the front and a transverse leaf spring at the rear. The car was powered by an inline six cylinder engine with double overhead cams and three side draft carburetors. The engine developed 250-270 horsepower at 7400 rpm and could propel the car to a top speed of 165 mph. The 250F did not have any single outstanding performance advantage, but it did everything well. It is widely considered to have been the best of the front engined Formula One cars.
The driver;
 Juan Manuel
Fangio (1911-1995) was an Argentine racing driver who won 5 Formula One World
Drivers Championships in 7 seasons during in the 1950s. Fangio learned his craft
competing in Argentina's tough Turismo Carretera
(dangerous high speed
rallys held on public roads) in the 1930s and 1940s. After WWII he began
competing in Europe and in 1950 he joined Formula one for its inaugural season.
Fangio dominated the first decade of Formula One's existence by winning 24 of 51
races, obtaining 29 pole positions, setting 23 fastest laps, and finishing on
the podium 35 times. He retired in 1958 and was kidnapped (and later released
unharmed) by Cuban revolutionaries that same year. Fangio is considered by many
motor sport historians to be the greatest racing driver of all time. His wins
average is still the highest ever achieved and his successes came at a time when
auto racing was dangerous to the point of being a blood sport.
Juan Manuel
Fangio (1911-1995) was an Argentine racing driver who won 5 Formula One World
Drivers Championships in 7 seasons during in the 1950s. Fangio learned his craft
competing in Argentina's tough Turismo Carretera
(dangerous high speed
rallys held on public roads) in the 1930s and 1940s. After WWII he began
competing in Europe and in 1950 he joined Formula one for its inaugural season.
Fangio dominated the first decade of Formula One's existence by winning 24 of 51
races, obtaining 29 pole positions, setting 23 fastest laps, and finishing on
the podium 35 times. He retired in 1958 and was kidnapped (and later released
unharmed) by Cuban revolutionaries that same year. Fangio is considered by many
motor sport historians to be the greatest racing driver of all time. His wins
average is still the highest ever achieved and his successes came at a time when
auto racing was dangerous to the point of being a blood sport.
The race;
Fangio's most famous drive happened in the German Grand Prix on August 4, 1957. The 22 lap race was held on the 14.173 mile Nurburgring. Fangio took the lead at the start and held it until he pitted for new tires and fuel on the 13th lap. The pit stop was a disaster and, when Fangio re-entered the race, he was in third place and a full minute behind the leading Ferrari of Mike Hawthorn. Fangio and his Maserati 250F took off in pursuit and over the next nine laps he set and reset the track's lap record until finally catching and passing Hawthorn on the 21st lap to win the race by a 3 second margin. It was his final Grand Prix victory and he was 46 years old at the time.
| THE KIT |
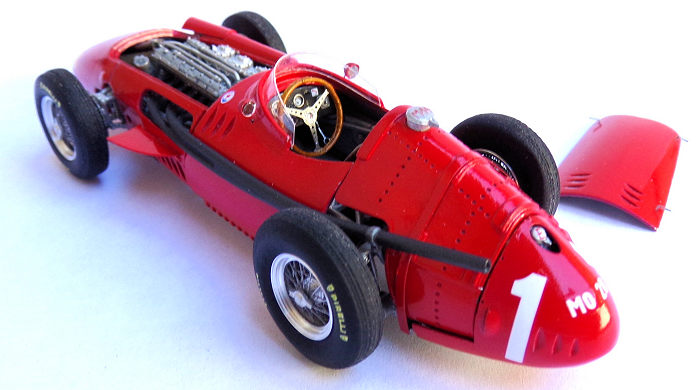
 Model
Factory Hiro's 1/43 Maserati 250F kit has 85 white metal parts, 12 turned
aluminum parts, 72 photo-etched parts, 4 rubber tires, 3x3D printed parts, a
vacu-formed windshield, a small sheet of waterslide decals, and 2 x 4 inch
lengths of .4 mm steel rods. The 4 page color instructions provide 9 illustrated
assembly steps along with a painting and decal placement guide. The instructions
stress the importance of test fitting the parts before gluing and note that the
suggested lengths to cut the provided steel rods may need adjustment as assembly
progresses. The decals provide markings for Fangio's 1957 French and German
Grand Prix winners. All of the parts are packaged in sealed plastic bags with
the exception of the 3D printed parts which come in a small, clear, plastic,
box.
Model
Factory Hiro's 1/43 Maserati 250F kit has 85 white metal parts, 12 turned
aluminum parts, 72 photo-etched parts, 4 rubber tires, 3x3D printed parts, a
vacu-formed windshield, a small sheet of waterslide decals, and 2 x 4 inch
lengths of .4 mm steel rods. The 4 page color instructions provide 9 illustrated
assembly steps along with a painting and decal placement guide. The instructions
stress the importance of test fitting the parts before gluing and note that the
suggested lengths to cut the provided steel rods may need adjustment as assembly
progresses. The decals provide markings for Fangio's 1957 French and German
Grand Prix winners. All of the parts are packaged in sealed plastic bags with
the exception of the 3D printed parts which come in a small, clear, plastic,
box.
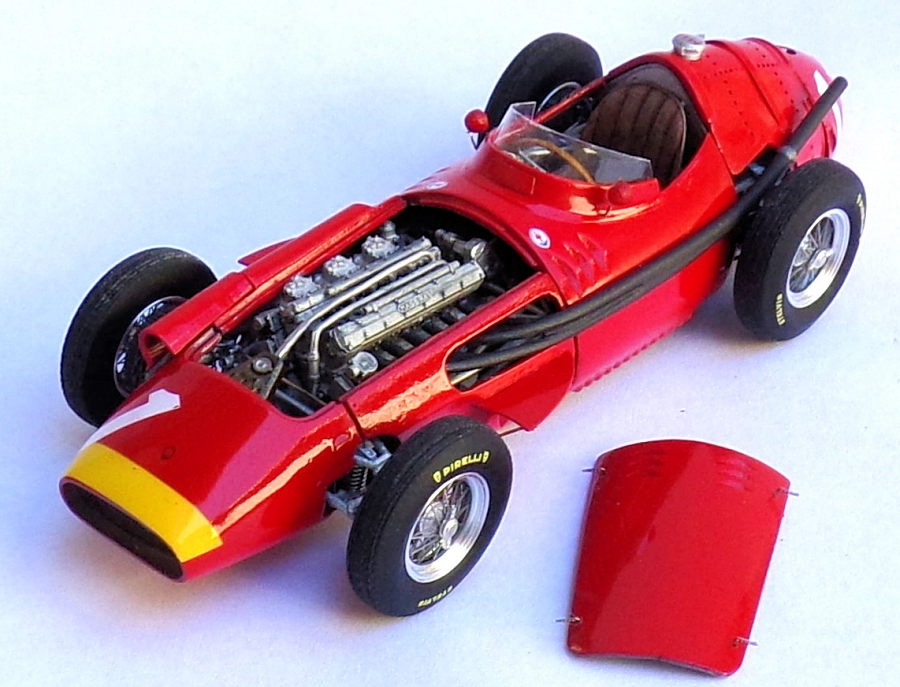
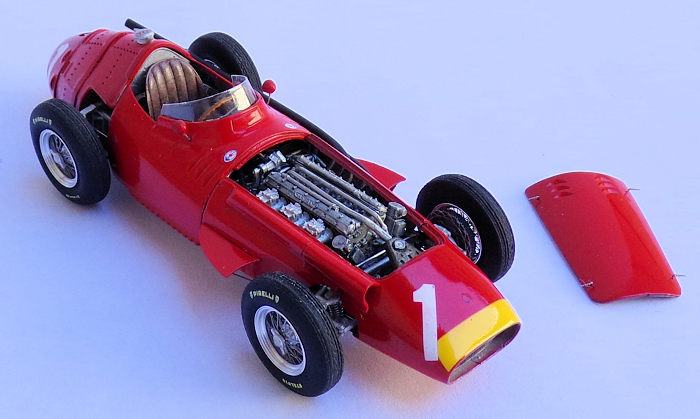
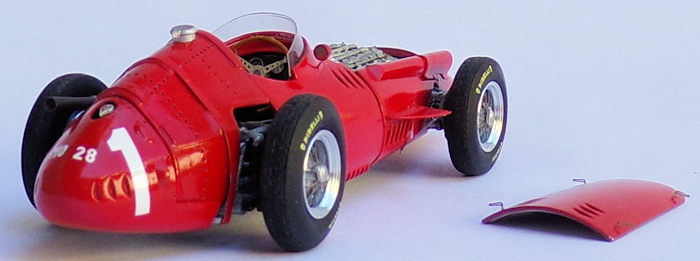
| CONSTRUCTION |
 After
cleaning up the mold separation lines on the white metal parts, I drilled out
all of the holes for the pin and socket attachments. I then test fitted all of
the joins of the white metal parts. Some holes needed to be drilled out further
and some parts needed to be slightly bent to facilitate better fits. The first
step in the assembly process is for assembling the transaxle and attaching it,
the driveshaft, the driveshaft tunnel, and the foot pedals to the chassis pan.
The second assembly step involves joining the upper and side sections of the
front and rear chassis to the firewall and chassis pan and constructing the
shifter assembly. The next step is for building the rear suspension, building
the steering box, and attaching the fuel tanks to the upper and lower sides of
the chassis that are adjacent to the cockpit. This assembly step also recommends
assembling the rest of the cockpit and attaching the brake drums, but I held off
on all but building and installing the dashboard until later in construction
process. The dashboard has a white metal back, a photo-etched face, photo-etched
gauge bezels and switch panels, and decal gauges. I painted the dashboard face
flat black and put a drop of white glue on all of the gauge faces to simulate
glass. In the next step, I attached the rows of louvers to both sides of the
part of the body that surrounded the cockpit. The louvers were a poor fit and
required a lot of filling and sanding. With the cockpit surround part assembled,
painted, and decaled, I tried to slide it over the front of the chassis and into
position. It would not clear the dashboard. I filed the top of the dashboard and
gently bent the cockpit surround out until it finally snapped into place. The
instructions recommended installing the windshield and rear view mirrors at this
point, but I held off until the model was closer to completion. In step five I
assembled the engine and installed it and some of the ancillary hoses in the
engine bay. I had to file about 1/16” off of the forward end of the crankshaft
to get the engine into position. The next step was for assembling the fuel and
oil tanks and installing them on the rear chassis. The fuel tank has a retaining
strap around its exterior. The strap is provided in the kit as a long and thin
photo-etched piece. Getting this piece bent into shape
After
cleaning up the mold separation lines on the white metal parts, I drilled out
all of the holes for the pin and socket attachments. I then test fitted all of
the joins of the white metal parts. Some holes needed to be drilled out further
and some parts needed to be slightly bent to facilitate better fits. The first
step in the assembly process is for assembling the transaxle and attaching it,
the driveshaft, the driveshaft tunnel, and the foot pedals to the chassis pan.
The second assembly step involves joining the upper and side sections of the
front and rear chassis to the firewall and chassis pan and constructing the
shifter assembly. The next step is for building the rear suspension, building
the steering box, and attaching the fuel tanks to the upper and lower sides of
the chassis that are adjacent to the cockpit. This assembly step also recommends
assembling the rest of the cockpit and attaching the brake drums, but I held off
on all but building and installing the dashboard until later in construction
process. The dashboard has a white metal back, a photo-etched face, photo-etched
gauge bezels and switch panels, and decal gauges. I painted the dashboard face
flat black and put a drop of white glue on all of the gauge faces to simulate
glass. In the next step, I attached the rows of louvers to both sides of the
part of the body that surrounded the cockpit. The louvers were a poor fit and
required a lot of filling and sanding. With the cockpit surround part assembled,
painted, and decaled, I tried to slide it over the front of the chassis and into
position. It would not clear the dashboard. I filed the top of the dashboard and
gently bent the cockpit surround out until it finally snapped into place. The
instructions recommended installing the windshield and rear view mirrors at this
point, but I held off until the model was closer to completion. In step five I
assembled the engine and installed it and some of the ancillary hoses in the
engine bay. I had to file about 1/16” off of the forward end of the crankshaft
to get the engine into position. The next step was for assembling the fuel and
oil tanks and installing them on the rear chassis. The fuel tank has a retaining
strap around its exterior. The strap is provided in the kit as a long and thin
photo-etched piece. Getting this piece bent into shape
 and
attached was an exercise in frustration and I considered replacing it with a
strip of tape, but I persevered and managed to make the photo-etched part work.
This step also covers the beginning of the front suspension assembly. Step seven
sees the front suspension assembly completed, the rest of the engine's ancillary
hoses attached, and the radiator and oil cooler assemblies completed and
installed. In step eight the carburetors, intake trumpets, and the plenum
chamber were attached to the engine. With the engine complete, the cowl side
panels, the stone guards, and the exhaust pipe were glued in place, Attaching
the brake drums to the stub axles completed this step. Each wire wheel assembly
had six layers of photo-etched spokes, three turned aluminum rims, a turned
aluminum hub, and a white metal knock off lug nut. Despite sounding very
complex, I assembled all four wheels in about half an hour and slid the tires
over the rims. Once the tires/wheels were attached to the brake drums, I glued
the grill inside the nose intake, and then attached it, the tail fairing, and
the air scoop into their positions. I finished this step by gluing the four
photo-etched hood/bonnet hooks into pre-drilled holes at each corner of the
hood. I completed construction of the model by assembling the steering wheel and
attaching it to the steering column, attaching the windshield, gluing the seat
to its mounting bracket, and attaching the rear view mirrors to their positions
on both sides of the cockpit opening.
and
attached was an exercise in frustration and I considered replacing it with a
strip of tape, but I persevered and managed to make the photo-etched part work.
This step also covers the beginning of the front suspension assembly. Step seven
sees the front suspension assembly completed, the rest of the engine's ancillary
hoses attached, and the radiator and oil cooler assemblies completed and
installed. In step eight the carburetors, intake trumpets, and the plenum
chamber were attached to the engine. With the engine complete, the cowl side
panels, the stone guards, and the exhaust pipe were glued in place, Attaching
the brake drums to the stub axles completed this step. Each wire wheel assembly
had six layers of photo-etched spokes, three turned aluminum rims, a turned
aluminum hub, and a white metal knock off lug nut. Despite sounding very
complex, I assembled all four wheels in about half an hour and slid the tires
over the rims. Once the tires/wheels were attached to the brake drums, I glued
the grill inside the nose intake, and then attached it, the tail fairing, and
the air scoop into their positions. I finished this step by gluing the four
photo-etched hood/bonnet hooks into pre-drilled holes at each corner of the
hood. I completed construction of the model by assembling the steering wheel and
attaching it to the steering column, attaching the windshield, gluing the seat
to its mounting bracket, and attaching the rear view mirrors to their positions
on both sides of the cockpit opening.
| COLORS & MARKINGS |
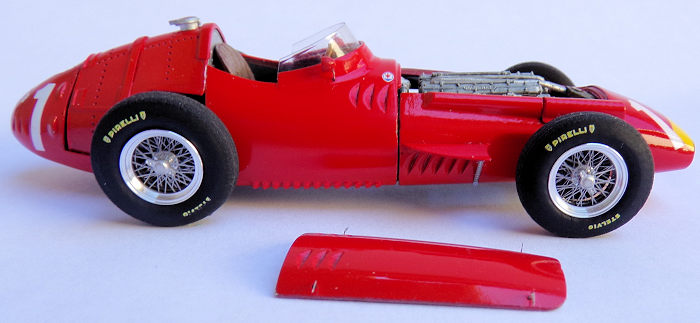 I chose to
use the kit's decal option for Fangio's 1957 German Grand Prix winner. In 1957
Formula One race cars were usually painted in the designated racing colors of
the car manufacturer's national origin. Maserati was an Italian manufacturer and
Italy's national racing color is red. I believe the yellow band on the nose was
a concession to Fangio's Argentine nationality. The yellow band is provided as a
decal. I primed the body parts with a coat of Rustoleum self etching primer
followed by a coat of Tamiya Gray Surface Primer. I lightly sanded the primer
with a 3200 grit micromesh cloth and then applied a couple of coats of Tamiya
LP-7 Pure Red Lacquer. I applied the decals directly onto the red lacquer. The
decals went on without any issues and, when they were dry, I applied a wet coat
of Tamiya TS-13 Clear lacquer straight out of the spray can. I've seen photos of
1950s Formula 1 race cars sporting paint and body work that would have
embarrassed Earl Scheib. Given that, I think the glossy finish on my model is
not very representative. I considered reducing the gloss and even adding some
weathering, but in the end, I decided to leave well enough alone.
I chose to
use the kit's decal option for Fangio's 1957 German Grand Prix winner. In 1957
Formula One race cars were usually painted in the designated racing colors of
the car manufacturer's national origin. Maserati was an Italian manufacturer and
Italy's national racing color is red. I believe the yellow band on the nose was
a concession to Fangio's Argentine nationality. The yellow band is provided as a
decal. I primed the body parts with a coat of Rustoleum self etching primer
followed by a coat of Tamiya Gray Surface Primer. I lightly sanded the primer
with a 3200 grit micromesh cloth and then applied a couple of coats of Tamiya
LP-7 Pure Red Lacquer. I applied the decals directly onto the red lacquer. The
decals went on without any issues and, when they were dry, I applied a wet coat
of Tamiya TS-13 Clear lacquer straight out of the spray can. I've seen photos of
1950s Formula 1 race cars sporting paint and body work that would have
embarrassed Earl Scheib. Given that, I think the glossy finish on my model is
not very representative. I considered reducing the gloss and even adding some
weathering, but in the end, I decided to leave well enough alone.
| CONCLUSIONS |
I had long wanted to add a model of the iconic Maserati 250F to my 1/43 race car collection and had been hoarding this kit for just that purpose. This was only the second Model Factory Hiro kit that I have built and I spent a lot of time preparing and test fitting the parts. I think that effort paid off because this model was much easier to build than the first Model Factory kit that I built. My only regret about the model is that the finish is not as representative as I would like. Recommended to experienced modelers only due to the high parts count, mixed media parts, and need to make parts fit.
10 April 2026
Copyright ModelingMadness.com. All rights reserved. No reproduction in part or in whole without express permission.
If you would like your product reviewed fairly and fairly quickly, please contact the editor or see other details in the Note to Contributors.