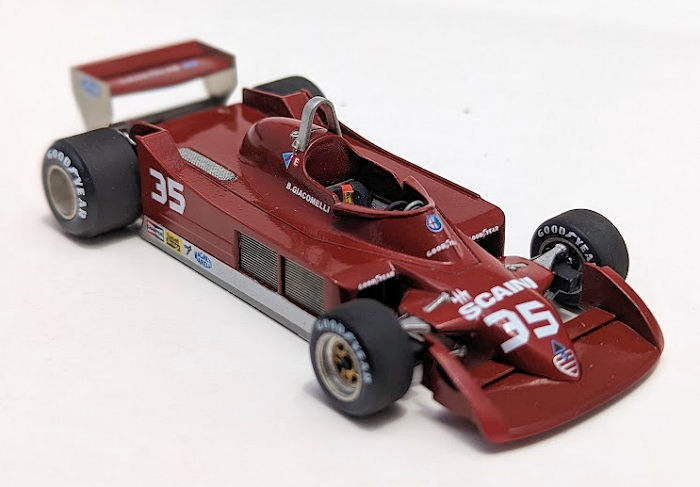
Tameo 1/43 Alfa Romeo 177
| KIT #: | SLK 125 |
| PRICE: | $35.00 'used' |
| DECALS: | One option |
| REVIEWER: | Rob Hart |
| NOTES: |
| HISTORY |
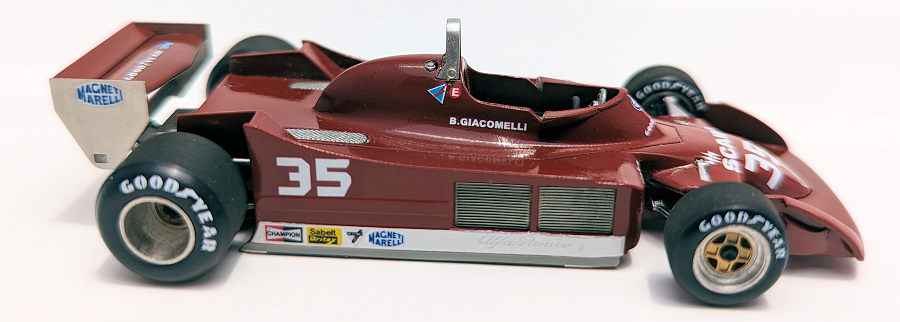
 The Alfa
Romeo 177 was a Formula One race car used by the factory Alfa Romeo team in the
1979 Formula One season. It marked Alfa Romeo's return to Formula one racing
after a 28 year hiatus. The car was used by Italian drivers Bruno Giacomelli and
Vittorio Brambilla in only three races during 1979, with the latter driver
recording the types best finish of 12th
in the Italian Grand Prix before it was supplanted by the Alfa Romeo 179.
The Alfa
Romeo 177 was a Formula One race car used by the factory Alfa Romeo team in the
1979 Formula One season. It marked Alfa Romeo's return to Formula one racing
after a 28 year hiatus. The car was used by Italian drivers Bruno Giacomelli and
Vittorio Brambilla in only three races during 1979, with the latter driver
recording the types best finish of 12th
in the Italian Grand Prix before it was supplanted by the Alfa Romeo 179.
The cars were powered by three liter flat 12 engines that were derived from those used in Alfa Romeo's racing sports cars. Although the engine was more powerful than the Cosworth DFVs used by most of it's competitors, it consumed more fuel and oil, was heavier, and was more difficult to work on due to significant dimensional differences between units. Under a somewhat bulky body, the 177 featured a riveted aluminum chassis, with front suspension by upper rocking arms, lower wishbones, and inboard-mounted coil springs. The rear suspension featured parallel lower links, single top links, twin radius rods, and outboard coil springs.
| THE KIT |
 The kit is
from Tameo's “SilverLine”. These kits are typically “curbside” with reduced
engine and chassis detail. They are also less expensive and somewhat easier to
build than the kits in Tameo's full detail line. This kit has 75 white metal
parts, 21 photo-etched parts, four rubber tires, two metal springs, a metal
screw, a short length of soft metal wire, and a hemispherical clear red lens.
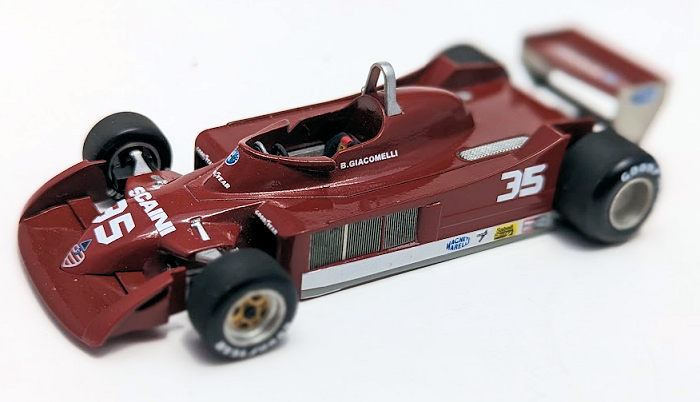
The water slide decals feature markings for Bruno Giacomelli's entry into the
1979 Belgian Grand Prix. The decals also include the faces for the instrument
panel gauges and an Alfa Romeo logo for the center of the steering wheel. Some
nice touches that I have not seen in other kits were the “Goodyear” lettering
pre-printed on the tire sidewalls and the contact surfaces of the tires
pre-scuffed to simulate wear.
The kit is
from Tameo's “SilverLine”. These kits are typically “curbside” with reduced
engine and chassis detail. They are also less expensive and somewhat easier to
build than the kits in Tameo's full detail line. This kit has 75 white metal
parts, 21 photo-etched parts, four rubber tires, two metal springs, a metal
screw, a short length of soft metal wire, and a hemispherical clear red lens.
The water slide decals feature markings for Bruno Giacomelli's entry into the
1979 Belgian Grand Prix. The decals also include the faces for the instrument
panel gauges and an Alfa Romeo logo for the center of the steering wheel. Some
nice touches that I have not seen in other kits were the “Goodyear” lettering
pre-printed on the tire sidewalls and the contact surfaces of the tires
pre-scuffed to simulate wear.
| CONSTRUCTION |
I began construction by
drilling out all of the locating holes where parts would be attached. I like for
these to be slightly larger than the pins going into them to allow for alignment
adjustments. I then cleaned up the castings for the front and rear wings and the
body with sandpaper and files. The few pinholes and mold imperfections were
filled with thin superglue and sanded smooth. The parts were then given an
airbrushed coat of Rustoleum self etching primer that had been decanted from a
spray can. I gave the self etching primer a light sanding with a 3200 grit micro
mesh cloth and applied a coat of Tamiya gray surface primer. I repeated the
micro mesh light sanding process on the Tamiya primer. My original plan was to
use ScaleFinishes' Alfa Romeo Red enamel as the final color coat on the body
.nose, and rear wing, but after spraying a coat and letting it cure for a few
days, the paint was still tacky enough to leave fingerprints when I touched it.
I stripped the paint off with lacquer thinner, applied new primer coats, and
sprayed a couple of color coats mixed from 1 x Tamiya LP1 Black and 19x Tamiya
LP21 Italian Red. I left these parts for the paint to dry and assembled the
cockpit. The dashboard has recesses where the gauge decals are to be applied. Af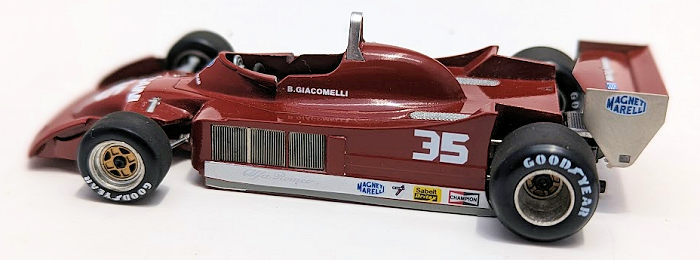 ter
the decals had dried, I added photo-etched bezels around the gauges and placed
drops of white glue on top of each gauge face to simulate glass/plexiglass
covers. I replaced the kit's photo-etched seat belts with aftermarket
photo-etched buckles/hardware and belts made from red masking tape. After
attaching the shifter to the right side of the cockpit tub, I glued a set of
photo-etched aftermarket gas, clutch, and brake pedals to the cockpit floor.
ter
the decals had dried, I added photo-etched bezels around the gauges and placed
drops of white glue on top of each gauge face to simulate glass/plexiglass
covers. I replaced the kit's photo-etched seat belts with aftermarket
photo-etched buckles/hardware and belts made from red masking tape. After
attaching the shifter to the right side of the cockpit tub, I glued a set of
photo-etched aftermarket gas, clutch, and brake pedals to the cockpit floor.
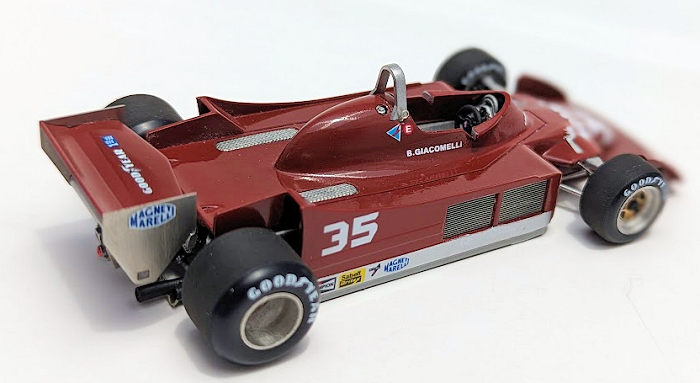
With the cockpit more or less complete, I started working on the rear suspension/engine/transaxle sub-assembly. I attached the cam covers to the cylinder heads of the engine and joined the one piece lower radius rods/track bar part to the underside of the engine/transaxle. A bulkhead separating the cockpit from the engine compartment was then glued in place. This bulkhead also provides the mounting points for the forward ends of the upper radius rods. Next to go in place was a cross brace that provides the upper mounting points for the shock absorbers/dampers. The ends of the shocks are then attached to this part and to flanges on the the lower radius rods. The next sub-assembly was a “three handed” operation that required the inner ends of the half shafts to be attached to the outer sides of the brake rotors/calipers while the outer ends of the half shafts are attached to the uprights. With the half shafts,rotors, and uprights all joined to each other, the inside faces of the rotors were glued to each side of the transaxle. Then, the aft ends of the upper and lower radius rods are attached to the uprights. Alignment is critical here to ensure that all four wheels touch the ground while pointing in the same direction. The exhaust pipes along with their photo-etched mounting bracket were glued to the engine and transaxle respectively. Two short hoses running from the transaxle to the transaxle cooler were formed from the soft metal wire provided in the kit and then the hoses and cooler were attached to the bottom of the transaxle. The three piece upper track rod was assembled and then it and two photo-etched links were attached to the uprights. The oil cooler was attached to the top center of the transaxle and two hoses were made from lengths of Pro-Tech .025 braided steel line and run from the oil cooler across the top of the engine (the forward ends of the hoses would not be visible on the finished model so they were left unattached). The rear suspension/engine/transaxle/sub-assembly was completed by attaching two small brackets to each side of the rear most end of the transaxle and gluing the clear red tail light lens between the brackets.
 The kit
decals went on without any failures or drama. They looked a bit on the thick
side, but conformed to the body's compound curves very nicely and showed no
evidence of silvering. Applying decals is one of my least favorite modeling
tasks and any time I can get the decals on without some minor disaster occurring
is a free pass in my books. I sealed the decals with a few coats of Mr Color
gloss clear lacquer and polished the clear coat successively with Tamiya coarse,
fine, and super fine polishes. Note: The “Goodyear” decal on the top of the rear
wing's center section should have been placed on the upturned “duck tail” area
instead of the horizontal section where I put it.
The kit
decals went on without any failures or drama. They looked a bit on the thick
side, but conformed to the body's compound curves very nicely and showed no
evidence of silvering. Applying decals is one of my least favorite modeling
tasks and any time I can get the decals on without some minor disaster occurring
is a free pass in my books. I sealed the decals with a few coats of Mr Color
gloss clear lacquer and polished the clear coat successively with Tamiya coarse,
fine, and super fine polishes. Note: The “Goodyear” decal on the top of the rear
wing's center section should have been placed on the upturned “duck tail” area
instead of the horizontal section where I put it.
The body and chassis were then joined while trapping the cockpit tub between them. A metal screw inserted through a hole in the base plate and into a tower on the underside of the body holds the whole thing together. The rear wing was constructed from a white metal center section, two photo-etched end plates, and a white metal cross brace. Once assembled, the wing was attached to the top of the transaxle
The front suspension was constructed from upper and lower wishbones, spindles that incorporated the front brake ducts, brake rotors/calipers, and steering arms that were made from 6 mm lengths of .04 mm steel pins. Then the front suspension and front wing/nose piece were attached to the body. The final sub-assembly to be constructed was the wheels/tires. After painting the center section of the wheels gold, photo-etched bead lock rings, and white metal center locking nuts were glued to the wheels. The tires were then slid onto the completed wheels and the wheels/tires were attached to the spindles.
| CONCLUSIONS |
This Tameo 1/43 Alfa Romeo 177 build turned out to be a pleasant and problem free experience. Aside from the issue with the ScaleFinishes paint, everything went according to plan. I'm reluctant to blame the paint as there are so many variables that can effect paint performance (with human error being the most prominent). Tameo has a huge catalog of high quality and builder friendly1/43 race car kits. I recommend this kit to anyone with an interest in small scale race car models.
27 June
Copyright ModelingMadness.com. All rights
reserved. No reproduction in part or in whole without express permission from
the editor.
Review kit courtesy of my wallet If you would like your product reviewed fairly and fairly quickly, please contact the editor
or see other details in the
Note to
Contributors. Back to the Main Page
Back to the Review
Index Page
Back to the Previews Index Page