Revell 1/24 1970 Plymouth Road Runner
| KIT #: | 14531 |
| PRICE: | $35.00 |
| DECALS: | One livery |
| REVIEWER: | Blair Stewart |
| NOTES: | Molded-in chassis and engine bay details. Optional engine parts and wheels. |
| HISTORY |
The Plymouth Road Runner is a mid-sized performance car built by Plymouth in the United States between 1968 and 1980. By 1968, some of the original muscle cars were moving away from their roots as relatively cheap, fast cars as they gained features and higher prices. Plymouth developed the Road Runner to market a lower-priced, basic trim model of its upscale GTX.
Plymouth paid $50,000 to Warner Bros.-Seven Arts to use the Road Runner name and likeness from their Wile E. Coyote and the Road Runner cartoons (as well as a "beep, beep" horn, which Plymouth paid $10,000 to develop). The Road Runner was based on the Chrysler B platform (the same as the Belvedere and Satellite), as a back-to-basics mid-size performance car.
 The earliest
of the 1968 models were available only as 2-door pillared coupes (with
a B-pillar or "post" between the front and rear windows), but later in the model
year, a 2-door "hardtop" model (sans pillar) was offered. The Road Runner of
1968-1970 was based on the Belvedere, while the GTX was based on the Sport
Satellite, a car with higher-level trim and slight differences in the grilles
and taillights.
The earliest
of the 1968 models were available only as 2-door pillared coupes (with
a B-pillar or "post" between the front and rear windows), but later in the model
year, a 2-door "hardtop" model (sans pillar) was offered. The Road Runner of
1968-1970 was based on the Belvedere, while the GTX was based on the Sport
Satellite, a car with higher-level trim and slight differences in the grilles
and taillights.
The interior was spartan with a basic vinyl bench seat, lacking even carpets in early models. Few options were available, such as: power steering and front disc brakes; AM radio; air conditioning (except with the 426 Hemi); and automatic transmission. A floor-mounted shifter for the four-speed manual transmission featured only a rubber boot and no console so that a bench seat could be used.
The 1969 model kept the same basic look, but with slight changes to the taillights and grille, side marker lights, optional bucket seats, and new Road Runner decals. Plymouth added a convertible option for 1969 with 2,128 produced that year. All were 383 cu in (6.3 L) engine cars, except for ten that were equipped with a 426 cu in (7.0 L) Hemi.
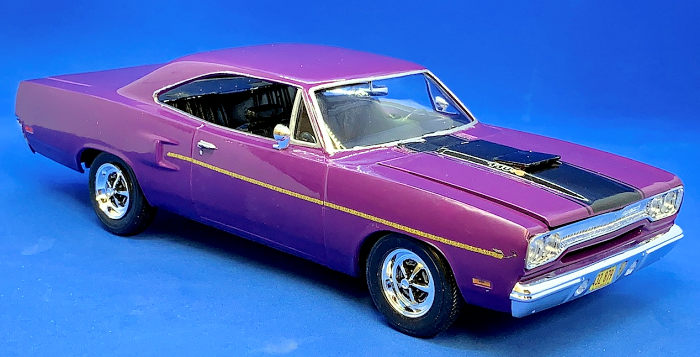
The 440-wedge engine option with 3x2 barrel Holley carburetors was added to the lineup at mid-year. The "440 Six Pack" had no wheel covers or hubcaps - only the 15x6" "H" stamped steel black wheels with chrome lug nuts. It featured a black fiberglass lift-off hood with 4 hood pins and a large functional hood scoop with a red sticker on each side saying "440-6".
 The 1970
model year brought new front and rear end looks to the basic 1968 body, and it
would prove to be another success. Updates included a new grille, cloth and
vinyl bench seat, hood, front fenders, quarter panels, single-piston
Kelsey-Hayes disc brakes (improved from the rather small-rotor Bendix 4 piston
calipers of '68 - '69), and even non-functional scoops in the rear quarters. The
design and functionality of the Air Grabber option was changed. A switch below
the dash actuated a vacuum servo to slowly raise the forward-facing scoop. "High
Impact" colors, with names like In-Violet, Moulin Rouge, and Vitamin C, were
available for that year. Although a heavy-duty three-speed manual became the
standard transmission, the engine lineup was left unchanged, relegating the
four-speed to the options list along with the TorqueFlite automatic
transmission. This was the second and last year of the Road Runner convertible,
with only 834 made. The new high-back bucket seats were shared with other
Chrysler products, which featured built-in headrests.
The 1970
model year brought new front and rear end looks to the basic 1968 body, and it
would prove to be another success. Updates included a new grille, cloth and
vinyl bench seat, hood, front fenders, quarter panels, single-piston
Kelsey-Hayes disc brakes (improved from the rather small-rotor Bendix 4 piston
calipers of '68 - '69), and even non-functional scoops in the rear quarters. The
design and functionality of the Air Grabber option was changed. A switch below
the dash actuated a vacuum servo to slowly raise the forward-facing scoop. "High
Impact" colors, with names like In-Violet, Moulin Rouge, and Vitamin C, were
available for that year. Although a heavy-duty three-speed manual became the
standard transmission, the engine lineup was left unchanged, relegating the
four-speed to the options list along with the TorqueFlite automatic
transmission. This was the second and last year of the Road Runner convertible,
with only 834 made. The new high-back bucket seats were shared with other
Chrysler products, which featured built-in headrests.
The 440 Six Barrel remained an option for 1970. A factory-produced cast iron piece replaced the 1969 Edelbrock aluminum intake; however, some early cars built before January 1, 1970, were equipped with the left-over aluminum Edelbrock intake from the year prior.
Today, restored or stock 1968-70 Road Runners in good shape bring decent prices on the collectible car market.
| THE KIT |
I have been watching a TV program that exclusively restores Mopar muscle cars from the sixties and seventies, so I have been interested in building a model of one of these. Revell first released this 1970 Road Runner kit in 2000 and updated it in 2022 (this version). The kit can be traced back to Monogram’s 1970 Plymouth GTX released in 1982. The current Revell version has new box art and an updated decal sheet. The 440 engine has a molded-on starter and is split down the middle, leaving a seam that one must deal with. The front seat is a bench seat, which was standard in most Road Runners. The kit includes both factory-stock Magnum 500 wheels and a set of chromed factory steel wheels (which were painted black on the real car).
 The somewhat
stark engine bay has a molded battery, a radiator overflow tank, a windshield
washer tank, and wires and hoses. The battery and windshield washer tank have no
break line to distinguish them as separate from the inner fenders.
The somewhat
stark engine bay has a molded battery, a radiator overflow tank, a windshield
washer tank, and wires and hoses. The battery and windshield washer tank have no
break line to distinguish them as separate from the inner fenders.
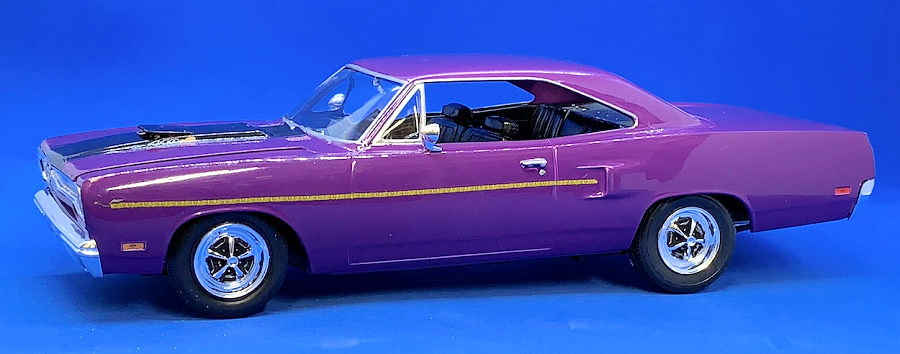
The body is very well molded and looks authentic. It has molded-in wheel-well trim - which on the real vehicle would be chromed. I think this was standard on the GTX but was an option on the Road Runner (I could only find a few pictures of 1970 Road Runners with these chrome wheel-well accents). In hindsight, I should have sanded these off for the more common 1970 Road Runner look I was after, but, alas, I didn’t think of this until I had painted the body, and I just didn’t have the gusto to paint them silver when I was finishing the kit.
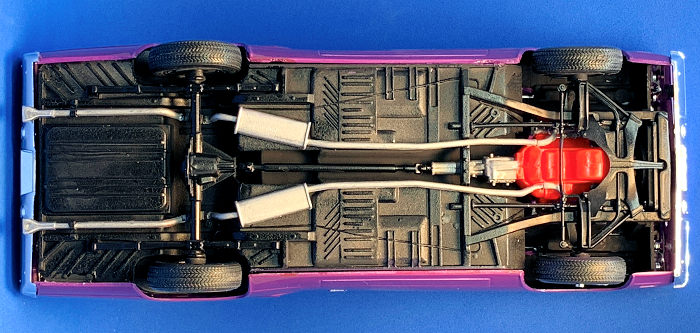
The chassis is relatively simple, typical of eighties model cars. Both the front and rear suspensions are molded as single parts with all the surrounding components attached. This makes them easy to assemble but makes detail painting more difficult.
| CONSTRUCTION |
Like most model car kits, assembly begins with the engine. After completing the assembly, I painted it with Model Masters Chevrolet Engine Orange and set it aside to dry (Mopar enthusiasts will probably have a coronary, but the Chevy red seems to me to match very well with the Mopar 440 engine color). Once dried, I hand-painted exhaust manifolds with Testors Aluminum, the carburetor with Testors Brass, and the oil filter holder, fan, and starter motor with Testors Gloss Black. Finally, I painted the fan/alternator belt with hobby acrylic flat black. I added detail in the form of a solder fuel line to the carburetor and small diameter wire for things like the air cleaner breather tube. I then added the distinctive three-carburetor air cleaner and detailed it with flat black and white paint. I attached the 440 6-pack decal to the cleaner. A minor drawback to the kit is that the molded-in large rubber seal that fits around the base of the air cleaner and seals to the underside of the hood is not very representative of that on the real car.
 For a
distributor, I cut a small length of brass tubing and then glued 9 blue
insulated wires – 8 for the sparkplugs and one for the coil – inside the tube (I
decided the blue wires looked like they represented cool after-market plug
wires). This is a quicker way to simulate a distributor than drilling holes in
the kit-supplied part, and it looks pretty good once done. I then added a small
piece of plastic rod on the engine manifold to simulate a coil and ran one of
the wires to that. I drilled small holes in the sides of the block and attached
the sparkplug wires with superglue. I painted the distributor “cap” with khaki
flat acrylic to simulate the light brown color of Mopar distributor caps.
For a
distributor, I cut a small length of brass tubing and then glued 9 blue
insulated wires – 8 for the sparkplugs and one for the coil – inside the tube (I
decided the blue wires looked like they represented cool after-market plug
wires). This is a quicker way to simulate a distributor than drilling holes in
the kit-supplied part, and it looks pretty good once done. I then added a small
piece of plastic rod on the engine manifold to simulate a coil and ran one of
the wires to that. I drilled small holes in the sides of the block and attached
the sparkplug wires with superglue. I painted the distributor “cap” with khaki
flat acrylic to simulate the light brown color of Mopar distributor caps.
Next, I skipped to Step 9 and 10 and assembled the interior, starting with the dash and the front bench seat. Revell supplies small decals for the tach and speedometer, which I secured to the dash using a puddle of Pledge Revive It. I then installed the completed dash and front seat into the interior bucket, along with the side door panels. I attached the small interior parts, including the steering wheel, the floor pedals, and the pistol-grip shifter.
I then hand-painted the dashboard and instruments black and highlighted the chrome interior trim pieces with Testors Metallic Silver. I left the seats and dash glossy and brushed-coated the rest of the interior with Testors Dullcote to get rid of the shine.
 After
attaching the front and rear suspension assemblies, I painted the chassis with
Testors flat black. I assembled the stock wheels and tires and hand-painted the
mag inserts with flat black hobby store acrylic paint. I painted the exhaust
pipes and mufflers Testors Aluminum and the exhaust tips with Testors Metallic
Silver.
After
attaching the front and rear suspension assemblies, I painted the chassis with
Testors flat black. I assembled the stock wheels and tires and hand-painted the
mag inserts with flat black hobby store acrylic paint. I painted the exhaust
pipes and mufflers Testors Aluminum and the exhaust tips with Testors Metallic
Silver.
I installed the firewall on the body and glued the taillight assemblies and windshield/windows (all one piece) to the interior of the body. I followed that by securing the interior to the inside of the body.
Final assembly consisted of attaching the tires and wheels and gluing the chrome bumpers and front and rear grills to the body’s exterior. I then mounted the body to the completed chassis. I added wires in the engine bay to replicate heater hoses and battery cables.
Here I ran into a small problem. The rear body sits too high on the chassis, resulting in an exaggerated “nose-down” stance. To fix this, I decided to superglue some plastic spacers inside the rear wheel wells to hold the body down. I was able to alter this stance problem, but I still think the model has an incorrect nose-down stance.
| COLORS & MARKINGS |
The Revell box art depicts a Road Runner painted in Plymouth Lemon Twist Yellow, but I opted to go with a different high impact color – In Violet Purple. After looking at pictures of Road Runners on the web and searching available gloss purple paints, I decided that Krylon Colormaxx Gloss Rich Plum in a rattle can was a pretty good match.
 I prepped
the body with Krylon Ultra Cover Flat White Primer from a spray can. I
wet-sanded the primer with 1500-8000 grit sanding pads. Once the primer coat was
ready, I sprayed the exterior body and hood with the Krylon Rich Plum and set
them aside to dry. In my opinion, the gloss from this paint was good enough to
not warrant a clear gloss coat, which would only thicken the paint coat on the
model.
I prepped
the body with Krylon Ultra Cover Flat White Primer from a spray can. I
wet-sanded the primer with 1500-8000 grit sanding pads. Once the primer coat was
ready, I sprayed the exterior body and hood with the Krylon Rich Plum and set
them aside to dry. In my opinion, the gloss from this paint was good enough to
not warrant a clear gloss coat, which would only thicken the paint coat on the
model.
Once this gloss coat dried, I color (wet) sanded the body using 4000-12000 grit sanding pads. I then waxed the body using “The Treatment” model wax. I masked the window trim and hand-painted it with Testors metallic silver, but this had poor results (in the past, I have tried to use Bare Metal foil with very mixed results, although I have seen many models where this has been successfully applied). I was able to clean up the hand-painted trim by using a Q tip dipped in some paint thinner, but close examination will reveal my less than stellar hand-painting.
One nicely added touch is that Revell provides a silver decal for the chrome Plymouth name that appears on the rear grill, and this eliminates the need for hand or otherwise painting of this emblem.
| CONCLUSIONS |
Given its eighties origins, this is a nicely done kit. It looks like a Road Runner and captures that iconic seventies muscle car look that Plymouth and Dodge were so noted for during that era.
| REFERENCES |
“Plymouth Road Runner,” Wikipedia, Worldwide Web, April 2024.
“Chrysler 440 Engine Guide,” Muscle Car Club, Worldwide Web, April 2024.
Tyler Halliday, “Revell 1/24 Scale 1970 Plymouth Road Runner Plastic Model Kit Review,” Finescale Modeler, Worldwide Web, November 29, 2022.
13 May 2024
Copyright ModelingMadness.com. All rights reserved. No reproduction in part or in whole without express permission.
If you would like your product reviewed fairly and fairly quickly, please contact the editor or see other details in the Note to Contributors.