| KIT #: | 7668 |
| PRICE: | $30.00 |
| DECALS: | Two options |
| REVIEWER: | Blair Stewart |
| NOTES: | Great engine detail, complete undercarriage |
| HISTORY |
In the model year 1941, Chevrolet decided to completely redesign its pickup truck. The redesign included a “waterfall” front grille and headlamps that were faired into the fenders. Chevy also beefed up its reliable 216.5 cubic-inch six-cylinder engine with new combustion chambers and a higher compression ratio to produce a whopping 90 horsepower and 174 ft-lbs. of torque. The transmission was a three-speed manual. The half-ton pickup had a wheelbase of 116 inches with parallel leaf springs and solid front and rear axles. For cabin comfort, the truck featured a crank-out front windshield that would let air into the vehicle.
 World
War II interrupted the production of most US autos and pickups (for you
youngsters, the US rationed gas, rubber and aluminum during the war, so
beginning in January 1942, there was little to no driving of private autos and
trucks). After the war ended, Chevy continued production of the 1941 design in
1946 and kept it in production for the 1947 model year.
World
War II interrupted the production of most US autos and pickups (for you
youngsters, the US rationed gas, rubber and aluminum during the war, so
beginning in January 1942, there was little to no driving of private autos and
trucks). After the war ended, Chevy continued production of the 1941 design in
1946 and kept it in production for the 1947 model year.
Chevrolet was given permission by the government to produce trucks for "high priority" civilian use (i.e., for those individuals and businesses that the government considered to be vital to the war effort). Due to material shortages, these wartime trucks came with painted grilles, bumpers, hubcaps, and trim; the "blackout" theme continued with the resumption of civilian production in late 1945 and early 1946.
General Motors, Chevrolet’s parent company, also sold the Chevy “AK Series” truck as a “C Series” GMC vehicle. The only visual difference was the front grille: the Chevrolet had vertical bars, and the GMC had horizontal bars.
Auto enthusiasts consider the 1941 Chevrolet pickup a classic and collectors seek them out. Its combination of style, performance, and historical significance makes it a notable vehicle in Chevrolet's long history of truck manufacturing.
| THE KIT |
After having built several aircraft models, I was looking for a change, so I checked out my “collection” of unfinished kits. Among them I found this kit, which I had started several years ago and set aside in a moment of “advanced modeler’s syndrome” (AMS). Revell released this kit in 1999, during its era of boxes with the integral top with a picture of the “real thing” (I have never liked these boxes, and I believe I am not alone, as Revell discontinued them after a couple of years – plus the government regulations requiring the genuine article picture were ultimately dropped).
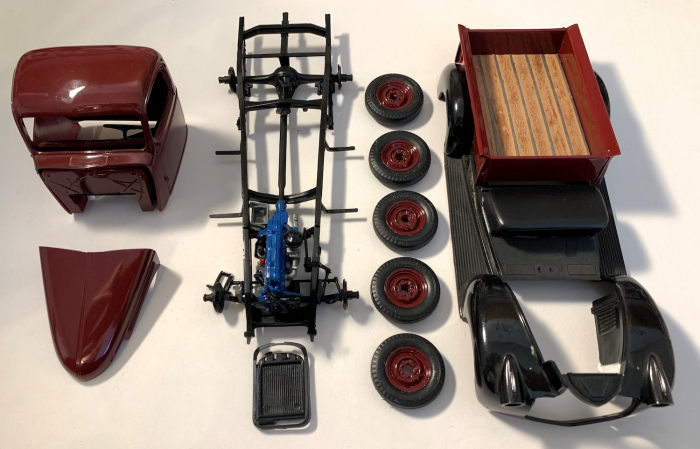
 The kit
consists of some 118 parts including vinyl tires, chrome-plated parts, and clear
and red plastic parts. The parts are nicely molded with virtually no flash and
excellent detail. The fenders, running boards, and cabin floorboard are molded
as one piece. The bed consists of 5 pieces including the nicely detailed, wooden
bed floor. The nice front and rear suspensions are built up with numerous parts
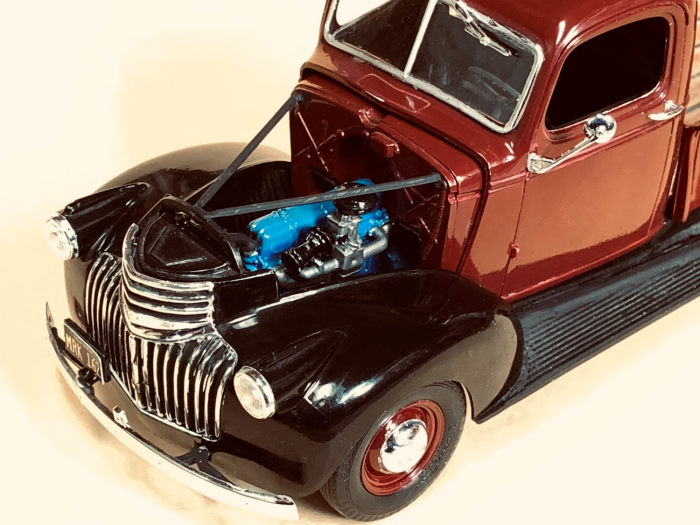
that are finely detailed. The Chevy 216 cubic inch, in-line six-cylinder engine
consists of 20 detailed parts. A nice detail touch is the handles that lift the
side-panels on the hood to access the engine without lifting the complete hood
(these were painted on the real car rather than being chrome-plated).
The kit
consists of some 118 parts including vinyl tires, chrome-plated parts, and clear
and red plastic parts. The parts are nicely molded with virtually no flash and
excellent detail. The fenders, running boards, and cabin floorboard are molded
as one piece. The bed consists of 5 pieces including the nicely detailed, wooden
bed floor. The nice front and rear suspensions are built up with numerous parts
that are finely detailed. The Chevy 216 cubic inch, in-line six-cylinder engine
consists of 20 detailed parts. A nice detail touch is the handles that lift the
side-panels on the hood to access the engine without lifting the complete hood
(these were painted on the real car rather than being chrome-plated).
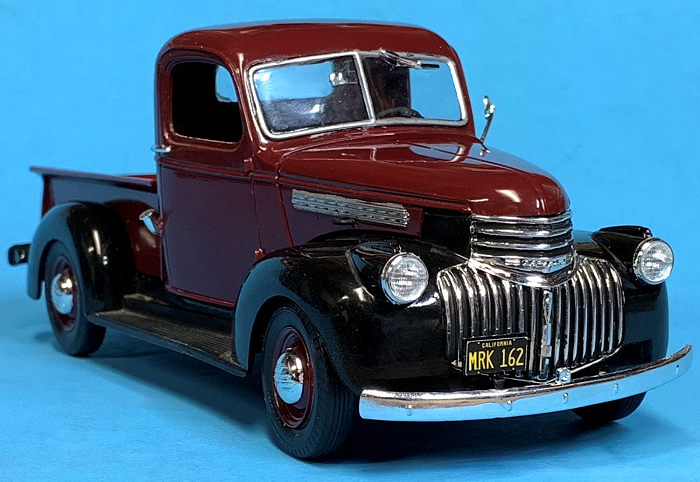
Chrome parts include the front grill, the headlight fairings, front and rear bumpers, hubcaps, driver’s side windshield wiper assembly, side and rearview mirrors, side-window cranks, and interior and exterior door handles.
The decal sheet contains logos for three different small businesses and five different front and rear license plates from Michigan and California. There are smaller decals for the Chevrolet label on the front grille as well as some markings for the engine. There is also a decal for the instrument panel with a choice of a black or silver background.
| CONSTRUCTION |
 Assembly
begins with construction of the nicely detailed engine, which includes the
exhaust manifold, carburetor and air cleaner, engine front cover, coil,
generator, starter, road draft tube, fuel pump, distributor, fan belt and fan. I
airbrushed the engine block with Testors Gloss Blue and then brush-painted the
various components with gloss black, gray and flat black hobby acrylic paints.
Assembly
begins with construction of the nicely detailed engine, which includes the
exhaust manifold, carburetor and air cleaner, engine front cover, coil,
generator, starter, road draft tube, fuel pump, distributor, fan belt and fan. I
airbrushed the engine block with Testors Gloss Blue and then brush-painted the
various components with gloss black, gray and flat black hobby acrylic paints.
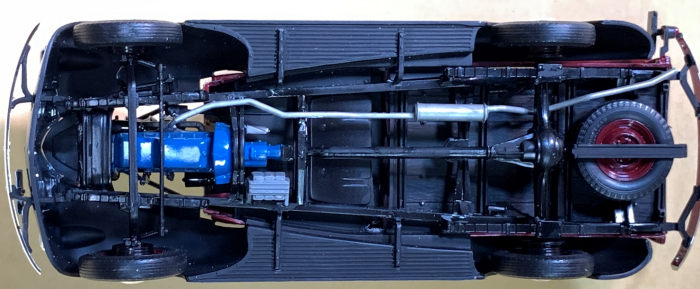
I then began building the front and rear suspension assemblies and attaching them to the frame. Once done, I airbrushed the whole assembly with Testors Flat Black. Once dry, I shot the frame assembly with some Testors to Glosscote lacquer to give it a satin finish. I painted the exhaust system with Testors Steel and mounted it to the frame assembly.
I mounted the engine to the frame and joined it to the rear differential via the included driveshaft. I painted the radiator shroud and radiator satin black and then mounted these on the frame and connected the radiator to the engine with the included upper and lower radiator hoses.
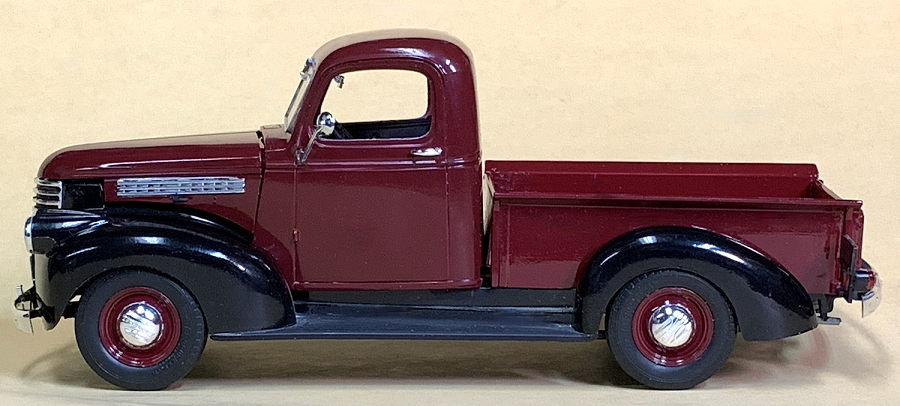
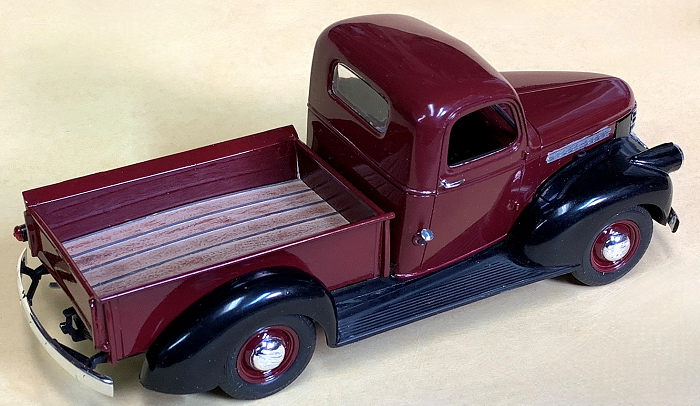
In Step 6, I assembled the front of the interior cab assembly and airbrushed it satin black. The directions called for the dash and firewall to be painted the body color, so I waited to attach these until after I had painted them with my chosen upper body color – Floquil Wisconsin Central Maroon. (Note: the 1941 Chevy pickup was offered in a two-tone paint scheme, with upper and lower body colors. In my case, I chose Maroon for the upper color and gloss black for the lower color – primarily, the fenders).
At this point, I skipped to Step 7 (fender assembly). I airbrushed the fender assembly with Testors Gloss Black. I painted the floorboard, seat bottom, seat base, and interior gas tank flat black and attached them to the fender assembly. I then painted the insides of the front fender assembly that form the engine compartment flat black.
 After
painting the bed assembly sides Wisconsin Central Maroon, I glued the four sides
together. For the bed floor, I brush-painted the bed wooden boards with light
tan and then streaked darker brown over the painted boards to simulate wood
grain. After the bed sides dried, I then glued the bed floor inside of the bed
(note: this was a very tight fit and probably could have been easier if I had
glued the painted sides to the bed floor instead of first gluing the bed sides
together. Oh well!).
After
painting the bed assembly sides Wisconsin Central Maroon, I glued the four sides
together. For the bed floor, I brush-painted the bed wooden boards with light
tan and then streaked darker brown over the painted boards to simulate wood
grain. After the bed sides dried, I then glued the bed floor inside of the bed
(note: this was a very tight fit and probably could have been easier if I had
glued the painted sides to the bed floor instead of first gluing the bed sides
together. Oh well!).
Another problem area I had was with the front and rear bumpers. The problem stems from the rather poor engineering (in my opinion) for how Revell calls for the bumper brackets to be mounted to the bumpers and then for the brackets to be mounted to the frame. First, to ensure good adhesion, one must scrape off the chrome from the bumpers and glue the brackets to the rear of each bumper. I had a hard time getting a good bond here using plastic cement - a problem I eventually remedied by using Super Glue - which is not the best glue to use with plastic, but given time, I was able to get good adhesion. Second, Revell’s process for attaching the brackets to the frame leaves a lot to be desired. Essentially, there are no plastic protrusions or pens to reinforce the points at which the brackets mate to the frame, thereby creating weak joints for both bumpers. Again, I finally solved this problem using super glue.
| COLORS & MARKINGS |
As I stated above, I had chosen a two-tone paint scheme using Testors Gloss Black and Floquil’s Wisconsin Central Maroon. Since I had already painted the fender assembly gloss black and the bed sides maroon, the only things remaining to be painted maroon were the cab, the hood, and the wheels.
 After
airbrushing these parts and letting them dry, I polished the gloss paint with
various sanding pads using grits ranging from 4000 to 12000. I achieved the
final gloss finish using Treatment Products model wax, which is a carnauba paste
wax (note: any carnauba car wax will work just as well).
After
airbrushing these parts and letting them dry, I polished the gloss paint with
various sanding pads using grits ranging from 4000 to 12000. I achieved the
final gloss finish using Treatment Products model wax, which is a carnauba paste
wax (note: any carnauba car wax will work just as well).
I glued the chrome parts to the cab and then started to attach the cab and bed to the frame and fender assembly. Here was my major problem: I couldn’t get the cab to sit correctly on the frame so that it would match up with the hood (the cab would sit too far back or wouldn’t go down far enough on the frame to make a proper fit). After trying several fixes – including shaving plastic off the cab floorboard – I finally got an alignment that was close enough (but still not correct). Again, I had to use superglue to hold the cab in the position I finally was able to achieve. Once the cab was attached, I laid the bed on the frame, and after some adjustments, was able to glue it down as well.
I left the hood unglued so I could display the engine. Finally, I had a very nice model of an iconic 1941 Chevy pickup!
| CONCLUSIONS |
I built my first car model – an AMT 1940 Ford Coupe – in about 1958. Like in all of scale modeling, car and truck models have come a long way in terms of detail and parts count since the fifties, and this Revell kit is no different. There are some fit issues, but It builds into a great representation of the real thing. If you are looking for a good, early years pickup model to build, you won’t go wrong with this one!
| REFERENCES |
“A Brief History of Chevrolet Pickups: 1941 to 1959,” Hotrod.com, World Wide Web, February 2026.
“Chevrolet AK Series,” Wikipedia, World Wide Web, February 2026.
“’41 Chevy Pickup,” Revell-Monogram, Morton Grove, Illinois,1999.
Blair
Stewart 19
February 2026 Copyright ModelingMadness.com. All rights reserved. No
reproduction in part or in whole without express permission from the editor. If you would like your product reviewed fairly and fairly quickly, please
contact
the editor
or see other details in the
Note to
Contributors.