
ICM 1/24 Ford Model T Fire Truck
| KIT #: | 24004 |
| PRICE: | 30€ |
| DECALS: | None |
| REVIEWER: | Frank Spahr |
| NOTES: | Hydrant By MAiM (Modern Armies in Miniature), #24184, @7.50 € |
| HISTORY |
There´s
surely very little new or original I can tell you about the iconic Ford Model T.
This rather simple car has the distinction of being the first truly
mass-produced and affordable car. In its production run that lasted from 1908
until 1927, a staggering 16.5 million were built. The impact of mass
motorization truly changed people´s way of life on virtually
 any level,
its radical consequences being what shapes a big part of our society and its
challenges today.
any level,
its radical consequences being what shapes a big part of our society and its
challenges today.
The Model T was the twentieth design by the Ford Motor Company, and its biggest success so far. Even though it was mass-produced in contrast to the more individual approach in the early years of motor car manufacturing, there were developments over the long production run, and some variants.
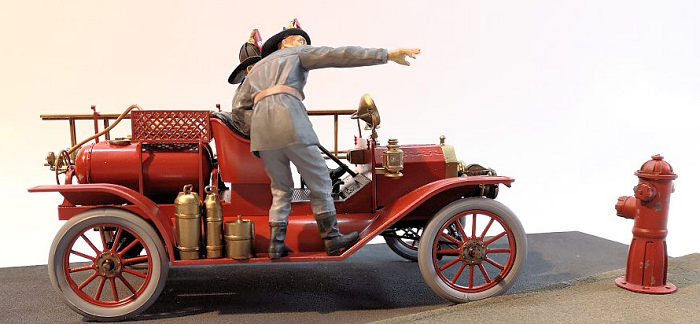
The American LaFrance Company modified about 900 Model T´s for firefighting use. These days, there are still some specimens extant, and from what I saw on TV, operating a Model T is seriously different from a modern car. But then, this is a design from more than a 100 years ago ...
| THE KIT |
ICM has issued nine variants of their 1:24 Model T kit. They cover the production years between 1911 and 1914, and different bodyworks. You can get a Roadster, a Touring, a Speedster, a delivery Van, and this firetruck. Like some of the other kits, the latter is available with or without two crew figures.
I discovered the kit during my annual browsing of the
small heap of catalogues the friendly people of IPMS Germany send me. This is a
ritual I am very fond of, and it renews my interest in modeling each year. I
normally build ship models, with
 the
occasional plane thrown in for good measure, but am not averse to something
completely different. Somehow that weird little vehicle, so different to the
hulking fire engines I am familiar with, caught my attention, and I decided to
give it a try.
the
occasional plane thrown in for good measure, but am not averse to something
completely different. Somehow that weird little vehicle, so different to the
hulking fire engines I am familiar with, caught my attention, and I decided to
give it a try.
I spent quite some time at this year´s Euro Model Expo browsing their quite mind-boggling heaps of kits for sale, and helped by a friend of mine, found this kit. So the delightful process of unpacking the box plus the sniffing and fondling of its contents was performed in congenial company, behind our show display.
The kit parts look neat and crisp in the box, and we are talking about a well-filled box here. There is one sprue with bodywork and cover out of which only two parts are needed for this version. The „gold-plated“ parts look toylike to me, and anyway you never get the seams or sprue attachment points painted to match the rest, so off the goldplating would have to go. The instructions are mostly clear, yet not without ambiguity in some areas. Colour callouts are Revell and Tamiya, and mostly correctly listed in the instructions. I found one or two points where the instructions and the boxart (and photo of the completed model) were not in accordance. There are no decals or raised marking for the lettering „NYFD“ on the crew figures´ helmets, and no dial faces for the manometers on the tanks. But all that is really minor, and the kit looked good to me.
| CONSTRUCTION |
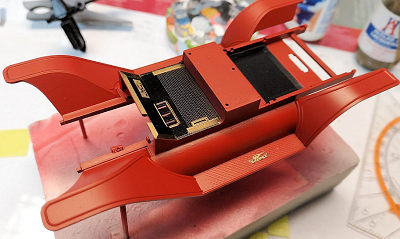
Despite being the latest addition to the stash, in which some kits are known to be languishing since the mid – 1990s, I immediately started it. That involved a lot of sifting through the instructions and identifying of subassemblies, and then a lot of cutting and sanding and mounting for painting. Generally parts fit was good, but there are some very iffy and small attachment points here and there. The seams where things counted, like the tank halves, were excellent, though. I replaced the exhaust pipe with a fitting piece of brass tubing, to avoid it being solid.
| COLORS & MARKINGS |
 I felt I
needed to prepaint as much as I could prior to actual assembly, and I needed to
strip the goldplating from the parts. My modeling pals agreed on using brake
fluid for this purpose, so I bought a can and set it to work. It did work, in
the end, but only at a glacial speed, taking three weeks. I have since learned
that using household bleach will work as well, and faster at that, and will try
to keep it in mind should I ever build another car kit.
I felt I
needed to prepaint as much as I could prior to actual assembly, and I needed to
strip the goldplating from the parts. My modeling pals agreed on using brake
fluid for this purpose, so I bought a can and set it to work. It did work, in
the end, but only at a glacial speed, taking three weeks. I have since learned
that using household bleach will work as well, and faster at that, and will try
to keep it in mind should I ever build another car kit.
The other issue I had was with the vinyl tyres, and how to get paint to stick to them. I soon learned that Stynylrez primer alone didn´t stick to the material, but I felt a bath in Vallejo´s airbrush cleaner did improve adhesion on my test pieces, so that´s what I did. As always, you´d best try it on a piece of scrap material.
I wasn´t really sure whether to use the figures, as I´m anything but a figure painter. But I did pre-assemble them.
 Having
finally stripped the gold coating from the parts, I was able to start priming
and painting in earnest. Everything got a coat of Stynylrez grey primer, to
check for flaws, and some were found and had to be addressed. The brass parts
were primed with Alclad´s gloss black primer, which worked well as always. The
following procedure needed some thought, and quite some masking, as you have
some parts that are in part brass, in part black and in part red. But somehow I
got there, though not without some to-ing and fro-ing. I was really happy with
the look of the brass parts (using Alclad´s bright brass), and decided against
any weathering, save the exhaust and a bit around the (invisible) engine. The
(pressure?) dials at the two tanks were not provided in the kit, and the large
scale made their absence rather obvious. So I looked for dials on the net and
found some generic one which I printed out to size and glued to the kit parts.
Having
finally stripped the gold coating from the parts, I was able to start priming
and painting in earnest. Everything got a coat of Stynylrez grey primer, to
check for flaws, and some were found and had to be addressed. The brass parts
were primed with Alclad´s gloss black primer, which worked well as always. The
following procedure needed some thought, and quite some masking, as you have
some parts that are in part brass, in part black and in part red. But somehow I
got there, though not without some to-ing and fro-ing. I was really happy with
the look of the brass parts (using Alclad´s bright brass), and decided against
any weathering, save the exhaust and a bit around the (invisible) engine. The
(pressure?) dials at the two tanks were not provided in the kit, and the large
scale made their absence rather obvious. So I looked for dials on the net and
found some generic one which I printed out to size and glued to the kit parts.
 When
everything was painted, the red of the bodywork received a good clear gloss coat
using Humbrol´s acrylic product. After curing, I started assembling, and
realized I hadn´t thought some things through well enough, especially where the
exhaust had to snake through the suspension. But somehow I got things threaded
into their approximate position, and experienced mainly a good fit, save around
the engine cover. I used CA glue to assemble the model, for fear of ruining the
paintjob. It all went rather swift in the end, and after a weekend I had the car
completed on its wheels. Well, on three of them. There was something out of
alignment somewhere, and any of my attempts at rectifying the situation led to
ominous creakings. Before I broke something I would not like to break, I stopped
my attempts and rather directed my thoughts towards covering up my mistake.
When
everything was painted, the red of the bodywork received a good clear gloss coat
using Humbrol´s acrylic product. After curing, I started assembling, and
realized I hadn´t thought some things through well enough, especially where the
exhaust had to snake through the suspension. But somehow I got things threaded
into their approximate position, and experienced mainly a good fit, save around
the engine cover. I used CA glue to assemble the model, for fear of ruining the
paintjob. It all went rather swift in the end, and after a weekend I had the car
completed on its wheels. Well, on three of them. There was something out of
alignment somewhere, and any of my attempts at rectifying the situation led to
ominous creakings. Before I broke something I would not like to break, I stopped
my attempts and rather directed my thoughts towards covering up my mistake.
| THE BASE |
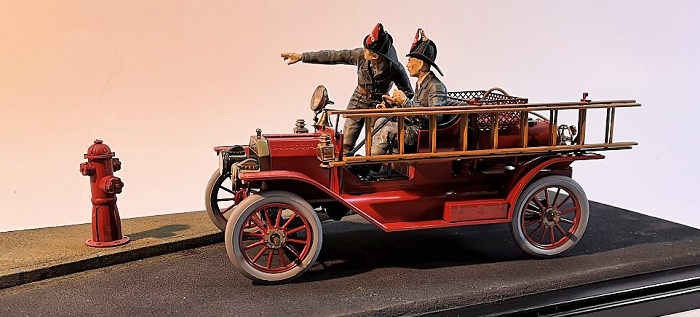
Placing the model on a plain black base, sans figures, as I had thought about, now looked less appealing. I doubted whether I could stick the mis-aligned vinyl tyres to a plain black base as solidly and neatly as needed for this purpose. So I thought about a simple and subdued base, nothing to distract from the vehicle, just a hint of atmosphere.
As it was a NYFD vehicle, I spent an hour consulting a
heavy coffee table volume on New York I have, with many photos from the
timeframe. I saw cobbled streets only in the poorer quarters, the newer
districts had very neat and seamless road surfaces, and equally seamless
sidewalks. So I assumed the roads were tarmac, and the sidewalks some sort of
 concrete.
Using some of my dwindling supply of depafit (a sandwich of fine-grained
styrofoam between two layers of cardboard), I made a base fitting into a
Trumpeter display box, with a sliver of sidewalk. Looking through the dio
accessories at one of the larger German modeling webshops, I found a very neat
hydrant in the scale required. Having ordered a new display box and the hydrant,
I did some „engraving“ with a pencil on my base parts. I then painted them some
shades appropriate to me, aiming at a restrained and unobtrusive look.
concrete.
Using some of my dwindling supply of depafit (a sandwich of fine-grained
styrofoam between two layers of cardboard), I made a base fitting into a
Trumpeter display box, with a sliver of sidewalk. Looking through the dio
accessories at one of the larger German modeling webshops, I found a very neat
hydrant in the scale required. Having ordered a new display box and the hydrant,
I did some „engraving“ with a pencil on my base parts. I then painted them some
shades appropriate to me, aiming at a restrained and unobtrusive look.
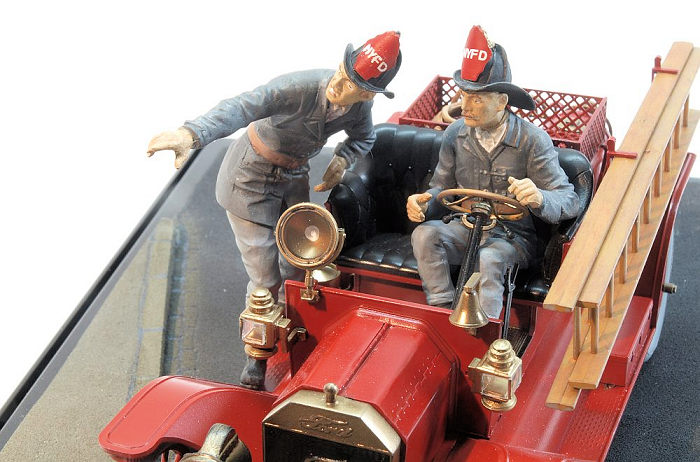
Parallel to that, I worked on the figures, spraying what I could and brushpainting the rest. Some washing and drybrushing completed my very basic approach. Luckily I found some dry transfers I could use for the lettering on the helmets. They were tricky to apply on the small and curved surface, but after some attempts I got it done and sealed them with clear flat.
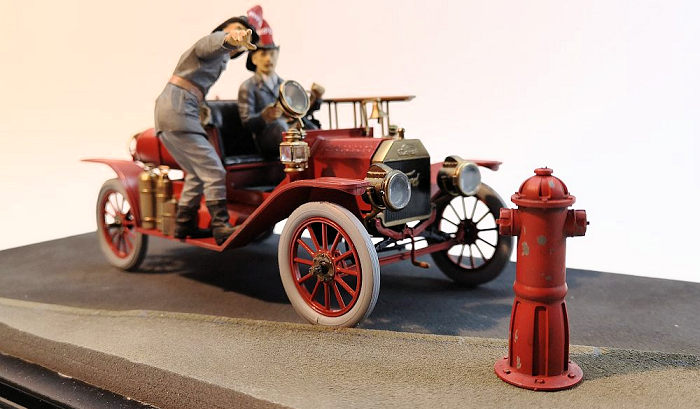
The hydrant on arriving looked very, very neat. I assume it was printed from the many small cutoffs below it, but there weren´t any obvious printing artifacts, nor less obvious ones. I primed it in Stynylrez grey, then applied some Marmite, added the red paint, brushed it off over the Marmite to produce some chipping, applied a dark wash plus some grey drybrushing and called it quits.
Having applied the figures to the vehicle, I then glued the vehicle to the base, with the one tyre off the ground slightly up the curb to hide my mistake, and considered the job done.
| CONCLUSIONS |
I am frequently game to leave the beaten path, and willing to forego any deep research. This was a neat and pleasing project, 99% out of the box, and looks quite nice on its display. Job done.
18 June 2019
Copyright ModelingMadness.com
If you would like your product reviewed fairly and fairly quickly, please contact the editor or see other details in the Note to Contributors.
Back to the Main Page Back to the Review Index Page Back to the Previews Index Page