
MiniArt 1/35 Tempo E400 Hochlader Pritsche
| KIT #: | 04714 |
| PRICE: | 36 Euros or so |
| DECALS: | options |
| REVIEWER: | Frank Spahr |
| NOTES: |
MiniArt #38081 Street Workers, @ 13 € Modern Armies in Miniature #35437 Farmer with Shovel, @ 7 € MiniArt #35641 Gardening Tools, @ 13 € Matho Models Manhole covers, MATHO35031, @ 7 € |
| HISTORY |
 In the
late 1920s, a Hamburg coal merchant founded a car manufacturing company together
with his son. They wanted to produce light utility vehicles, to specifications
that would be exempt from vehicle tax at the time. Thus they built
three-wheelers with a very small engine driving the front wheel. The Tempo „Hanseat“
was available in various configurations, open or closed, and catered to the
needs of delivery services and small merchants and businesses. They all had in
common that it was not a good idea to drive around corners with any speed, or
they would topple over.
In the
late 1920s, a Hamburg coal merchant founded a car manufacturing company together
with his son. They wanted to produce light utility vehicles, to specifications
that would be exempt from vehicle tax at the time. Thus they built
three-wheelers with a very small engine driving the front wheel. The Tempo „Hanseat“
was available in various configurations, open or closed, and catered to the
needs of delivery services and small merchants and businesses. They all had in
common that it was not a good idea to drive around corners with any speed, or
they would topple over.
The company´s heyday was the time immediately after the war, when light, resource-saving and inexpensive vehicles were in huge demand. With the economy growing, the need for vehicles like that was reduced, and the big manufacturers gradually drove Tempo out of business. The company ceased production in Hamburg in 1962, and the production facilities were exported to India. There, a licence-built Hanseat was produced until the year 2000.
It is well looking into the company´s history and its other models. I for one do not remember seeing one of those three-wheelers in my childhood, but they must have been around. Tempo produced a total of more than 100,000 vehicles of this type.
| THE KIT |
 MiniArt
first issed a Tempo Dreirad kit in 2021, and has since produced nine more kits
catering to the plethora of versions the company had on offer. I was hooked when
I saw the first image, and managed to get a kit at Euro Model Expo Lingen in
2022 or 2023.
MiniArt
first issed a Tempo Dreirad kit in 2021, and has since produced nine more kits
catering to the plethora of versions the company had on offer. I was hooked when
I saw the first image, and managed to get a kit at Euro Model Expo Lingen in
2022 or 2023.
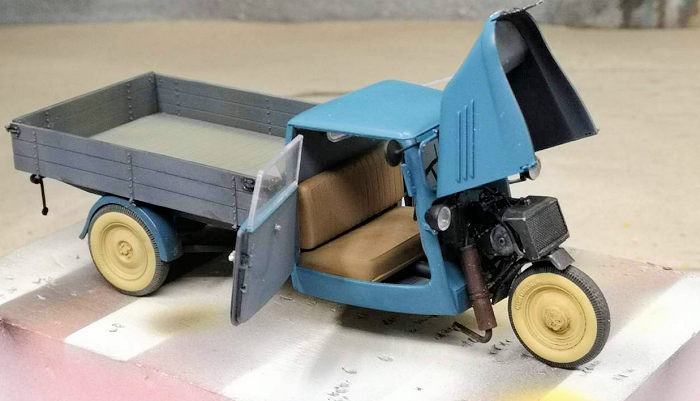
The kit comprises eight plastic sprues, one of them with the clear parts, one with only the intricately slide-molded hood, and one with generic fencing and garden furniture as cargo. There is also a PE sheet with pretty delicate parts, and a comprehensive and well printed decal sheet with three markings options. The instructions have colour profiles and colour callouts for various manufacturers, and are detailed and well drawn. The parts are well molded, yet some of them are very intricate, bordering on iffy. Certain attachment points are on the small side and will not make for a very stable model.
| CONSTRUCTION |
I chose the blue vehicle, as it was based in Nuremberg, the capital of Franconia, where my godmother spent the best part of her life. Construction actually did start with a good hard think, as I felt I would not be able to proceed with the driver´s compartment as planned.
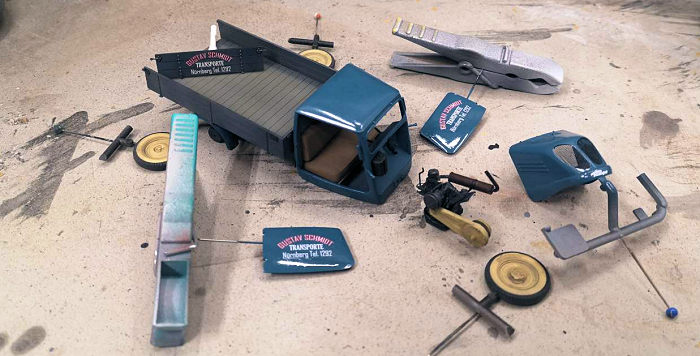 Instead
of adding the numerous details inside first and then build up the bodywork piece
by piece, I opted to first assemble, clear up and paint (!!!) the bodywork
inside and out, before adding interior detail, let alone clear parts. Parallel
to that, I started on the other identifiable subassemblies. The flat bed, the
wheels, the seats, the cargo, sundry interior details, and the intimidating
engine were started almost simultaneously.
Instead
of adding the numerous details inside first and then build up the bodywork piece
by piece, I opted to first assemble, clear up and paint (!!!) the bodywork
inside and out, before adding interior detail, let alone clear parts. Parallel
to that, I started on the other identifiable subassemblies. The flat bed, the
wheels, the seats, the cargo, sundry interior details, and the intimidating
engine were started almost simultaneously.
I felt I had made the right decision when I had to clean up some seams on the bodywork, even though it was all very minor, I felt more comfortable doing that without iffy interior detail present.
There are some aspects of the kit which are recommended for experienced modelers only. I wanted to give them a try. I started on the PE for the hingework on the flatbed, and proceeded to the brake lines leading to the rear axle. Having had some prior experience helped.
The engine proved to be as intimidating to build as expected. Half of the time I did not realize what was up and what was down, and the parts were both small and not easy to glue. Adding ignition lines proved to be demanding and challenging, aka a pain in the posterior.
Getting the PE grills to conform to the cutout in the hood and getting them glued without collateral damage proved to be tricky and well, see above. But I got there in the end, due to copious amounts of patience and self-control poured in bucketloads over the workbench. After some (actually not that long) time I had my parts ready for painting.
| COLORS & MARKINGS |
 It was
tricky enough to mask the painted interior prior to painting the exterior. Some
creative masking was needed. Having followed the instructions wouldn´t have made
me all that happy, I reckon.
It was
tricky enough to mask the painted interior prior to painting the exterior. Some
creative masking was needed. Having followed the instructions wouldn´t have made
me all that happy, I reckon.
I used various paints from my stocks, adhering to kit instructions in their general directions. The bodywork was glosscoated quite intensely prior to decaling. The flatbed was sprayed in various shades to get a used and ligthly scuffed look. So far, no weathering was applied.
I also assembled and painted the fence and garden furniture parts intended as cargo, and gave them some greenish weathering.
Now I applied the decals, which worked very neatly and without more stress. They were sealed with another gloss coat, and then the bodywork was toned down with some flatcoat. Now came the time for some limited weathering on the bodywork, yet mostly to show this vehicle was actually used.
| FINAL CONSTRUCTION |
 This last
part of the build got demanding again. I started with adding all the interior
detail to the driver´s compartment, and then its glazing. Now came the real
assembly.
This last
part of the build got demanding again. I started with adding all the interior
detail to the driver´s compartment, and then its glazing. Now came the real
assembly.
Several small attachment points keep the whole show together, and they don´t react well to stress. So thought and consideration is needed to mate the engine, the rear axle assembly and the flatbed to the driver´s compartment. The three wires running from the accelerator, brake and clutch pedals to the engine and wheel proved to be yet another challenge, but it was nice once they were on.
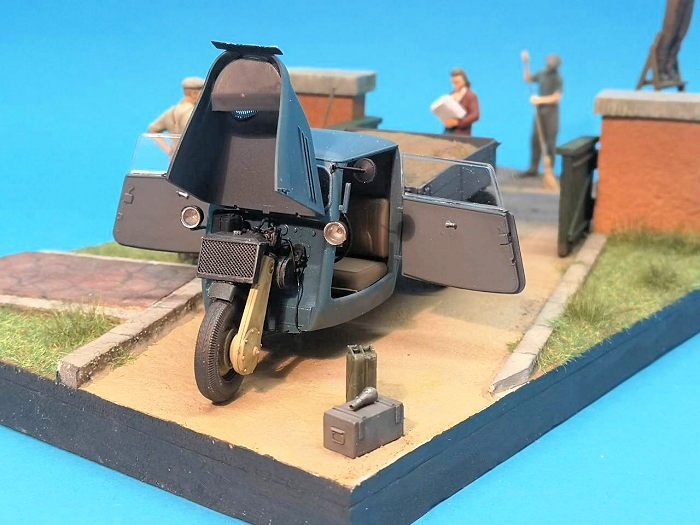
Once that was all achieved (very carefully!) I was able to add the (not that small number of) remaining fiddly bits, including the doors and the hood. Once all the numberplates, wing mirrors, indicators and so on had been added, I allowed myself a heartfelt sigh that I had completed this kit.
| THE DIORAMA |
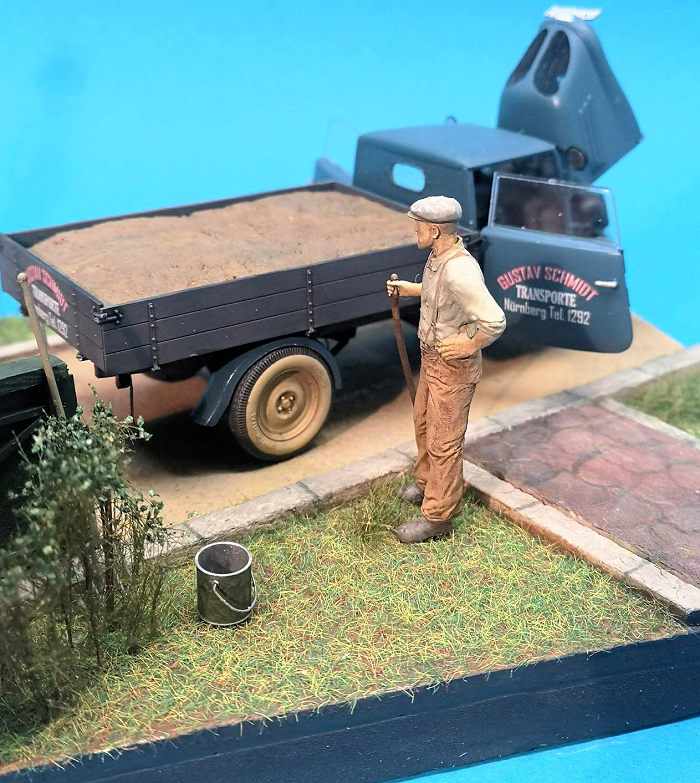
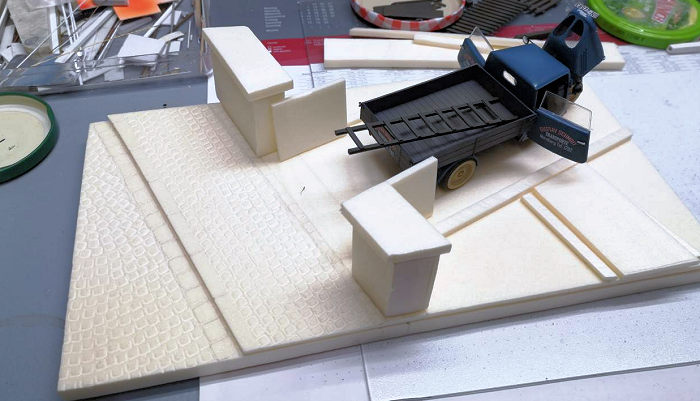
Now that the model stood there, I felt sorely tempted not to leave it as it was. A simple base would be just the ticket, ideally one that fitted into a generic display box or a generic storage box.
So I looked into my
supplies and decided to use a storage box, which limited the size of the base. I
was also eager to use my foam cutter, so I fired it up and started measuring and
cutting. My idea was to have the vehicle stand parked in a driveway to a
property, possibly that of its owner. He had just d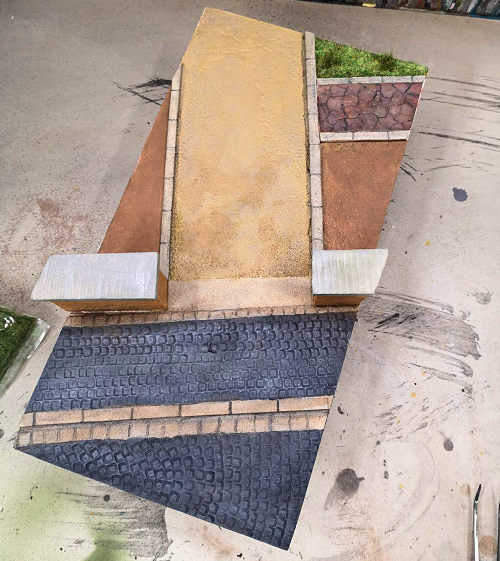 elivered
something to his home, was about to unload the cargo, and felt the need to
refuel and perform some little light tinkering beneath the hood. It´s always
more pleasing in my view to place the scene at an angle to the base, so further
limitations in size arose from the vehicle´s size. I would also have to show at
least a small area of sidewalk and road, which at that time still had cobbles.
elivered
something to his home, was about to unload the cargo, and felt the need to
refuel and perform some little light tinkering beneath the hood. It´s always
more pleasing in my view to place the scene at an angle to the base, so further
limitations in size arose from the vehicle´s size. I would also have to show at
least a small area of sidewalk and road, which at that time still had cobbles.
The area behind the property´s wall would need some structure, too, and at least a bit of vegetation.
So piece by piece the simple base grew and escalated. I enjoyed cutting and texturing the foam, and gradually arriving at a design I liked. Somewhere along the way I decided not to use the kit cargo, but to make a piece of foam that looked as if the flatbed was loaded with manure or soil. Preferably something not too heavy for the vehicle´s capacity, BTW.
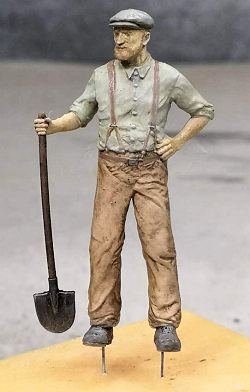
Soon the question of figures turned up, and originally it was to be just the one. The vehicle´s driver, holding a shovel/spade and thinking about what to do next. I found a fine 3D printed figure at www.sockelshop.de of their own label Modern Armies In Miniature, and got that plus some paraphernalia.
My order history there
says it started with this figure, on 29 December. Having got it and painted it
and enjoyed it, I sifted through their catalogue of figures and dio supplies. I
still have the Minicraft
 LGOC
Omnibus, and found figures to go with that, so I ordered them. But the main
attraction was Minicraft´s street workers, which suited my dio to a T. A street
sweeper, a newspaper delivery girl, and a guy doing some work on a very neat
gaslight would all fit ideally on my base. Plus some jerry cans to be placed
next to the vehicle. Ordered all that on 17 January.
LGOC
Omnibus, and found figures to go with that, so I ordered them. But the main
attraction was Minicraft´s street workers, which suited my dio to a T. A street
sweeper, a newspaper delivery girl, and a guy doing some work on a very neat
gaslight would all fit ideally on my base. Plus some jerry cans to be placed
next to the vehicle. Ordered all that on 17 January.
When the figures arrived, I set to work. These are injection molded, so more cleanup and actual assembly was called for. I modified the gaslight, using styrene rod as framing instead of the clear part provided. Having painted and weathered the lamp, I „glazed“ it using thin PVA glue, which looked better to me. With the figures, I replaced the sweep´s brush handle with brass wire, but apart from that they are built out of the box.
That could have been it, but in the meantime, my thoughts had proceeded, so yet another order was placed on 5 February. This time, I ordered tufts of vegetation in two variations, a set of gardening tools and another of garage / workshop equipment (both by MiniArt), and (as the cherry on top) a set of photo etched manhole covers by Matho Models.
Having received all those goodies, I applied some of them to the dio and then called things quits. I really had to have that manhole cover.
| CONCLUSIONS |
I´m neither a military nor a figure nor a dio modeler. I just like to dabble. Which I did, and which I very much enjoyed. I need virtually no excuse to bring out my foam cutter, and like creating something out of nothing. I might have mentioned earlier that during the convoluted ordering process, another vehicle kit found its way to me, setting the total in my stash at three. We anticipate.
| REFERENCES |
https://en.wikipedia.org/wiki/Tempo_(automobile)
In German:
https://de.wikipedia.org/wiki/Vidal_%26_Sohn_Tempo-Werk
https://tempo-dienst.de/fahrzeuge/
Frank Spahr
Copyright ModelingMadness.com. All rights reserved. No reproduction in part or in whole without express permission.
If you would like your product reviewed fairly and fairly quickly, please contact the editor or see other details in the Note to Contributors.