Heller 1/24 Citroen Fourgon H Van
| KIT #: | 80768 |
| PRICE: | $25 |
| DECALS: | Two options |
| REVIEWER: | Peter Chiu |
| NOTES: | MotoBitz Decals |
| HISTORY |
 The
Citroën H-Type vans (but mostly Citroën HY), are a series of panel vans and
light trucks, produced by French automaker Citroën for 34 years (from 1947
through 1981), that are memorable for their Industrial design, using many
corrugated metal outer body panels, to save material, weight, and costs.[1]
Early models of the uniquely styled trucks were just named Type H, but soon they
were differentiated by a second letter, using the last four letters in the
alphabet – except for the type HP for (flat-bed) pickups. Thus the vans were
built as the types HW through HZ – with the majority of them built as Citroën
HY.
The
Citroën H-Type vans (but mostly Citroën HY), are a series of panel vans and
light trucks, produced by French automaker Citroën for 34 years (from 1947
through 1981), that are memorable for their Industrial design, using many
corrugated metal outer body panels, to save material, weight, and costs.[1]
Early models of the uniquely styled trucks were just named Type H, but soon they
were differentiated by a second letter, using the last four letters in the
alphabet – except for the type HP for (flat-bed) pickups. Thus the vans were
built as the types HW through HZ – with the majority of them built as Citroën
HY.
The Citroën H-types were developed as simple, low-cost, front-wheel drive vans after World War II, using the same design philosophy as on Citroën's 2CV, but featuring a frameless, unitary body-structure. A total of 473,289 of their variants were produced in 34 years in factories in France and Belgium.
| THE KIT |
 When I had
returned to modelling kits I had assumed that Heller were content to reissue old
kits under new boxing. So while looking through one of the numerous online model
kit suppliers I was surprised to see a new tooling of the Citroen Van. Along
with the 2Cv and the DS, no other vehicle was representative of France than the
H van. The tooling was released in 2015. Sprues came in a medium grey colour
with options to build 2 different versions with differing rear wheel arches,
radiator grill and front windscreen. The decal options weren’t particularly
interesting so I left it in the stash.
When I had
returned to modelling kits I had assumed that Heller were content to reissue old
kits under new boxing. So while looking through one of the numerous online model
kit suppliers I was surprised to see a new tooling of the Citroen Van. Along
with the 2Cv and the DS, no other vehicle was representative of France than the
H van. The tooling was released in 2015. Sprues came in a medium grey colour
with options to build 2 different versions with differing rear wheel arches,
radiator grill and front windscreen. The decal options weren’t particularly
interesting so I left it in the stash.
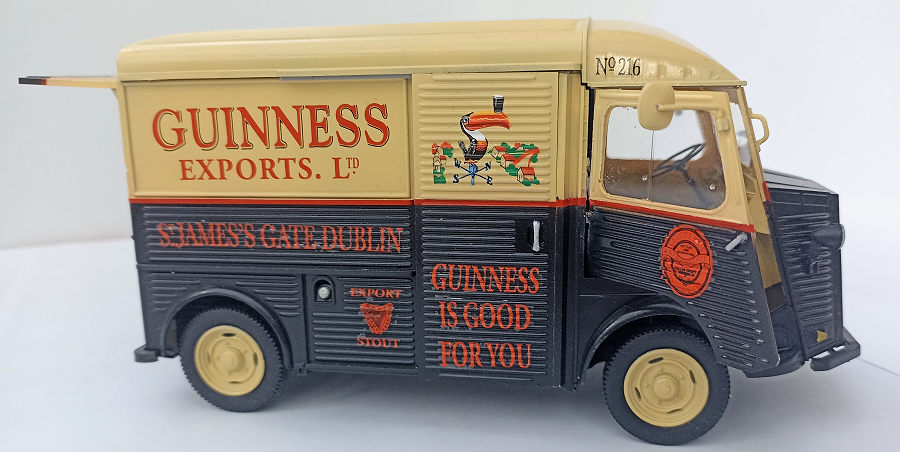
After purchase, the kit sat in my stash for a couple of years until I came across a decal set from UK supplier Motobitz representing a Guiness Delivery van. Some research online I found a photo of the van, as I recall it was used as a static promotional prop for a bar in Spain.
| CONSTRUCTION |
I started off by spaying all the parts in Vallejo grey primer.
Following the instructions the build started with the chassis and engine. I decided to build and paint the sub assemblies as I went on as it would make it much easier than when they have been put together. The engine assembly went together without any real problems, I painted the parts a mixture of Vallejo model air Engine Grey, Black.
Looking at the paint instructions for the Motobitz decals I decided to paint the van in a mix of Vallejo Model Air Beige matt for the top half, Matt red for the strip and matt black for the lower half of the kit.
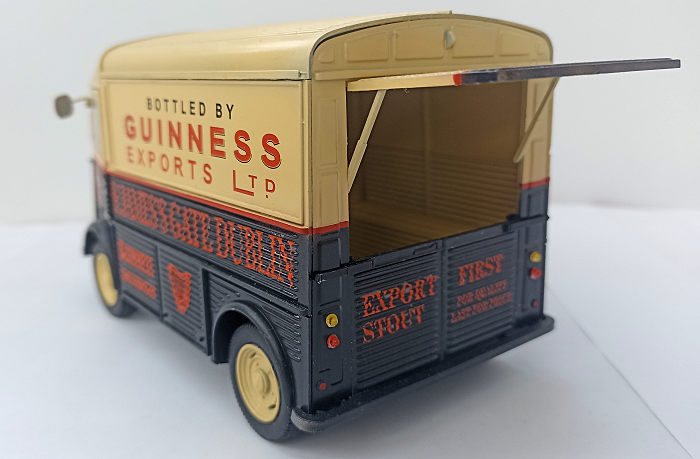
The interior I painted black for the van floor as well as the floor of the load bay. The front dashboard I painted in the Matt beige. I decided to pre-paint the interior of the Van load bay in the matt Beige as well. This for the side walls as well as the interior ceiling / roof. The seats were painted a dark brown.
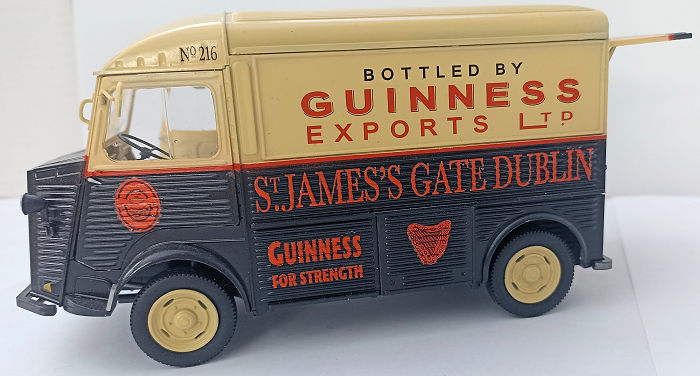 There was
a red decal stripe for the demarcation between the two main colours, however I
didn’t feel like it would confirm to the side of the van so I carefully marked
where to spray the van sides, rear door and front doors. I then cut Tamiya
masking tape to the same width as the decal and masked off the red stripe all
around the van.
There was
a red decal stripe for the demarcation between the two main colours, however I
didn’t feel like it would confirm to the side of the van so I carefully marked
where to spray the van sides, rear door and front doors. I then cut Tamiya
masking tape to the same width as the decal and masked off the red stripe all
around the van.
The side panels, roof and bonnet were glued to the chassis before the next step. Fit was only ok, although it was a new tooling the instructions were a bit vague and it needed some careful alignment to get the side panels, bonnet and roof to fit.
I then sprayed several light layers of beige trying to slowly build up the colour. This was done to the top of the van, with the windscreen having been masked off. The driver and passenger doors and rear hatch were also masked off and the beige applied. Once dry, I masked of the top half and ten sprayed matt black on the lower half of the van, again the doors and hatch were done separately.
When the painting was done, I carefully sprayed Alclad II Aqua Gloss varnish to the van in preparation for the decals. Took several attempts on one side of the van where I had to sand back and respray the beige paint and gloss twice before I got a decent finish.
Decals took some care to apply correctly. The Motobitz decals came off the backing paper with no real problems. Aligning them correctly required copious amount so Micro Sol /Set to get them to settle. The most difficult part were the decals on the lower side panels that have a corrugated finish. These would not settle so I used a needle to prick small holes and added more setting solution to prevent any silvering. I also used cotton buds to press the decals in the corrugated grooves.
| CONCLUSIONS |
This was something different from my usual build of planes of various shapes and sizes, although a new tooling the fit was only ok and the instructions were rather old school printed in black and white not always very clear as to where the parts went.
Still it makes a nice change to build something a bit different, I’ve already bought Hellers recent release of a Renault van as well and plan to buy another set of Motobitz decals to go with them.
Definitely recommend to builders looking for something a bit different.
| REFERENCES |
Kit instructions
Wikipedia
2 April 2024 Copyright ModelingMadness.com. All rights
reserved. No reproduction in part or in whole without express permission from
the editor. If you would like your product reviewed fairly and fairly quickly, please contact the editor or see other details in the
Note to
Contributors. Back to the Main Page
Back to the Review
Index Page
Back to the Previews Index Page