| KIT #: | 2-2502 |
| PRICE: | $2.50 when new |
| DECALS: | Three options |
| REVIEWER: | Stephen Young |
| NOTES: |
| HISTORY |
For a great article with internet links please see the
Wikipedia article. The Heinkel He 177 Grief (Griffin) was the only long range
bomber to be flown in combat by the Luftwaffe during World War II. Comparable in
size and payload capacity to B-17, B-24, Lancaster, and Halifax, the He 177 saw
much more limited operational use due to time dealing with technical problems
and ultimately the pressure of the Allied air offensive against Germany making
fighter production a priority and limiting fuel availability. Originally
intended to be a strategic bomber to support a long-term bombing campaign
against the Soviet Union the requirement to support dive bombing was included
due to Luftwaffe concerns regarding bombing accuracy with level bombing and a
requirement to use only two fully nacelled engines which lead to significant
engineering and performance problems later on involving engine cooling and
engine fires which delayed operational use to late in the war. Most of the use
occurred on the Eastern Front over the Soviet Union although it was also used in
the late war Operation Steinbock against England.
Heinkel received specifications for the bomber in 1936. For a
bomber of its planned size Heinkel’s chief designer Siegfried Gunter recognized
that at least a pair of 2000 hp engines would be needed. No such
 power
plant existed in Germany at that time so a revolutionary coupled engine system
using two DB 601 liquid cooled 12-cylinder inverted vee inline engines mounted
side by side in a nacelle driving one propeller were utilized cooled by annular
radiators behind the propellers.
power
plant existed in Germany at that time so a revolutionary coupled engine system
using two DB 601 liquid cooled 12-cylinder inverted vee inline engines mounted
side by side in a nacelle driving one propeller were utilized cooled by annular
radiators behind the propellers.
The first prototype He 177V1 was flown for the first time on
November 9, 1939 and the overheating engine problem was identified. The second
prototype V2 broke up in the air during diving trials leading to modification of
the remaining prototypes tail surfaces. Prototype flight experience was
problematic with He 177V4 also crashing. Multiple changes led to the final
configuration. Eight prototypes were completed followed by 35 pre-production He
177A-0s built by Heinkel and Arado and 130 Arado built He 177A-1s. The aircraft
in this batch were used for trials and briefly for operations but with
problematic results. These were then withdrawn from service and replaced after
1942 by 17 He 177A-3 and 826 A-5 models for a total production run of 1,137
aircraft. In the ultimate production model A-5, defense was provided by one
remotely controlled dorsal turret FDL 131Z, with two MG 131 machine guns, a
manned dorsal turret with one MG131, a manned tail turret armed most often with
a 20mm MG 151 cannon, a flexible MG 81 machine gun in the nose and rear of the
under nose Bola gondola with a 20 mm MG FF cannon in the front. Maximum bomb
load was 13,200 pounds. In the A-5 version the offensive weapons were primarily
mounted under the wings.
Operational experience was troubled when the He 177 entered
service on the Russian Eastern front. In support of the Battle of Stalingrad 13
missions were flown with the loss of seven He 177s lost to aircraft fire without
action attributable to the enemy.
As the war progressed the aircraft were sitting on airfields around
Europe waiting for new engines or engine related modifications. Used in
operation Steinbock, the blitz of 1944, the He 177 achieved some significant
success with a loss rate below 10% compared to 60% for all other bomber types
used by Germany.
However, by the summer of 1944 the He 177 was grounded due to the success of
Allied bombing crippling German fuel production.
| THE KIT |
Airfix’s He 177 A-5 kit
is ancient by contemporary modeling standards having been first released in the
early 1970s. It has been re-boxed multiple times by Airfix and its affiliates
over the years but is not currently in production. I obtained mine around 1970
when I was in post graduate school and started it then but it got shelved. As I
moved around I saved the kit. A few years ago after the kids started to grow up
I resumed model building. We all know the story; models started but never
finished. I had 3 WWII German multi-engine planes in that category and finally
resolved to finish the He 177 as well as the other two. Dug it out of storage
and a second later issue version of the kit. The original I have is the MPC
boxing while the other is the Airfix boxing when Airfix kts were made in France.
They are all the same old molds with no changes except the color of plastic; the
decals for the later kit are limited to one aircraft while the MPC kit has
options for three. These Airfix kits are often seen on Ebay; often for high
asking prices. The kit features marginal accuracy in outline and detail, heavy
out of scale rivets, thick clear parts, inaccurate detail part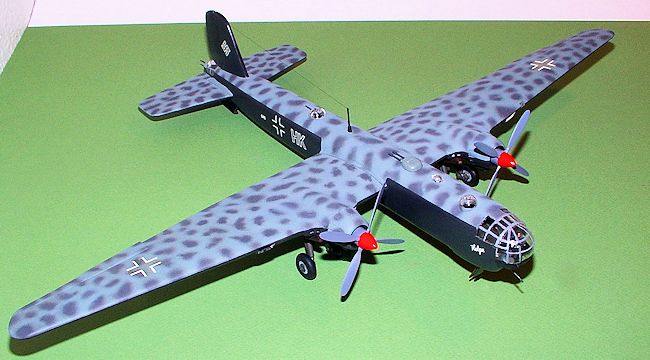 s,
and odd fit and engineering compared to contemporary kits. All the features we
loved in a simpler time when Airfix was king in 1/72nd scale.
Instructions are simple diagram type. Compared to the out of production Revell
He 177 A-5 (which I have but haven’t built) it’s not only a dinosaur, it might
as well be a fossil. There simply is no comparison in quality or
representational accuracy between the two. If you want a serious quality He 177
forget the Airfix and build the Revell.
s,
and odd fit and engineering compared to contemporary kits. All the features we
loved in a simpler time when Airfix was king in 1/72nd scale.
Instructions are simple diagram type. Compared to the out of production Revell
He 177 A-5 (which I have but haven’t built) it’s not only a dinosaur, it might
as well be a fossil. There simply is no comparison in quality or
representational accuracy between the two. If you want a serious quality He 177
forget the Airfix and build the Revell.
The kit comes includes 8 sprues of parts and 1 sprue of clear parts in the traditional two part box. Instructions are simple diagram type with generic paint color call outs. 2 identical pilot figures are included along with a seated gunner and a prone bola gunner and a prone tail gunner. The cockpit includes only two seats with little resemblance to reality and a partial rear bulkhead. The seated gunner when positioned on the bomb bay floor would be located somewhere in the fuselage fuel tank on the real plane. Bombs are provided as is the option to open up the bomb bay but there is no detail in the bomb bay otherwise. The gun turrets are simple representations and the tail gun position is completely wrong being set up as a prone position. Three Henschel HS293 radio controlled bombs are included although I left these off my model. Simple diagrams show the camouflage paint schemes for the 3 aircraft and the decal placement. The decal is printed with the carrier film sprayed over the entire sheet unlike contemporary decals.
| CONSTRUCTION |
When I started this kit decades ago I recognized some of the
outline issues although the only reference I had was William Green’s Famous
Bombers of WWII, long out of print, but a WWII aircraft buff’s classic. Over the
years I had accumulated some additional references on the plane. Resurrecting
the kit I decided to complete it to get it don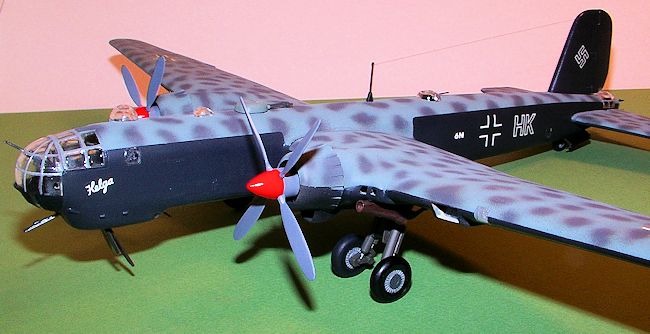 e
and close out a era in my modeling. My model building skill is rather average
but limiting the hours spent and “Just finish it” was the prime directive.
e
and close out a era in my modeling. My model building skill is rather average
but limiting the hours spent and “Just finish it” was the prime directive.
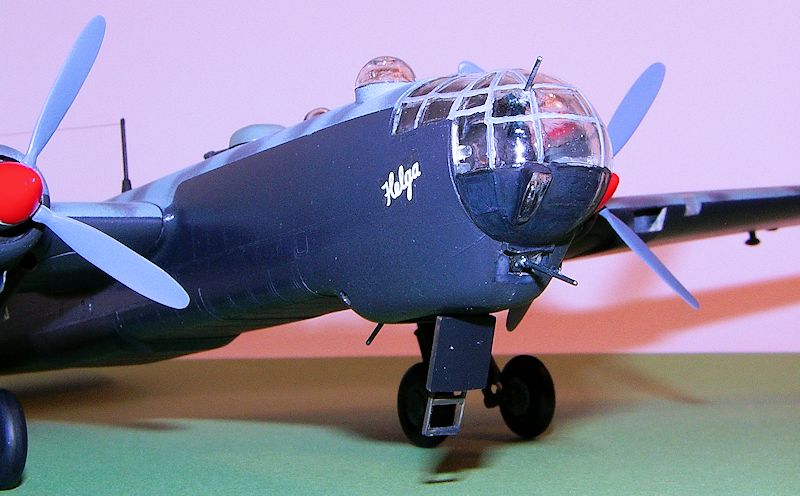
The kit has a simplified and inaccurate cockpit with a floor and a partial rear bulkhead. The entry hatch has a ladder and it can be built open or closed. Since my plane would be represented on the landing field I wanted it to be open. I did not use any of the figures nor did I attach the HS 293 glide bombs or bomb racks. I made a full rear cockpit bulkhead from sheet plastic. I added build up components attached to the rear bulk head representing radios and ammo boxes but you can not see any of it after the canopy is attached. I made or modified the existing very generic kit seats to provide a pilot, bombardier, gunner, and jump seat and added masking tape seatbelts. The gunner’s seat is elevated on a pedestal so that seat was made from scratch using 0.01 sheet plastic and mounted on a 1/8th in diameter plastic rod pedestal positioned under the gunner’s cupola. The Revell kit has the entire cockpit interior on the flight deck well detailed so I used it for reference. Side cockpit consoles were also added but you can’t see anything much through the thick non-uniform clear fishbowl when the cockpit is closed up anyway. The interior was painted Humbrol RLM 61.
The kit allows a open bomb bay option with bombs but has no
other internal bomb bay detail so I omitted the bombs and closed it up. The fit
of the closed version bomb bay doors is poor. The tail gunner position puts a
prone gunner figure attached to a rudimentary representation of a MG151 cannon.
I build a gunner’s seat out of plastic sheet, covered the stabilizer slots
visible in this area with 0.010 plastic sheet, added masking tape seat belts,
and painted the area RLM61. I rebuild the horizontal stabilizer and elevators,
the vertical fin and rudder with plastic sheet pieces spliced in. All the out of
scale rivets and most of the raised panel lines were sanded off to leave a fine
residual for surface texture interest mostly on the fuselage which actually adds
some visual interest when painted. I did not rescribe any panel line detail
which was lost. The seam along the top and rear of the fuselage required filling
with Squadron White
 putty
(which I use thinned with Testors liquid cement) due to the fact that the
thinness of the plastic and the square cross section of the fuselage leads to a
shallow depression along the seam. I thought I had prevented this by shimming
the fuselage halves with sheet stock before joining.
putty
(which I use thinned with Testors liquid cement) due to the fact that the
thinness of the plastic and the square cross section of the fuselage leads to a
shallow depression along the seam. I thought I had prevented this by shimming
the fuselage halves with sheet stock before joining.
I used the thick kit windows except for the rear bola scanning
windows that I discarded in favor of Micro Krystal Klear. You will need to
improvise the bola gun ports. The rear is provided with a clear plastic window
that works ok. I fitted the window and glued it in place with Testors clear
parts cement. The front is another story since the fishbowl canopy incorporates
part of the bola front. I just used Micro Krystal Klear and attached the cannon
with cyanoacrylate adhesive (my favorite is Loctite Professional). I attached
the fishbowl canopy front and canopy with Devcon 5 minute epoxy and after the
adhesive dried filled the gaps to the fuselage with white glue. I glued the MG
81 into the fish bowl before attaching. The canopy parts, the clear turret and
sighting blister and tail gun canopy were dipped in Future floor wax and allowed
a week to dry prior to installation to help conceal the rough molding marks.
Once the thick canopy is attached you can see little detail in the interior
although you can make out seats and belts and the other interior items enough
that you know something is in there. After that no additional small parts were
attached to the fuselage until after completion of painting.
The wings and engine nacelles were next. The trailing edge is enormously thick including the ailerons that are separate parts. I thinned down the edges with filing and multiple sanding stick sessions and glued everything together. I use Ambroid Pro Weld or Tenax 7-R as a styrene plastic cement. I attached the engine cowls leaving off the propellers to be added at the end of assembly. The engine cowls are completely inaccurate at the cowl flaps but I did not want to spend the time to rework them so I painted the radiator fronts and attached them. The oil cooler scoops are obviously too small so I carved wood masters to vacuform new scoops and housings and fitted and attached these with plastic cement. The landing gear doors should be assembled closed over the wheel wells since this was the normal status when the plane was on the ground. At this stage the clear areas were masked with Tamiya masking tape and the components were ready for paint.
| COLORS & MARKINGS |
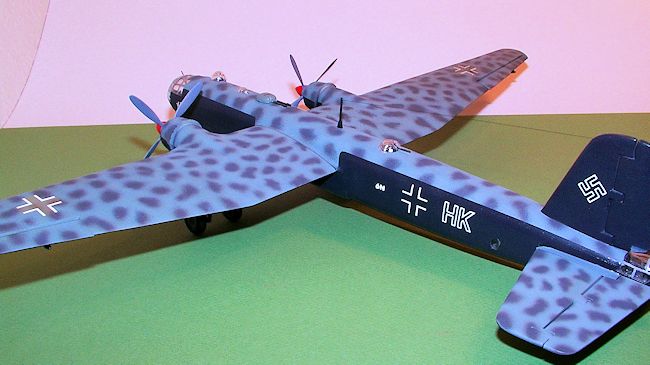
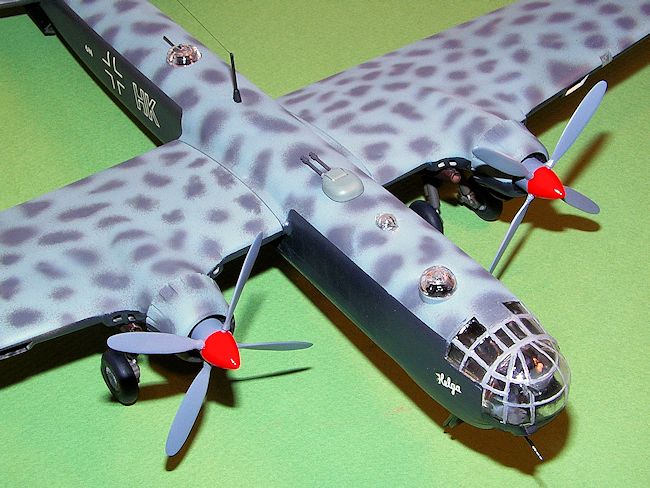
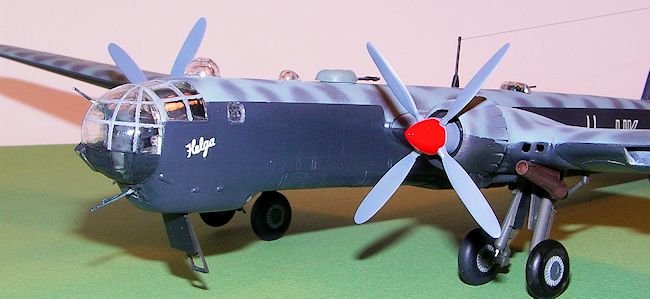 There are
pictures of a He 177 named “Helga” of
KG100 and the original Airfix decals provide those markings so I
decided to finish the model as Helga in RLM 22 black undersurfaces and RLM 76
light blue with RLM 75 gray-violet mottled upper surfaces. For the black I used
Rustoleum gloss black decanted from a spray can mixed with 15% Rustoleum white
to lighten the black to scale. I had never done 1/72 WWII German mottled
camouflage before and with my Badger 150 in retrospect my mottled patches are
too large.
Humbrol and Testors Model master enamels were used followed by a overcoating of
Testors glosscote to prepare for the decals. The canopy framing was painted by
hand using Testors Acrylic paint. Using acrylic allows you to carefully clean up
any paint out of place by scraping with a sharpened wooden tooth pick. Following
the decals everything received a sprayed light coat of Testors dullcote. I did
not do any weathering.
There are
pictures of a He 177 named “Helga” of
KG100 and the original Airfix decals provide those markings so I
decided to finish the model as Helga in RLM 22 black undersurfaces and RLM 76
light blue with RLM 75 gray-violet mottled upper surfaces. For the black I used
Rustoleum gloss black decanted from a spray can mixed with 15% Rustoleum white
to lighten the black to scale. I had never done 1/72 WWII German mottled
camouflage before and with my Badger 150 in retrospect my mottled patches are
too large.
Humbrol and Testors Model master enamels were used followed by a overcoating of
Testors glosscote to prepare for the decals. The canopy framing was painted by
hand using Testors Acrylic paint. Using acrylic allows you to carefully clean up
any paint out of place by scraping with a sharpened wooden tooth pick. Following
the decals everything received a sprayed light coat of Testors dullcote. I did
not do any weathering.
I painted the fuselage, horizontal tail, and wings as
separate components for ease of handling. The landing light lens on the port
wing was simulated with transparent clear tape after completion of painting.
Clear windows and the canopy were masked with Tamiya masking tape and/or
Microscale Micro Mask. After painting the landing gear was attached to the wings
using Loctite Professional cyanoacrylate glue. This is where I had a problem I
did not recognize until I attached the wings. The four wheel main gear makes it
easy to obtain misalignment. This happened to me on the starboard outboard gear
and once fully assembled the wheel does not touch the floor surface. Too late to
fix without removing and reattaching that leg so that is the way she sits.
| FINAL CONSTRUCTION |
I then attached all the small parts; gunner’s cupola,
remote dorsal gun turret, manned gun turret, tail gun, bola guns, tail wheel
doors, landing gear doors, and antenna mast. Using a #81 drill bit I drilled a
hole at 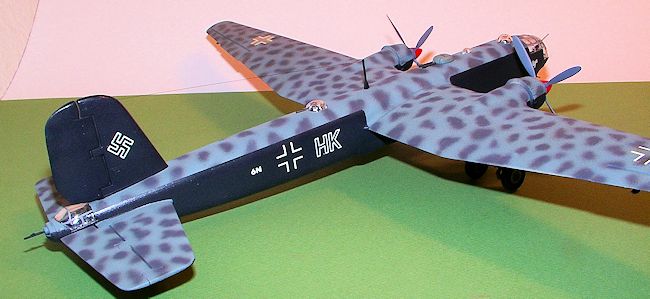 the
end of the mast and super glued one of my daughter’s straight long hairs from
the mast to a similar hole drilled in the fin to represent a aerial. Straight
human hair works better for antenna wire than anything else in this scale and
also in 1/48th scale.
the
end of the mast and super glued one of my daughter’s straight long hairs from
the mast to a similar hole drilled in the fin to represent a aerial. Straight
human hair works better for antenna wire than anything else in this scale and
also in 1/48th scale.
The wings and the horizontal stabilizer were glued to the
fuselage using Devcon 5 minute epoxy holding each component in place until the
glue set up.
Finally the propellers were painted gray for the blades and insignia red for the spinners (a color photo on the internet confirms that Helga had red spinners). Be careful attaching the props because they are opposite handed; the port rotates clockwise when viewed from the front of the airplane and the starboard rotates counterclockwise. Some minor brush paint touch up was applied and she was done.
| CONCLUSIONS |
A classic (meaning “old”) Airfix kit. 30 plus years ago it
was quite the thing being a plane no manufacturer had produced to that time.
Since then it is far outclassed by the Revell kit in 1/72 (currently out of
production but available; buyer beware of outrageous asking prices). I have
never seen the limited run MPM 1//48 kit but from the reviews that is a
challenging build that can lead to a very impressive result. This Airfix kit
still builds up into a model that looks like a He 177; but it won’t stand up to
close scrutiny without enormous rework and significant modeling skill. It is
impressively large in 1/72; as large as a B-24 in wing span and larger in span
than most of the 1/48th scale single engine models that I usually
build. I am
very happy to have completed it after all these years and it’s a good feeling to
close out a project and it makes a good conversation topic.
| REFERENCES |
The Grievous Griffin, Air International, V8, No.4, April 1975,
p177 to p184
Kofu-Fan Illustrated No.33, WWII German Military Aircraft,
p162 to p164
Luftwaffe in World War II, Aero Pictorials 1, 1968
Luftwaffe in World War II, part 2, Aero Pictorials 5, 1979
Luftwaffe in World War II, part 3, Aero Pictorials 6, 1980
Luftwaffe Bombers in Action, Squadron/Signal Publications,
Aircraft No. Three, 1972
Heinkel 177, Aero Series 13, 1967
Famous Bombers of World War II, William Green, Doubleday &
Company, New York, 2nd Edition, 1975
Wikipedia, He 177 article including web links to sites showing interior photos, diagrams, German aircraft
February 2015
If you would like your product reviewed fairly and fairly quickly, please contact the editor or see other details in the Note to Contributors.